
Proxmox - Changing Windows 10 BIOS from SeaBIOS to OVMF (UEFI)
Even though Windows 10 is sunsetting in 2025 (on 14th of October), there's a lot of users that still use this OS as their main OS - whatever the reason may be. I am one of those users and heavily use this OS in my VMs on Proxmox.
As you may be aware, Windows 11 has much more stringent requirements for installation - using TPM is just one of those requirements. Of course, there are ways to install Windows 11 without using TPM, but officially, that is not a supported method.
On top of that, if you're using Windows 10 for business as BYOD, your company may require you to have certain settings the way they want, which is completely legitimate for BYOD's.
So, what happens if you happen to have Windows 10 that does not meet those requirements? Well, luckily, there is a way to convert Windows 10 using legacy BIOS (SeaBIOS) to OVMF without losing any data or a need to re-install Windows. It's quite easy actually, there are just a few steps involved.
Here are the steps:
- validate the conversion process:
mbr2gpt /validate /allowFullOS- execute this command within an elevated command prompt (run it as Administrator) in existing Windows 10 installation; if the output of the command is successful, continue with the next step
In case you have Bitlocker enabled, you will have to suspend it for the previous command to work!
- next, run:
mbr2gpt /convert /disk:0 /allowFullOS- also in the elevated prompt- please note that in my case it was
/disk:0, but in your case it may be a different designation, previous command (validation) will let you know what the disk designation is
- please note that in my case it was
You may encounter an error complaining that it Failed to update ReAgent.xml, but you can safely ignore it - at least that was in my case.
- finally, in the Proxmox VM Hardware settings:
- add new
EFI Disk, make sure that optionPre-Enroll Keysis checked - add new
TPM Statedevice, making sure that its location is the same as previously addedEFI Disk - finally, change
BIOStoOVMF (UEFI)
- add new
You may also need to change Machine type to q35 if you plan on passing through your GPU to the VM!
Final result should look something like this:
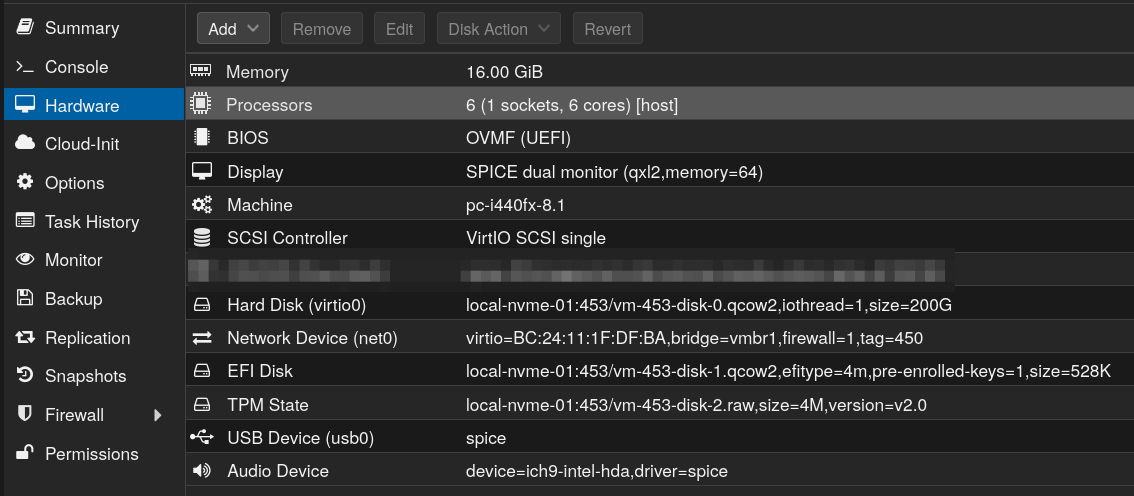
And that's it. You should now be able to start the VM and if everything went well, you should basically see no difference.
I played it safe, so I actually created the clone beforehand, tested it in the clone and once I was satisfied it worked, I converted my main VM. I do have backups, but this was a way easier approach than to pull the VM back from the backup.
Comments (0)
No comments yet. Be the first to comment.
Leave a comment
Privacy: your name and comment are shown once published. Your e-mail address is never shown or passed on; it is used for the confirmation link and to recognise your later comments, and is deleted when you have no comments left here. Comments that are never confirmed are deleted after 7 days. Confirming sets a cookie in this browser so that it does not ask again.