Traefik with mTLS
In previous posts we deployed our step-ca PKI and also enabled traefik to request certificates by using ACME from our PKI. All of this was done so that we could authenticate our servers, but what about authenticating clients?


Mutual TLS (mTLS) is an enhanced form of Transport Layer Security (TLS) that provides authentication for both the client and the server in a network connection. Unlike standard TLS, where only the server is authenticated using certificates, mTLS requires both parties to present certificates to verify each other's identity, establishing a bidirectional trust. This ensures that both the client and server are who they claim to be, offering a higher level of security, especially in sensitive environments like microservices architectures, APIs, and internal corporate networks. mTLS is commonly used to prevent unauthorized access and to secure communication between systems.
In a nutshell, only authenticated clients are allowed to access resources that are protected with mTLS!
In this post we will configure our traefik instance to allow mTLS and then we will deploy two services so that we can test this - in my case, it will be Portainer and a simple nginx container. I will provide configuration for the nginx container, while configuration of Portainer will come in another post.
Preparing traefik for mTLS is quite easy if you followed my tutorial. You should already have a confs directory under /data/dockers/01-traefik (or whatever your directory structure looks like):
$ ls -alh

total 36K
drwxr-xr-x 3 nenad nenad 4.0K Sep 28 16:27 .
drwxr-xr-x 3 nenad nenad 4.0K Sep 27 18:49 ..
-rw------- 1 nenad nenad  11K Sep 28 15:51 acme.json
drwxr-xr-x 2 nenad nenad 4.0K Sep 28 16:14 confs
-rw-r--r-- 1 nenad nenad 2.2K Sep 28 16:14 docker-compose.yml
-rw-r--r-- 1 nenad nenad  504 Sep 28 16:27 .env
-rw-r--r-- 1 nenad nenad 1.6K Sep 28 15:49 traefik.toml
We will create a new file under ./confs directory, I'm calling it dynamic_conf.toml:
[tls.options]
  [tls.options.clientAuthRequired]
    [tls.options.clientAuthRequired.clientAuth]
      caFiles = ["/etc/ssl/certs/ca.demo.networktechguy.com.pem"]  # Path to your CA file
      clientAuthType = "RequireAndVerifyClientCert"

  [tls.options.default]
    # No clientAuth settings here; this will not require client certificates.
That's all there is to it! Since we pre-configured traefik to use dynamic configurations that are inside of the /data directory within the container, and that one is mapped to /data/dockers/01-traefik/confs on the host, this will immediately allow traefik to use it, without restarting the container.
Next, we will configure our new nginx container. I'm using /data/dockers/03-nginx-test as the directory, you can use whatever you want. Since we are defining most parameters through variables, we need two files - .env and docker-compose.yml. Let's create them:
#SYSTEM STUFF
TZ=America/Toronto
DNS_SRV1=10.75.1.1
DOCKER_SOCK_PATH=/var/run/docker.sock
SYS_TIME_PATH=/etc/localtime

#Container specific stuff - split by app
CNT1_IMG=nginx
CNT1_VER=
CNT1_NAME=nginx-test
CNT1_RESTART=unless-stopped
CNT1_PUID=1000
CNT1_PGID=1000
CNT1_PATH=/data/dockers/03-nginx-test
CNT1_PORT1=80
CNT1_PORT2=
CNT1_DMN_NAME1=webtest-01
CNT1_DN1=demo.networktechguy.com
CNT1_RSLV=step
CNT1_NET1=ext-net
services:
nginx-test:
image: $CNT1_IMG
hostname: $CNT1_NAME
container_name: $CNT1_NAME
restart: $CNT1_RESTART
env_file:
- .env
environment:
- PUID=$CNT1_PUID
- PGID=$CNT1_PGID
- TZ=$TZ
dns:
- $DNS_SRV1
volumes:
- $CNT1_PATH/web:/usr/share/nginx/html
- "$SYS_TIME_PATH:$SYS_TIME_PATH:ro"
labels:
- traefik.enable=true
- traefik.http.services.$CNT1_DMN_NAME1.loadbalancer.server.port=$CNT1_PORT1
- traefik.http.routers.$CNT1_DMN_NAME1.rule=Host(`${CNT1_DMN_NAME1}.${CNT1_DN1}`)
- traefik.http.routers.$CNT1_DMN_NAME1.tls.certresolver=$CNT1_RSLV
- traefik.http.routers.$CNT1_DMN_NAME1.entrypoints=websecure
- traefik.http.routers.$CNT1_DMN_NAME1.tls.options=clientAuthRequired@file
networks:
- $CNT1_NET1
networks:
ext-net:
external: trueWith that done, we are ready to start our container:
docker compose down && docker compose pull && docker compose up -dBefore we jump to our workstation, let's check the status of the container:
$ docker ps -a

CONTAINER ID   IMAGE                           COMMAND                  CREATED         STATUS         PORTS                                                                                                                 NAMES
47d888d6bd6e   traefik:v3.1.4                  "/entrypoint.sh --co…"   2 minutes ago   Up 2 minutes   0.0.0.0:80->80/tcp, :::80->80/tcp, 0.0.0.0:443->443/tcp, :::443->443/tcp, 0.0.0.0:8080->8080/tcp, :::8080->8080/tcp   traefik-01-app
dac20cd81316   nginx                           "/docker-entrypoint.…"   4 minutes ago   Up 4 minutes   80/tcp                                                                                                                nginx-test
As you can see, the container has already been running for 2 minutes, so it's not restarting or anything. Finally, let's check the logs to make sure everything is working as expected:
$ docker logs nginx-test

/docker-entrypoint.sh: /docker-entrypoint.d/ is not empty, will attempt to perform configuration
/docker-entrypoint.sh: Looking for shell scripts in /docker-entrypoint.d/
/docker-entrypoint.sh: Launching /docker-entrypoint.d/10-listen-on-ipv6-by-default.sh
10-listen-on-ipv6-by-default.sh: info: Getting the checksum of /etc/nginx/conf.d/default.conf
10-listen-on-ipv6-by-default.sh: info: Enabled listen on IPv6 in /etc/nginx/conf.d/default.conf
/docker-entrypoint.sh: Sourcing /docker-entrypoint.d/15-local-resolvers.envsh
/docker-entrypoint.sh: Launching /docker-entrypoint.d/20-envsubst-on-templates.sh
/docker-entrypoint.sh: Launching /docker-entrypoint.d/30-tune-worker-processes.sh
/docker-entrypoint.sh: Configuration complete; ready for start up
2024/09/28 21:11:39 [notice] 1#1: using the "epoll" event method
2024/09/28 21:11:39 [notice] 1#1: nginx/1.27.1
2024/09/28 21:11:39 [notice] 1#1: built by gcc 12.2.0 (Debian 12.2.0-14)
2024/09/28 21:11:39 [notice] 1#1: OS: Linux 6.1.0-25-amd64
2024/09/28 21:11:39 [notice] 1#1: getrlimit(RLIMIT_NOFILE): 1048576:1048576
2024/09/28 21:11:39 [notice] 1#1: start worker processes
2024/09/28 21:11:39 [notice] 1#1: start worker process 29
2024/09/28 21:11:39 [notice] 1#1: start worker process 30
2024/09/28 21:11:39 [notice] 1#1: start worker process 31
2024/09/28 21:11:39 [notice] 1#1: start worker process 32
2024/09/28 21:11:39 [notice] 1#1: start worker process 33
2024/09/28 21:11:39 [notice] 1#1: start worker process 34
2024/09/28 21:11:39 [notice] 1#1: start worker process 35
2024/09/28 21:11:39 [notice] 1#1: start worker process 36
Everything seems to be normal, so let's jump to our workstation and check how things are there.
As you can see here:
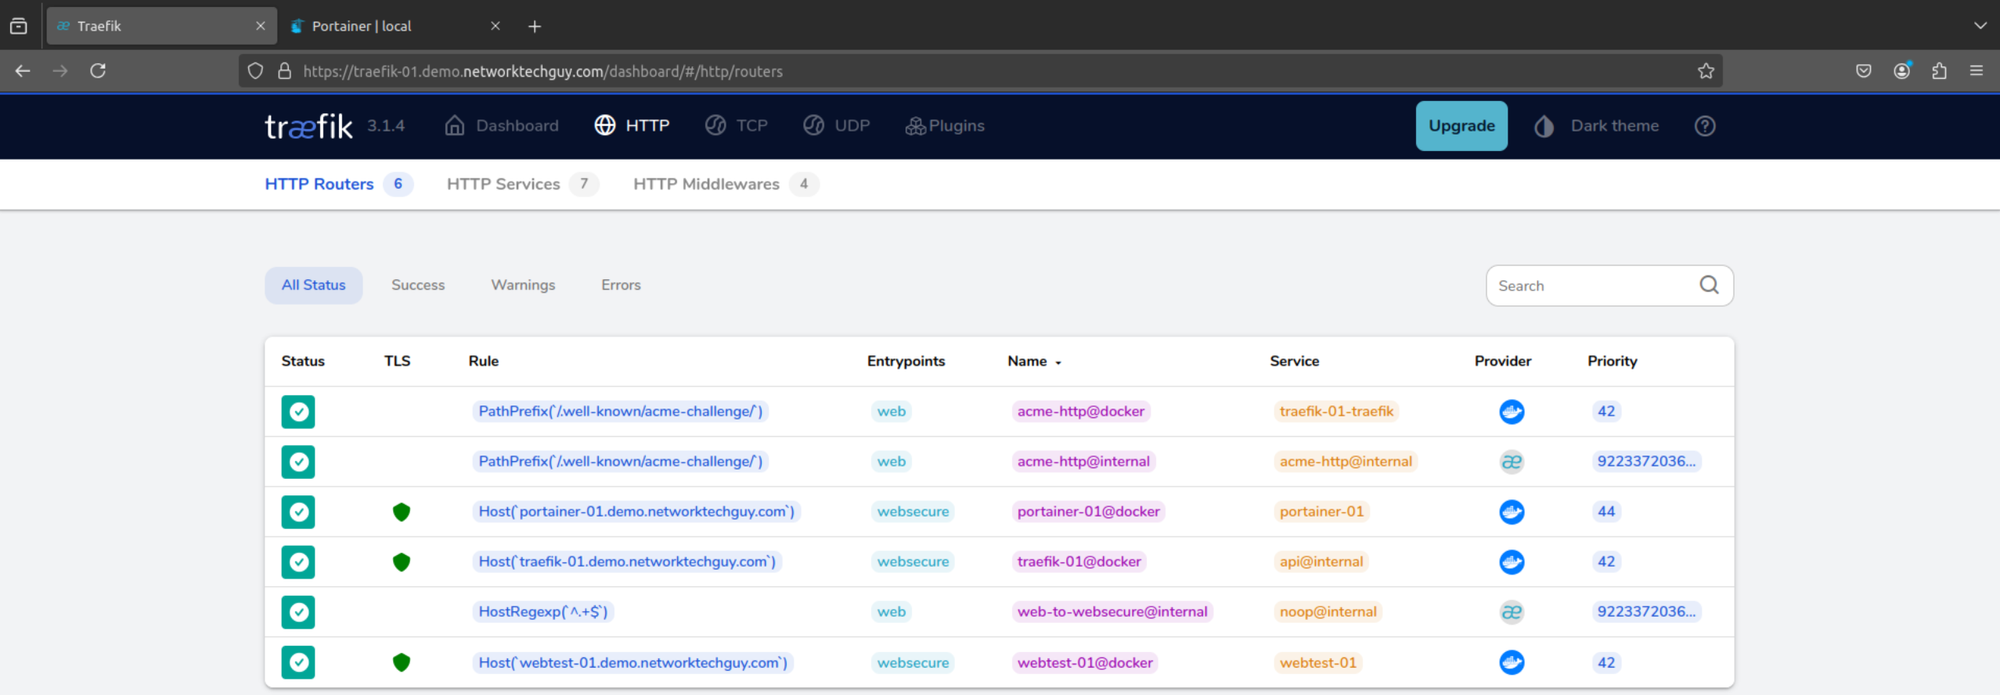
traefik reverse proxythere are multiple routers currently running, and since I already pre-configured Portainer, it's also already showing as running.
The one we are interested in is the webtest-01, so let's take a closer look:
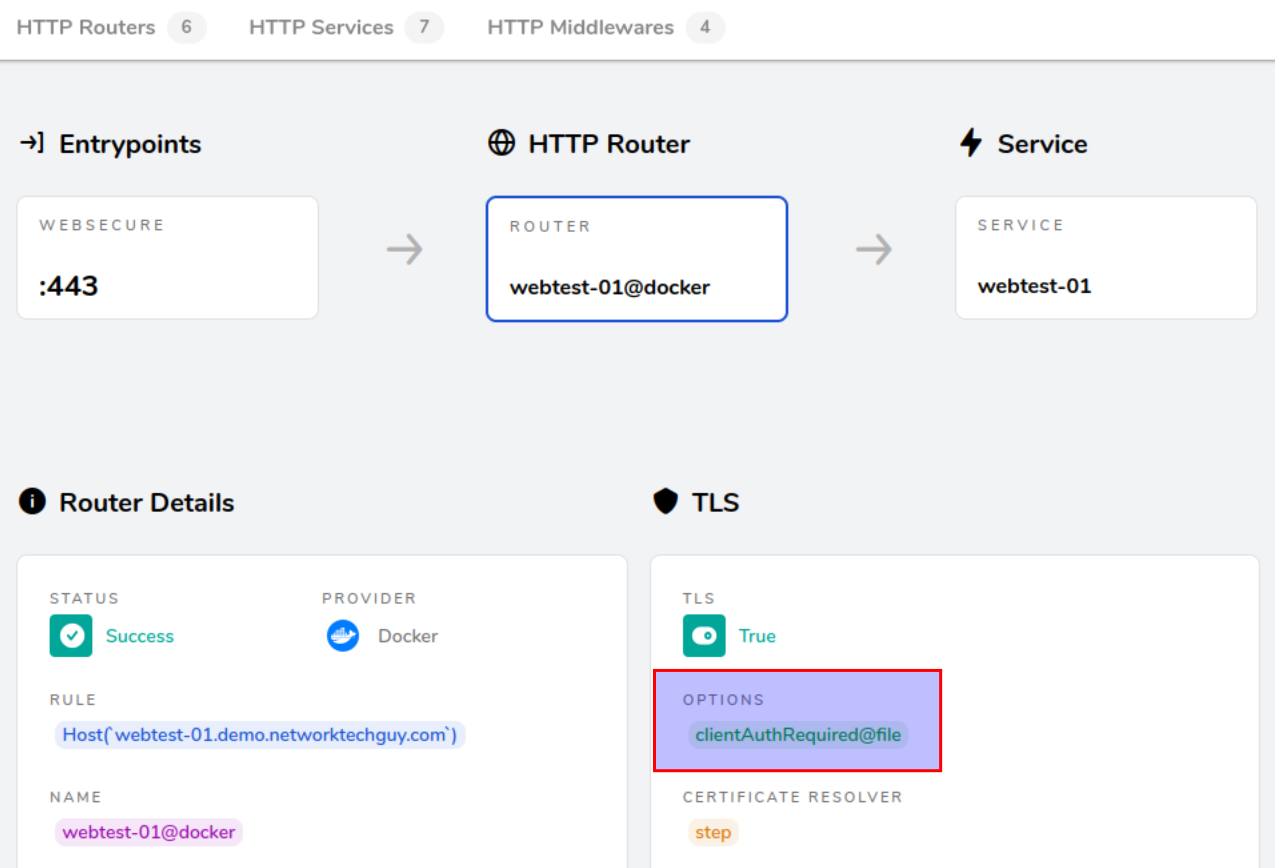
webtest-01 routerYou will notice that there is a TLS option enabled on this router, called clientAuthRequired@file. This is this part of the docker-compose.yml file configuration:
- traefik.http.routers.$CNT1_DMN_NAME1.tls.options=clientAuthRequired@fileWith this label we are effectively commanding this service to use the traefik dynamic configuration file to request a client certificate!
Let's try and visit the page. If you try and do it without a personal certificate installed in the certificate store, Firefox most likely won't display anything, while Chromium will show the following:

To resolve this issue, we need to create a personal certificate first, and if you're working on a workstation that's already bootstrapped to the CA, it's very easy to do so:
step ca certificate [email protected] --san=www.networktechguy.com [email protected] NenadKarlovcec-priv.crt NenadKarlovcec-priv.keyHere we are requesting new certificate and also defining two more SANs (Subject Alternative Names). Those additional SANs are defined by the parameter --san=. If you don't define additional SANs via this parameter, the CN will become the only SAN attached to the certificate (in this case, that would be [email protected]). Since I already had the certificate and the key file under those names, step is asking me if I want to overwrite them:
$ step ca certificate [email protected] --san=www.networktechguy.com [email protected] NenadKarlovcec-priv.crt NenadKarlovcec-priv.key

✔ Provisioner: NTG (JWK) [kid: 6zkvMKLGZxf0qa4n-cleOyn2seI04fweoAuOjBlcr4A]
Please enter the password to decrypt the provisioner key:
✔ CA: https://ca.demo.networktechguy.com
✔ Would you like to overwrite NenadKarlovcec-priv.crt [y/n]: y
✔ Would you like to overwrite NenadKarlovcec-priv.key [y/n]: y
✔ Certificate: NenadKarlovcec-priv.crt
✔ Private Key: NenadKarlovcec-priv.key
Finally, let's inspect the newly created personal certificate:
$ step certificate inspect NenadKarlovcec-priv.crt

Certificate:
    Data:
        Version: 3 (0x2)
        Serial Number: 25527343456051633845343372163019213391 (0x13346334441c501fc7dc9b42cc388a4f)
    Signature Algorithm: ECDSA-SHA256
        Issuer: O=NetworkTechGuy.com CA,CN=NetworkTechGuy.com CA Intermediate CA
        Validity
            Not Before: Sep 29 02:33:41 2024 UTC
            Not After : Sep 29 14:34:41 2026 UTC
        Subject: [email protected]
        Subject Public Key Info:
            Public Key Algorithm: ECDSA
                Public-Key: (256 bit)
                X:
                    03:e5:e5:d9:5a:ed:3d:71:d2:0b:0a:fe:77:f9:34:
                    d1:5a:8c:a9:6a:38:dc:1a:19:cb:36:8f:7e:34:38:
                    0c:e6
                Y:
                    6b:82:51:4f:96:a8:05:99:b6:04:df:8e:5b:ee:6b:
                    56:60:d7:10:c5:41:9c:4d:4f:43:54:c8:0b:ad:6f:
                    f9:cb
                Curve: P-256
        X509v3 extensions:
            X509v3 Key Usage: critical
                Digital Signature
            X509v3 Extended Key Usage:
                Server Authentication, Client Authentication
            X509v3 Subject Key Identifier:
                7F:73:B4:F1:9A:B4:E8:7D:82:C1:7B:CA:FB:5D:2E:E1:26:DF:2F:27
            X509v3 Authority Key Identifier:
                keyid:68:AA:E5:56:18:0F:A2:87:0A:F8:95:61:C0:CC:04:A7:DE:B7:50:AB
            X509v3 Subject Alternative Name:
                DNS:www.networktechguy.com
                email:[email protected]
            X509v3 Step Provisioner:
                Type: JWK
                Name: NTG
                CredentialID: 6zkvMKLGZxf0qa4n-cleOyn2seI04fweoAuOjBlcr4A
    Signature Algorithm: ECDSA-SHA256
         30:46:02:21:00:ef:15:9c:f9:f5:c0:2b:1c:77:f5:8d:3a:0c:
         cc:dd:18:e6:75:27:95:b7:2d:46:07:33:25:63:80:e4:fc:89:
         43:02:21:00:a2:bb:f4:da:87:bb:b1:9e:20:3e:ff:05:1c:d5:
         17:23:7b:6f:b5:2b:0d:9c:0d:9f:e4:23:6f:7e:1d:0d:f8:63
You will notice that SANs have been properly populated, one as DNS name (www.networktechguy.com), while the other one is an email address ([email protected]). Subject, or CN is equal to whatever the parameter is that we set while invoking the command, in this case it is also [email protected]. If you want the CN to be different, something like Name LastName, then the command would be:
step ca certificate [email protected] --san=www.networktechguy.com "Nenad Karlovcec" NenadKarlovcec-priv2.crt NenadKarlovcec-priv2.keyThis would be a resulting certificate in that case:
$ step certificate inspect NenadKarlovcec-priv2.crt

Certificate:
    Data:
        Version: 3 (0x2)
        Serial Number: 68381942766335860781603481004406234702 (0x3371e21457bfc6f2000d38e19ce85e4e)
    Signature Algorithm: ECDSA-SHA256
        Issuer: O=NetworkTechGuy.com CA,CN=NetworkTechGuy.com CA Intermediate CA
        Validity
            Not Before: Sep 29 02:38:44 2024 UTC
            Not After : Sep 29 14:39:44 2026 UTC
        Subject: CN=Nenad Karlovcec
Notice that CN has now become Nenad Karlovcec, as that is what we requested when we created the certificate. In a nutshell, the command to create a certificate looks like this:
step ca certificate CN_name cert.crt cert.key --san=value1 --san=value2 --san=valueXPlease note that if CN_name has spaces between words, it needs to be put between (double) quotes.
OK, now it's the time for truth. Will it actually work in the browser? Let's test it out! Go to Firefox and open the Certificate Manager in settings, select 'Your Certificates' tab and click on Import... to import the newly created certificate. By default, Firefox will look for PKCS12 files, which is basically both the certificate and key files merged into one, but you can click change the selection and choose 'Certificate Files' instead. Select the certificate from the location where you created it and you will most likely be presented with an error like this:

Don't worry, this is normal if you created the certificate and signed the key. Let's go back to the terminal and create a PKCS12 file:
$ step certificate p12 NenadKarlovcec-priv.p12 NenadKarlovcec-priv.crt NenadKarlovcec-priv.key

Please enter a password to encrypt the .p12 file:
✔ Would you like to overwrite NenadKarlovcec-priv.p12 [y/n]: y
Your .p12 bundle has been saved as NenadKarlovcec-priv.p12.
In my case, since I already had a p12 file, it's asking me to overwrite it, but that will not be in your case. The command needs to have the basic step certificate p12 structure, and then followed by the name of the new certificate bundle (NenadKarlovcec-priv.p12), source CRT file (NenadKarlovcec-priv.crt) and the source key file (NenadKarlovcec-priv.key). It will create a new p12 file that we can now use to import to Firefox:
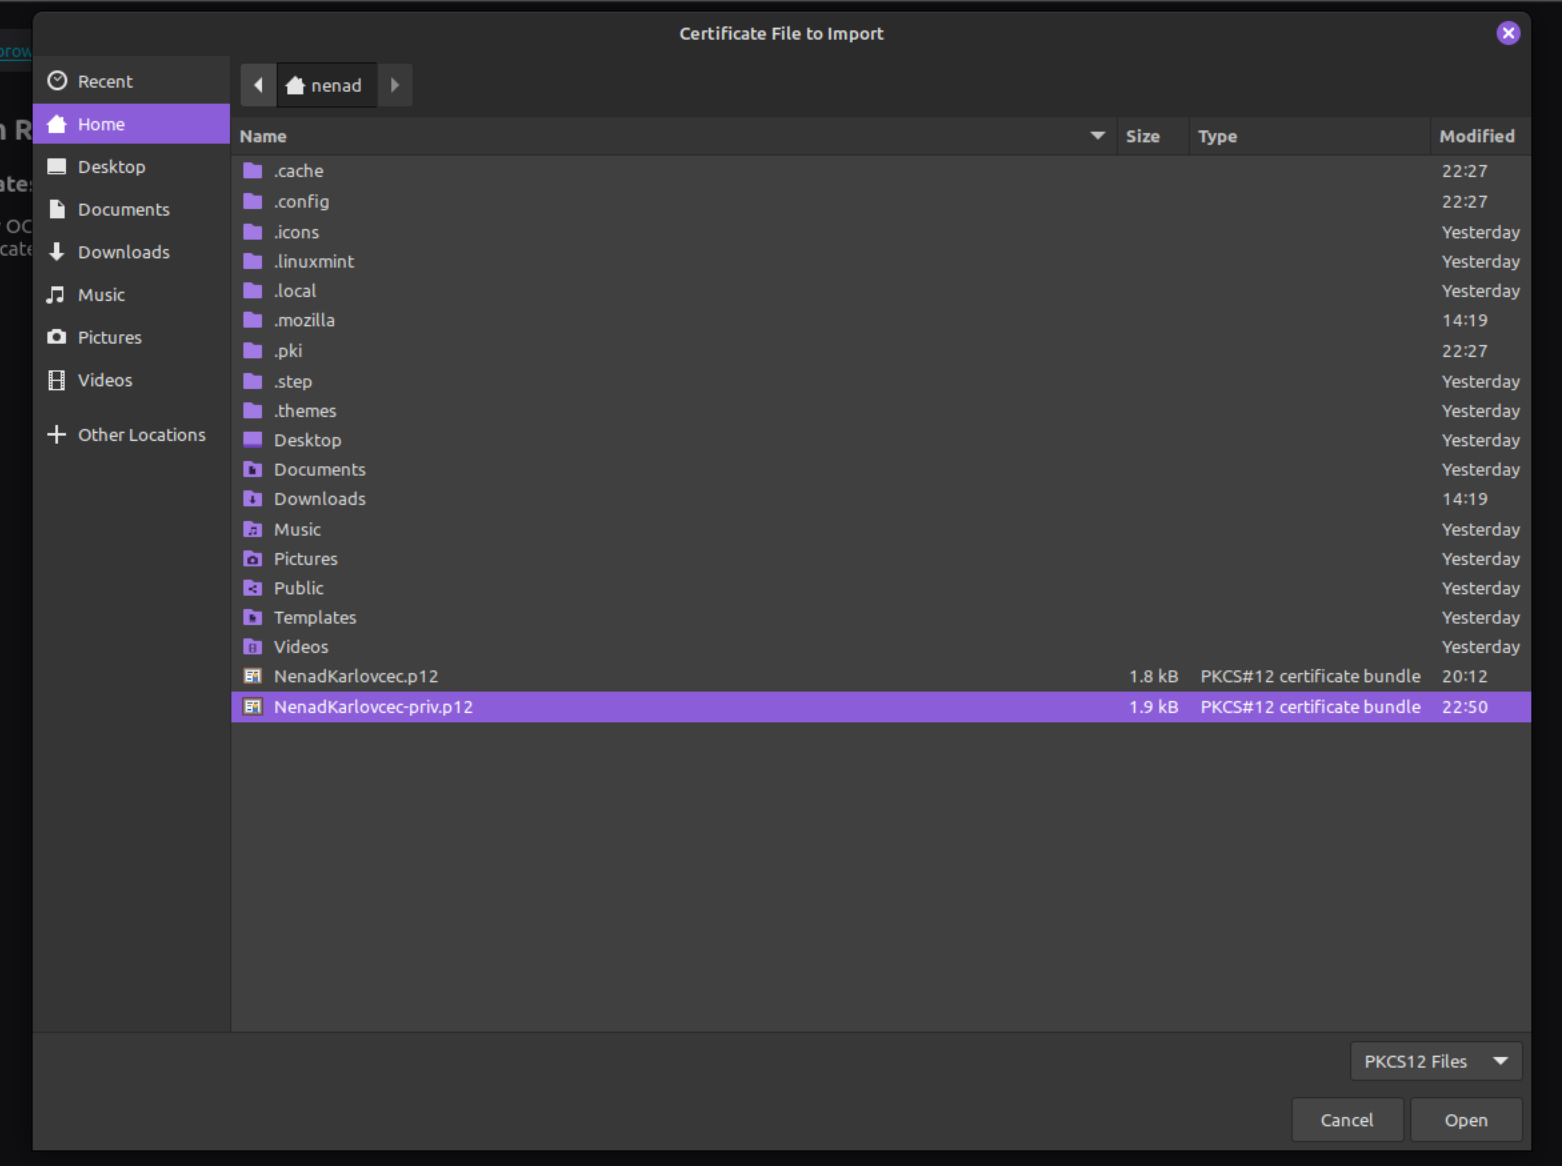
It will then ask you for the password that you created when you created the p12 bundle in the previous step:
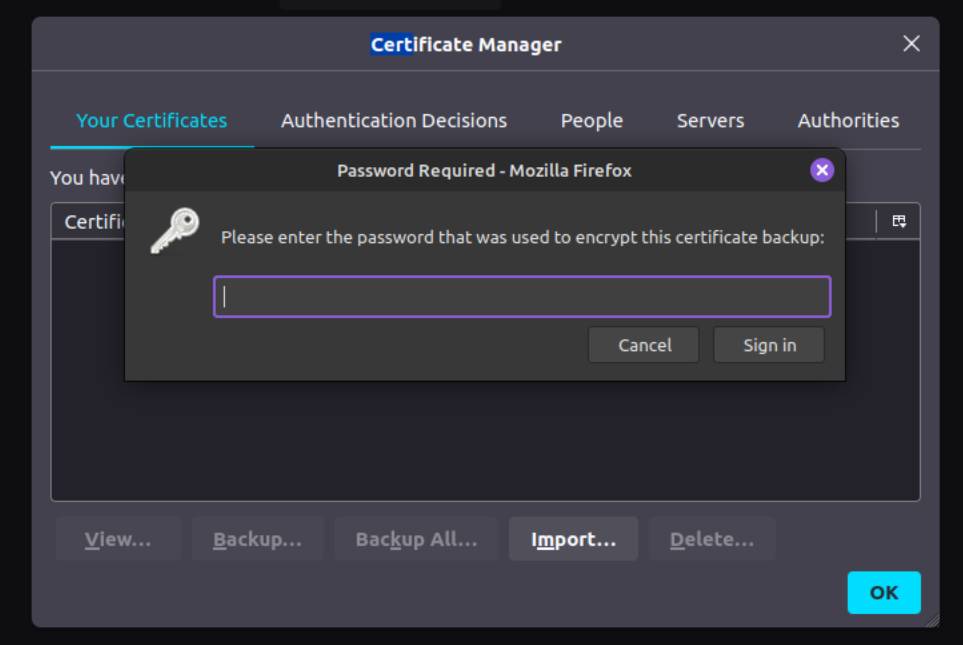
Once you enter the password and click on Sign in, the certificate will be imported to Firefox under Your Certificates tab:
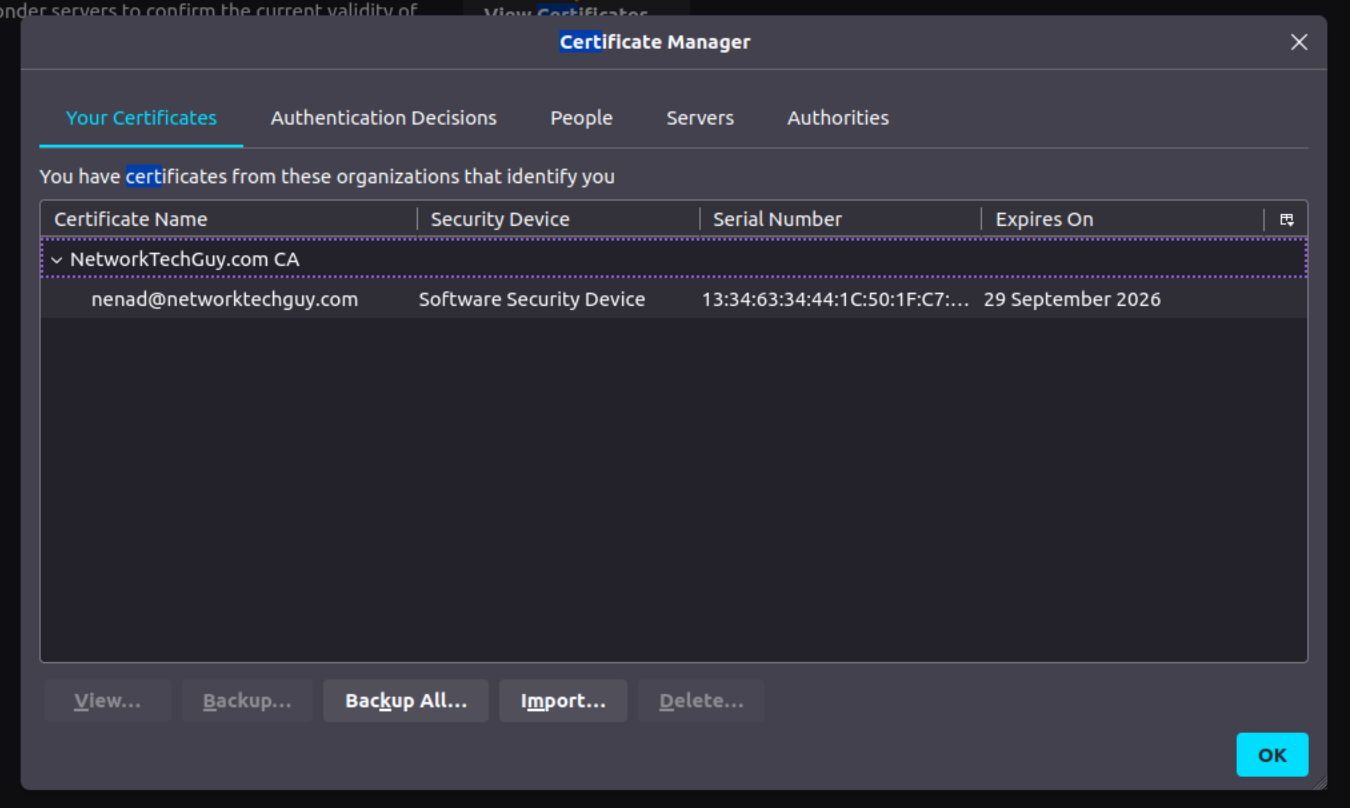
Click on OK, and now go back to the tab where you tried to open your nginx test web (or open a new tab). You should now be presented with a screen like this:

Select your client certificate (if you have more than one) and choose whether you want Firefox to remember your selection. If everything is working properly, you should be getting the reply from the server:

That's it - now you have an mTLS setup that you can use on your services via traefik. The only thing that you need to do is to either add or remove the line defining the usage of mTLS, like this in my case:
- traefik.http.routers.$CNT1_DMN_NAME1.tls.options=clientAuthRequired@file
webtest that would be alias for both webtest-01 and webtest-02, but I actually ran into DNS issues. Problem is that if you create an alias for webtest, you actually need to create two DNS entries - one for docker server #1 and another one for docker server #2. The problem then becomes when step-ca tries to issue certificates via ACME, as it uses DNS to effectively check whether the service exists. Since DNS points to two different servers for the same alias, step-ca has problems with connecting to the one that the request initially came from. There may be a solution to this that I'm currently unaware of, but for now, just keep in mind that if you require load balancing between different servers, this solution will not work. You could always spin up another reverse proxy in front of the docker-01 and docker-02 and point your DNS to that one and then request certificates from there, but that is just complicating stuff and is not part of this blog post.
Member discussion