Palo Alto FW IP-tagging
With that said, what is the actual benefit of using IP-tagging? One of the scenarios where you would use it is when you want to build a dynamic security policy that will match certain IP addresses based on certain criteria.
Let's expand on this - one of the usage cases is when you want to add IP addresses that do something that triggers your threat defense to flag it. For example, let's say that someone starts a port scan on your firewall, which triggers a threat defense and based on the pre-set value, it performs an action. In case of using default security profiles, action is set to default, which in case of severity level of critical and high, in most cases it will be either reset-client, reset-both or reset-server.
So, let's say that you apply your vulnerability profile to your security policies, and start seeing some logs in your firewall regarding threats. It may look something like this:

As you can see, there's quite a bit of entries here where Palo Alto FW identified threats and blocked them. But that doesn't actually stop users behind these IP addresses to try again, correct? Security is always a game of cat and mouse, and because of that, the best thing that we can do is to ban those IP addresses to ever reach the firewall on any open ports. Of course, parsing through threat logs and extracting source IP addresses is not something that we would want to do. There are ways to script this out, of course, but there is also a native, built-int technology in Palo Alto firewalls that can help with this.
IP-tagging will utilise logging capabilities of the firewall itself and tag the IP addresses in the process.
So how do we do that? First, create a tag under Objects -> Tags:
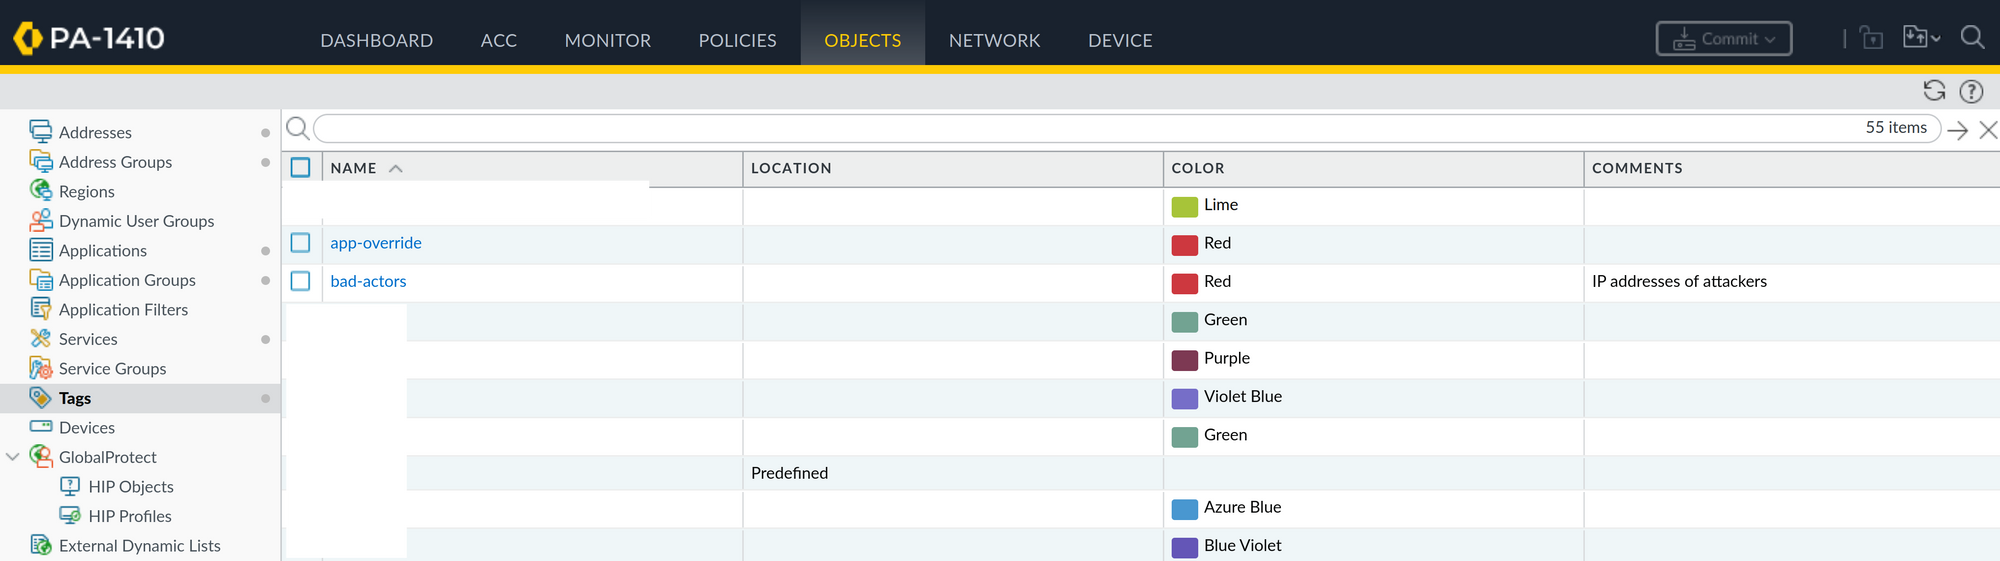
In my case, I called the tag bad-actors.
Next step is to create a Log Forwarding Profile - don't worry, if you already have one, you can add the necessary actions under an existing profile:
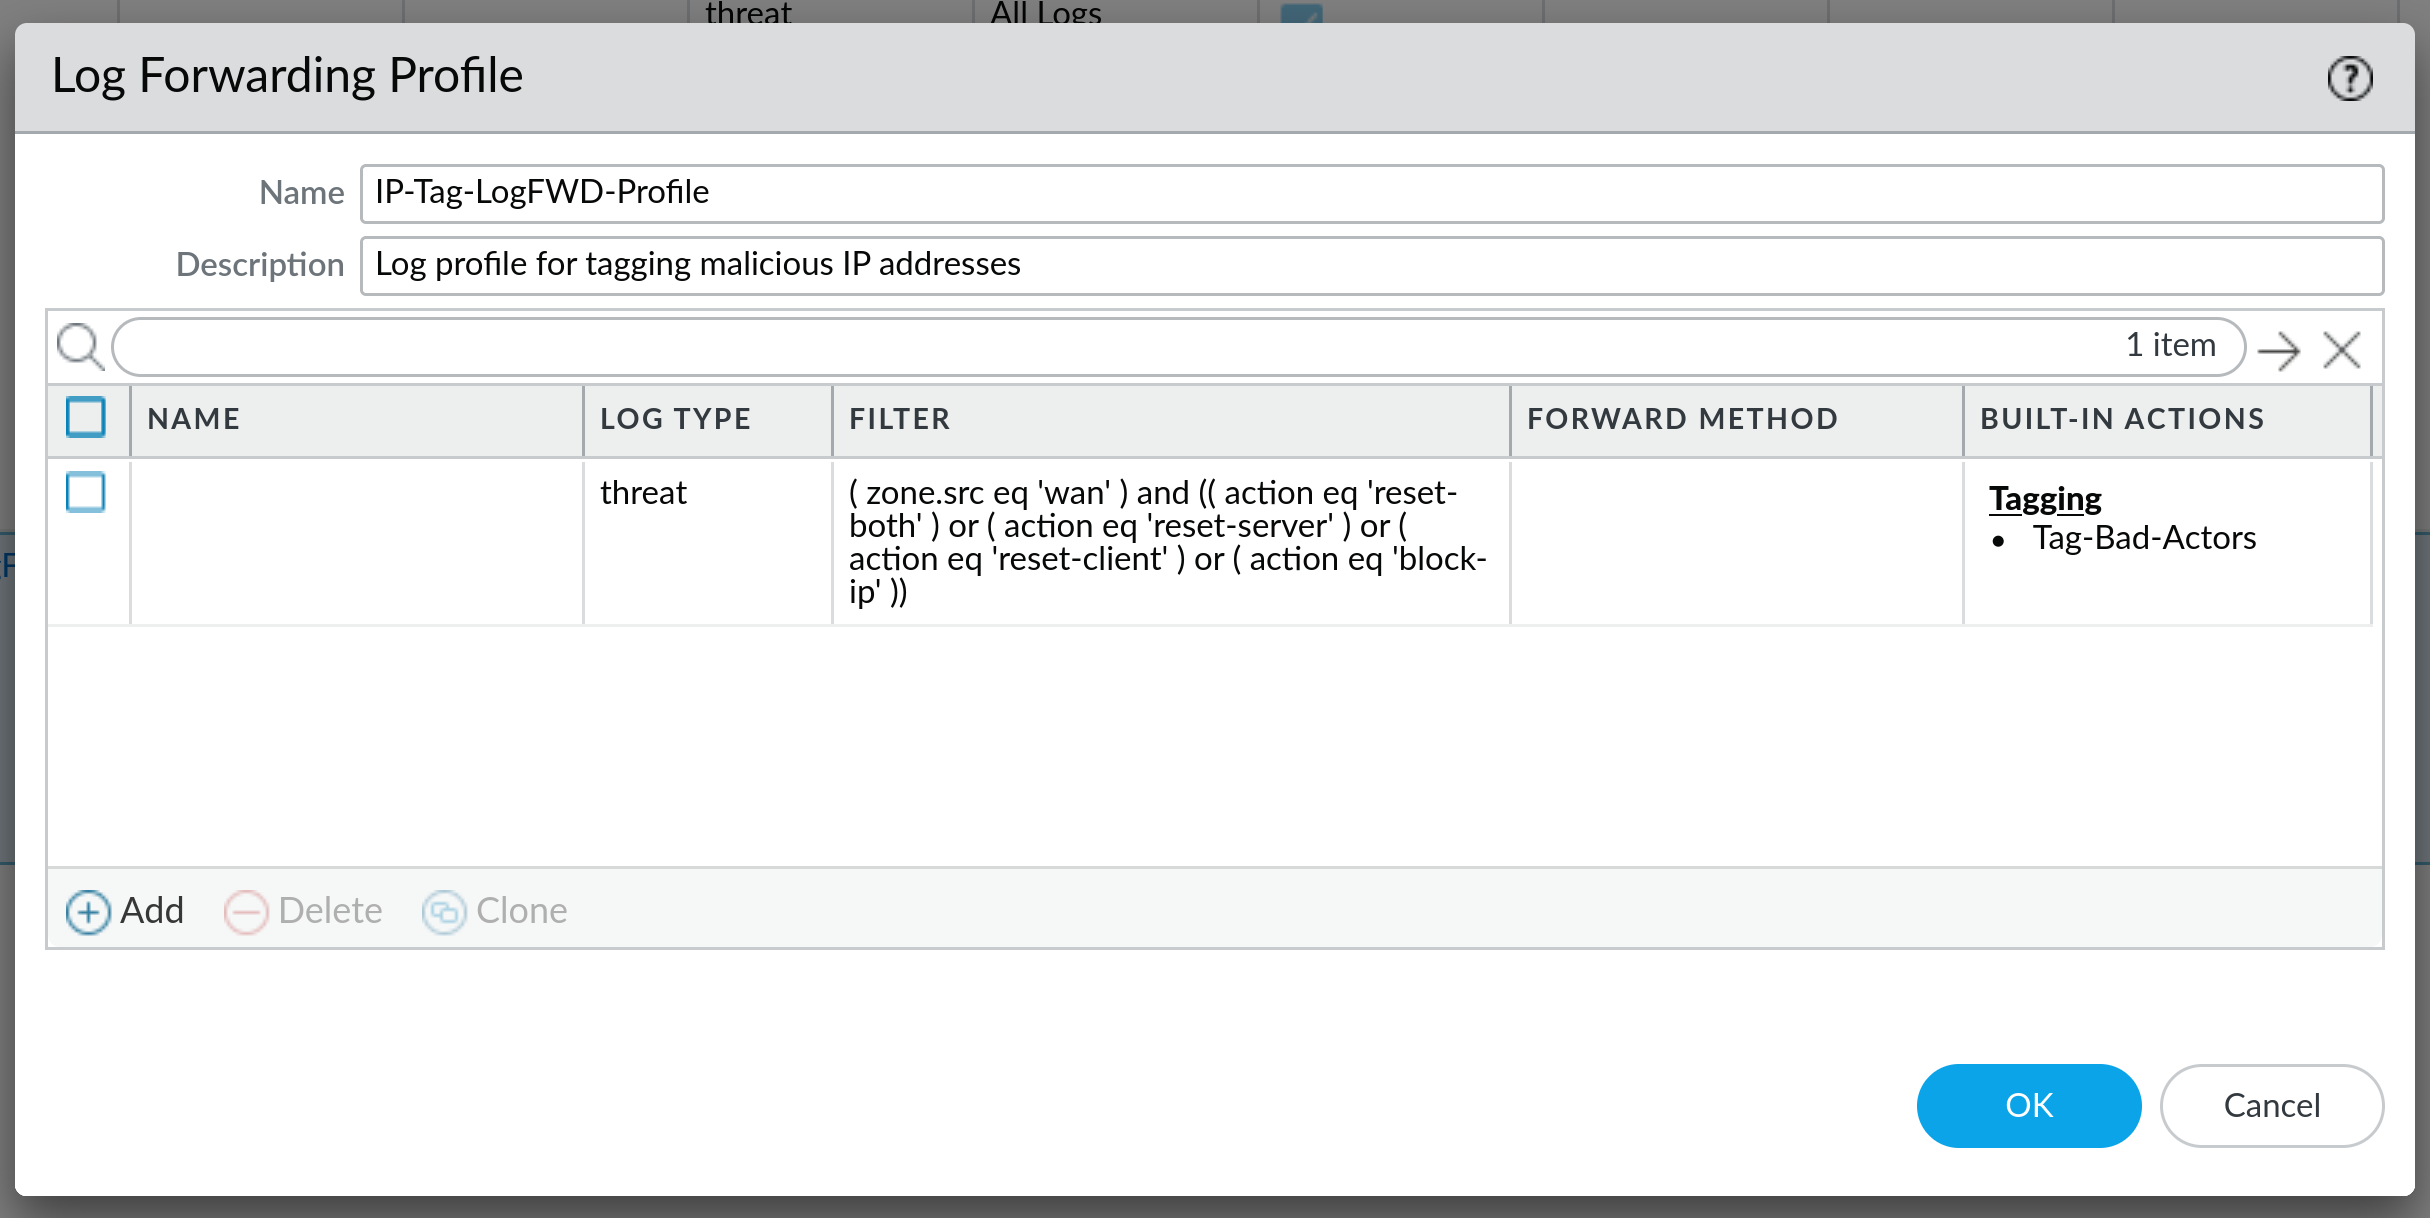
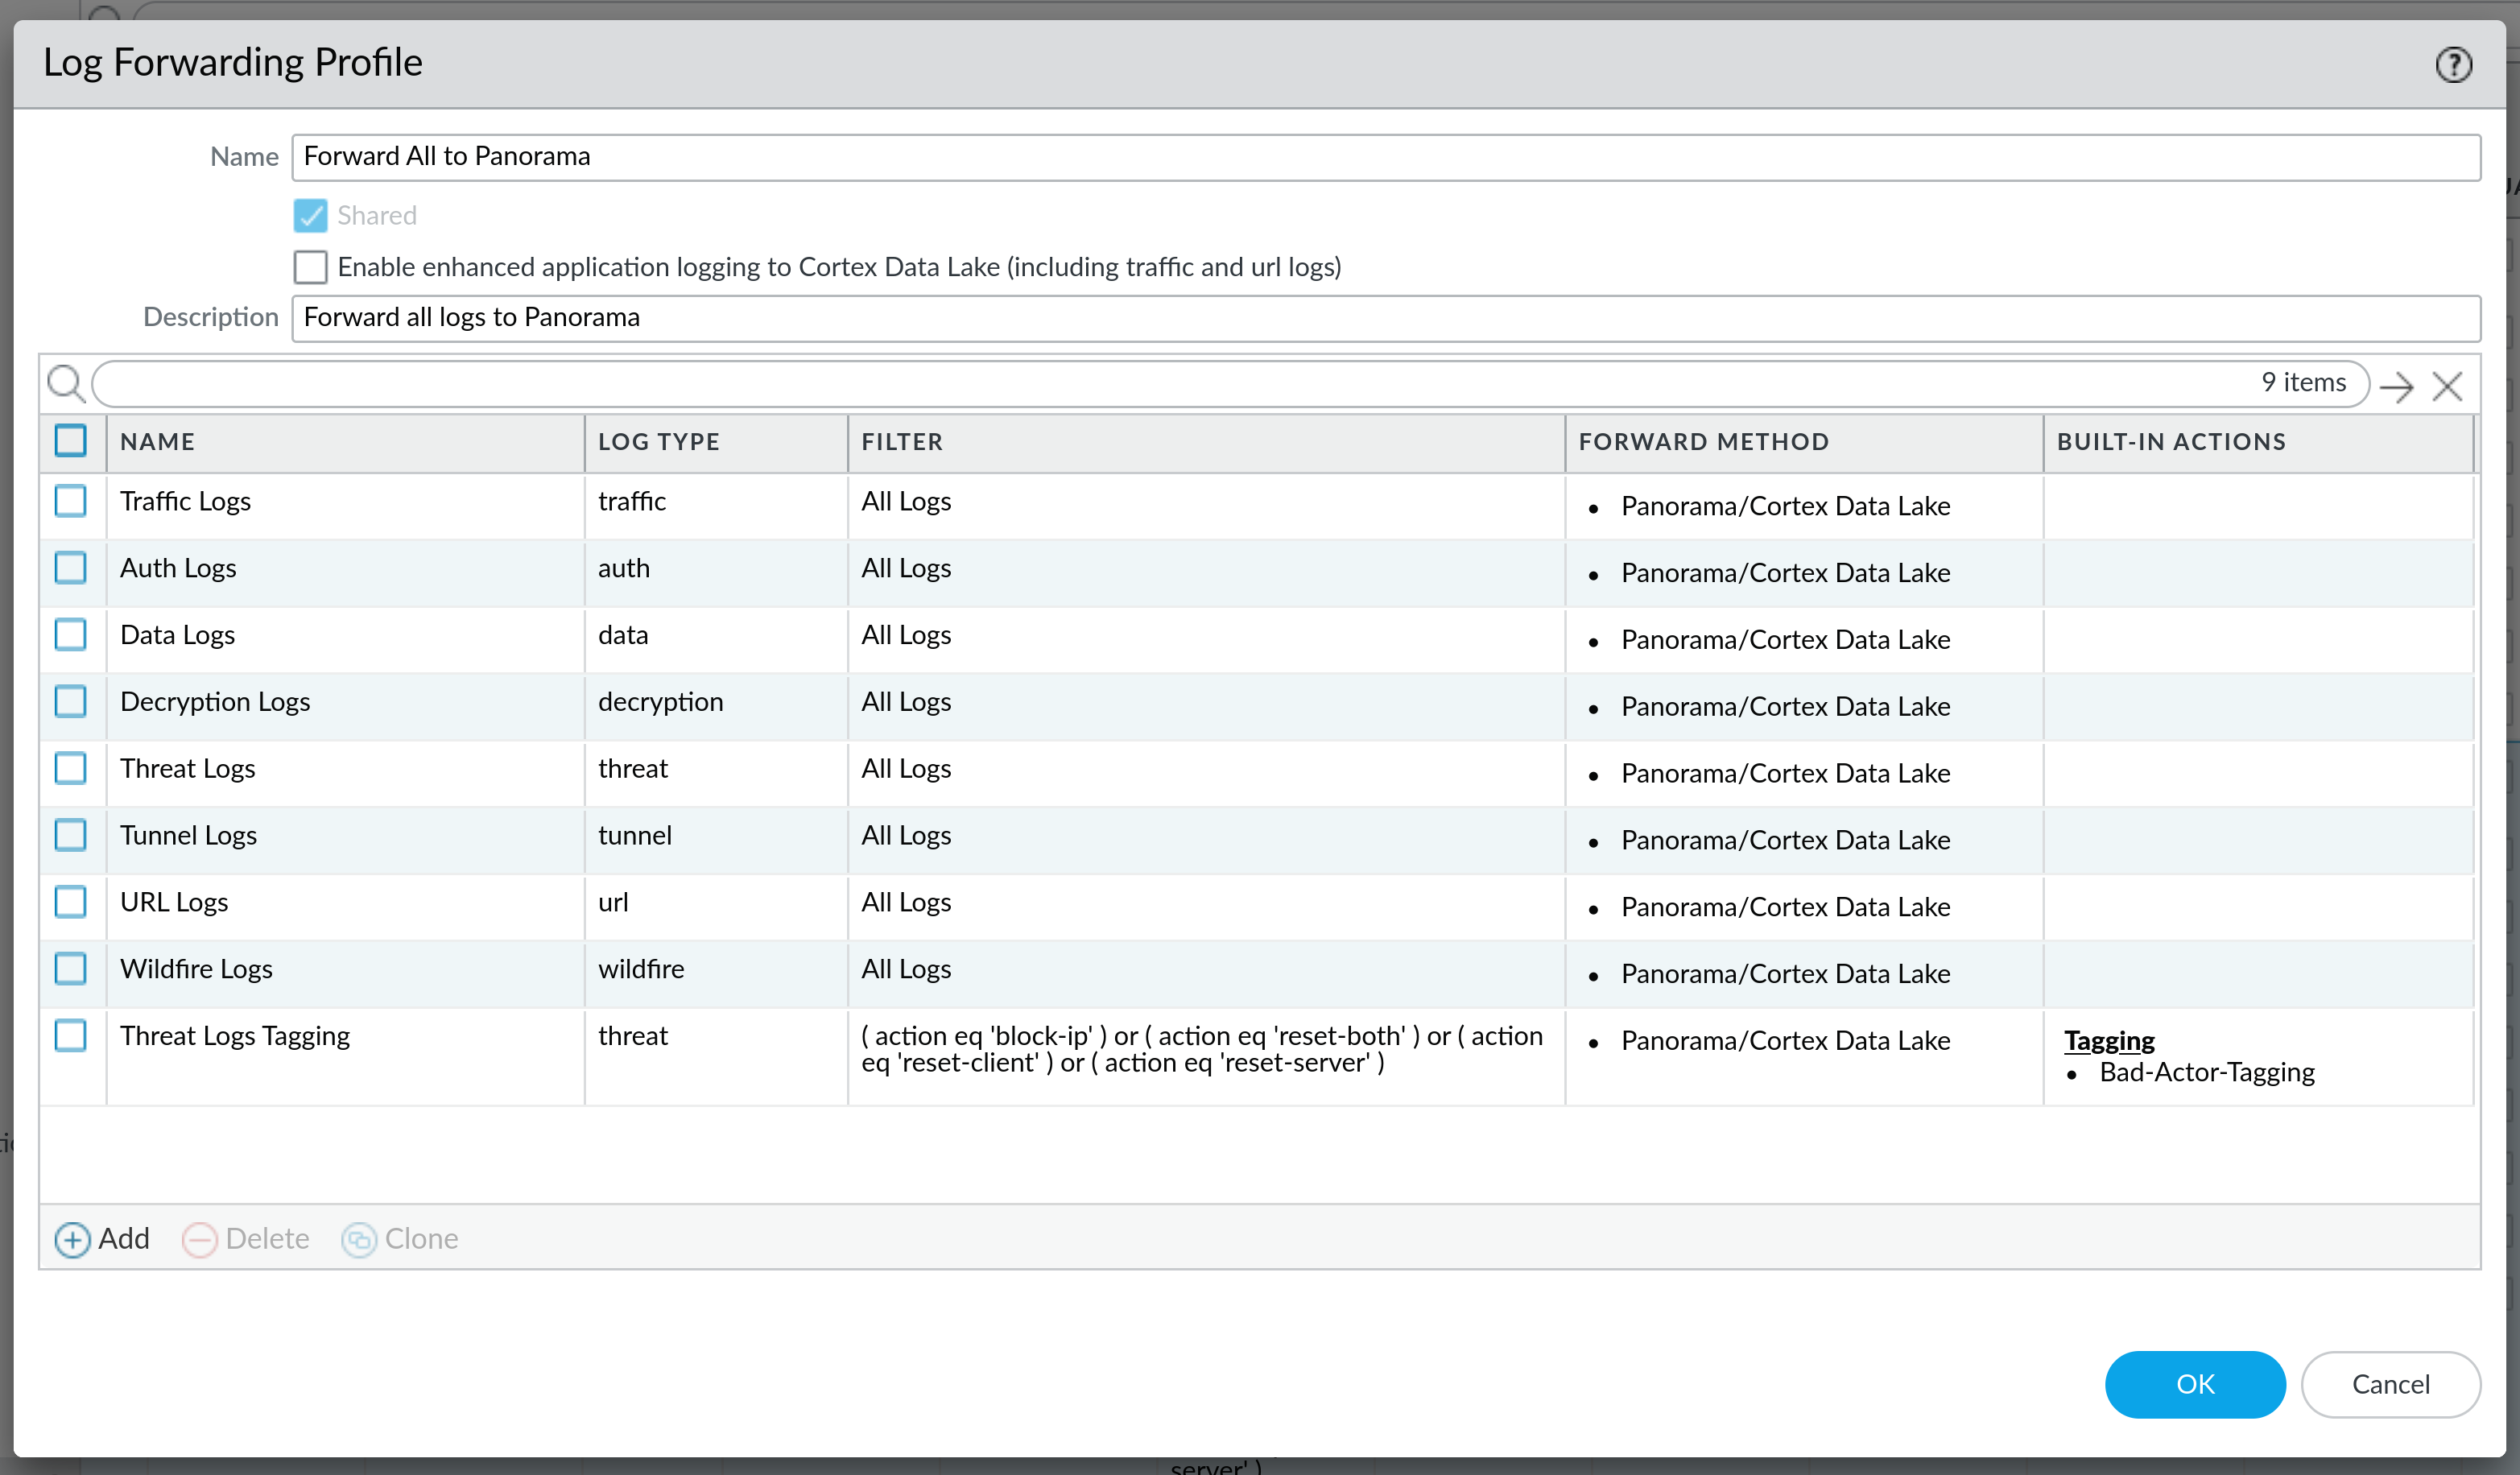
As you can see, multiple logs can be added to a Log Forwarding Profile, which is a good option when you have an existing one (like in this case where we are already sending all the logs to our Panorama server). You will notice that the filter in these two examples is a little bit different, and we will touch on that next.
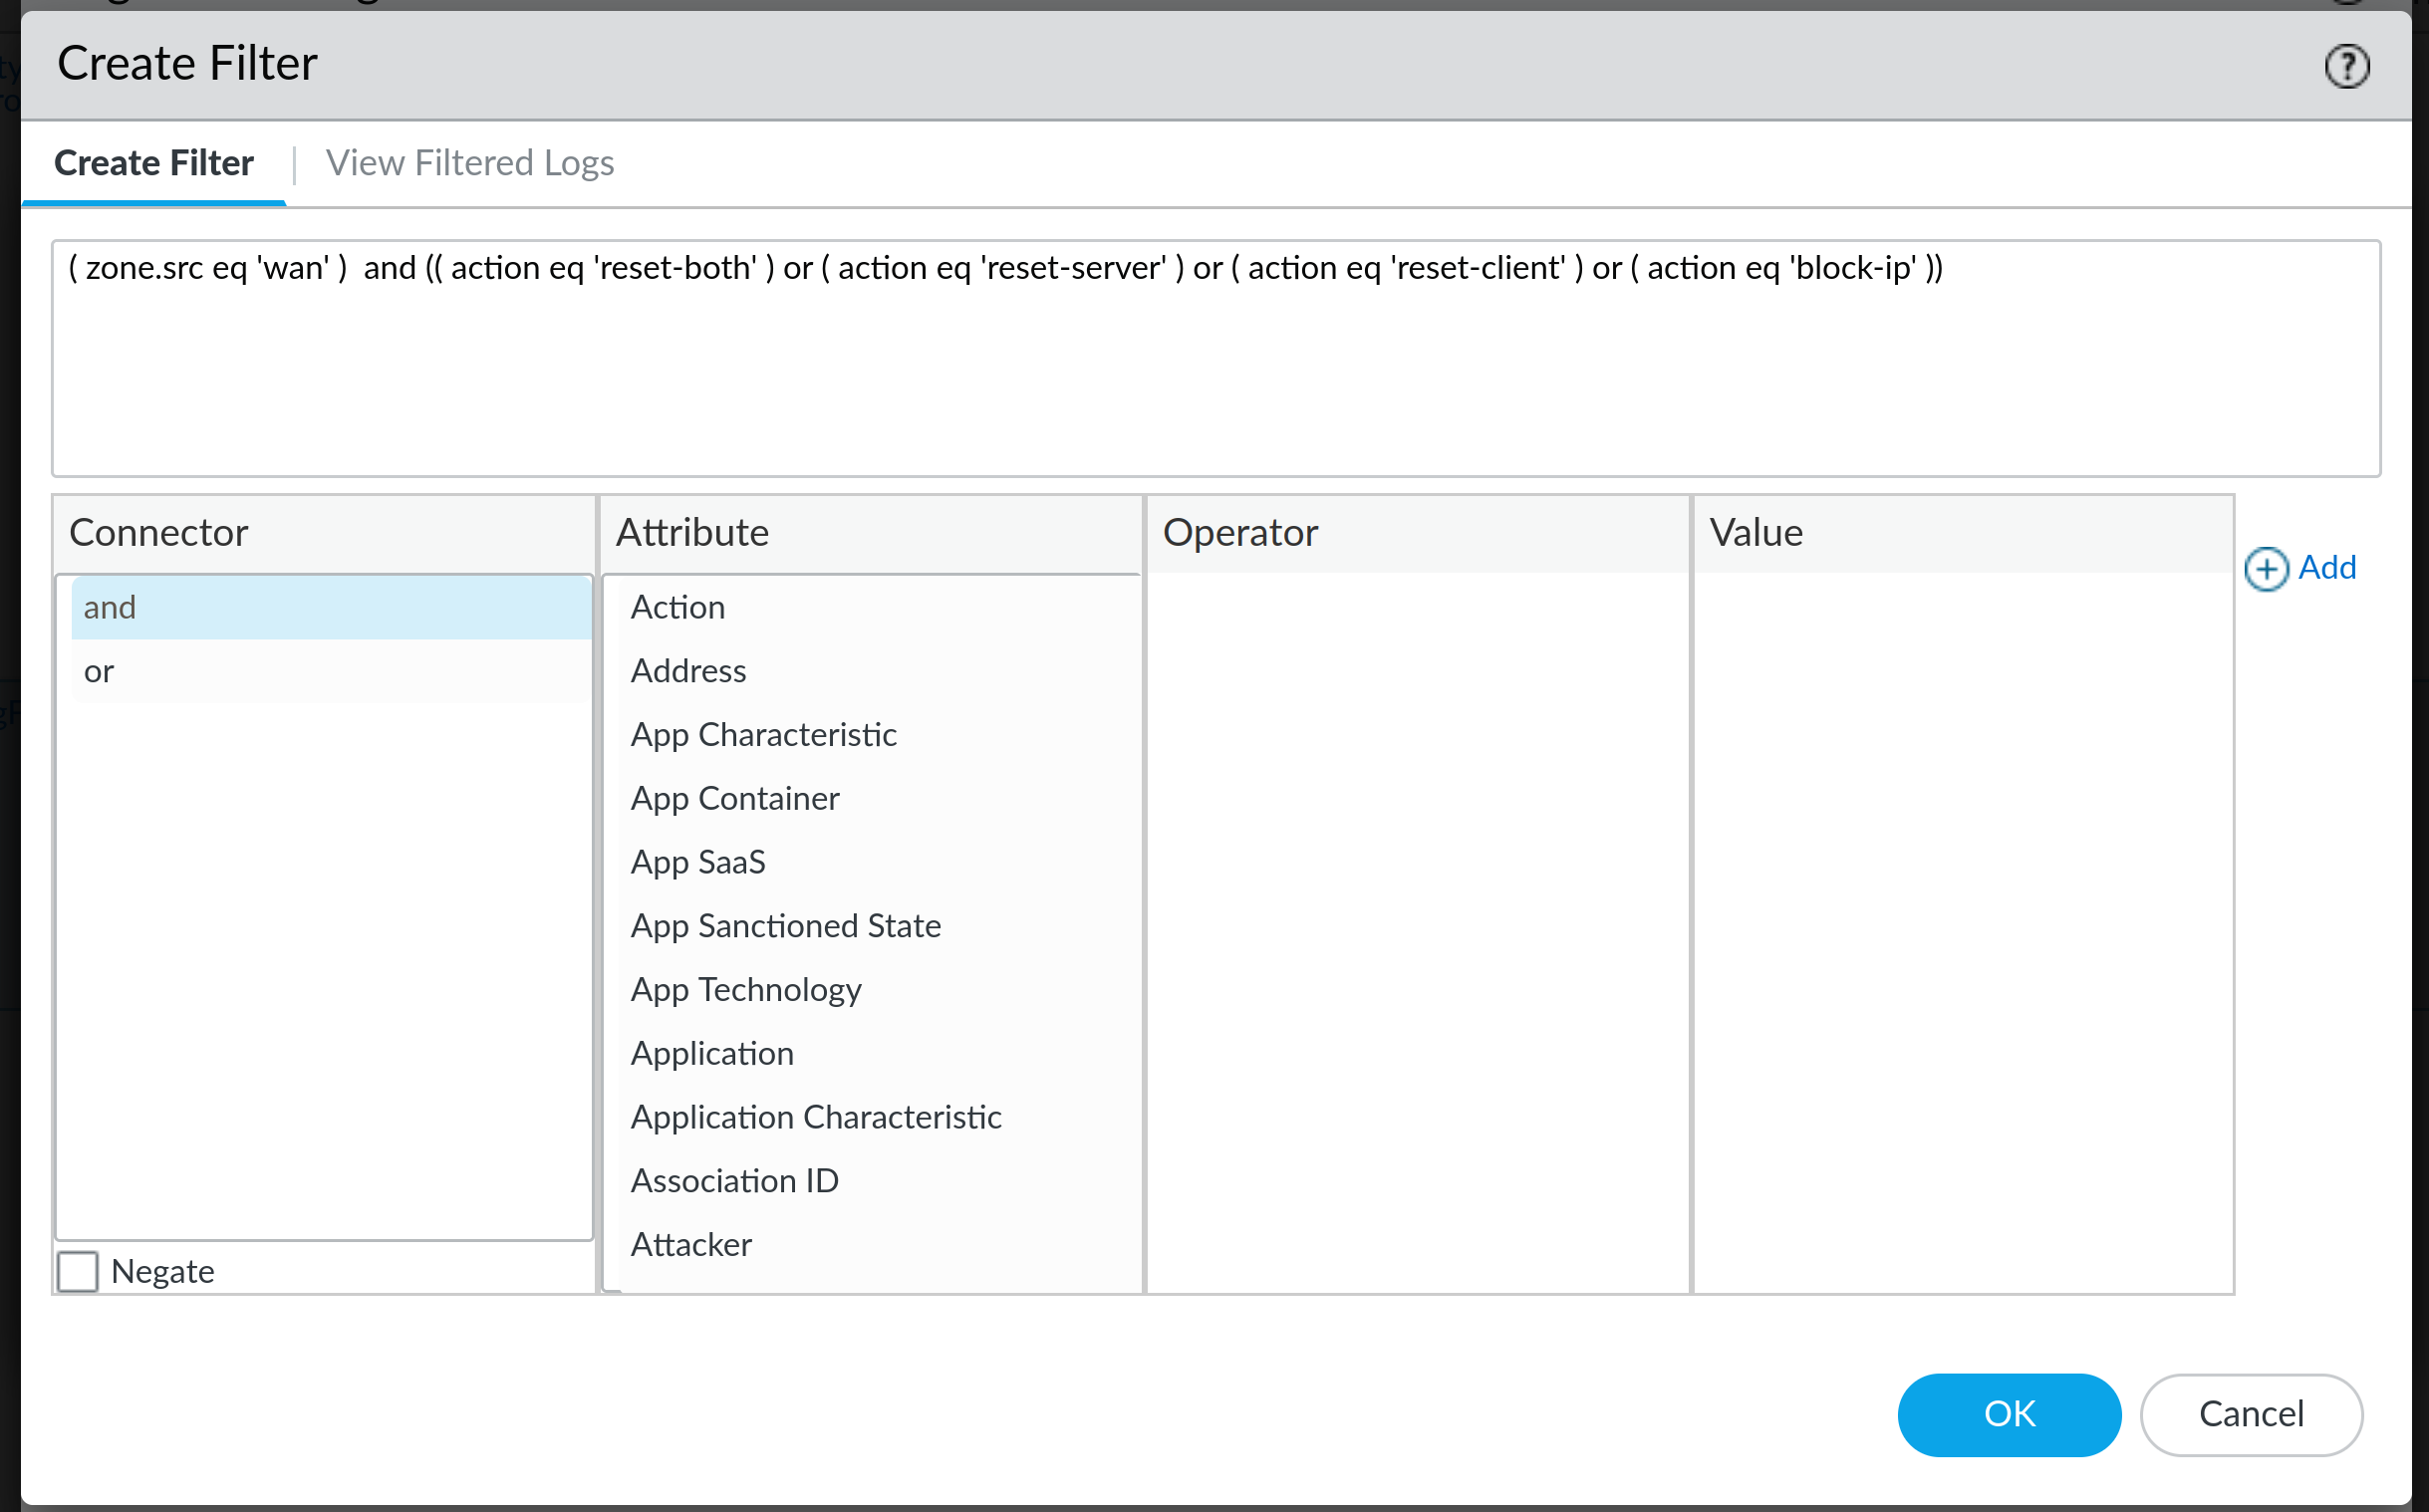
When you create a new log under the Profile, you can select what type of logs you want to parse, and not only that, but you can also apply certain filters to that log. Let's take a look at these two examples:
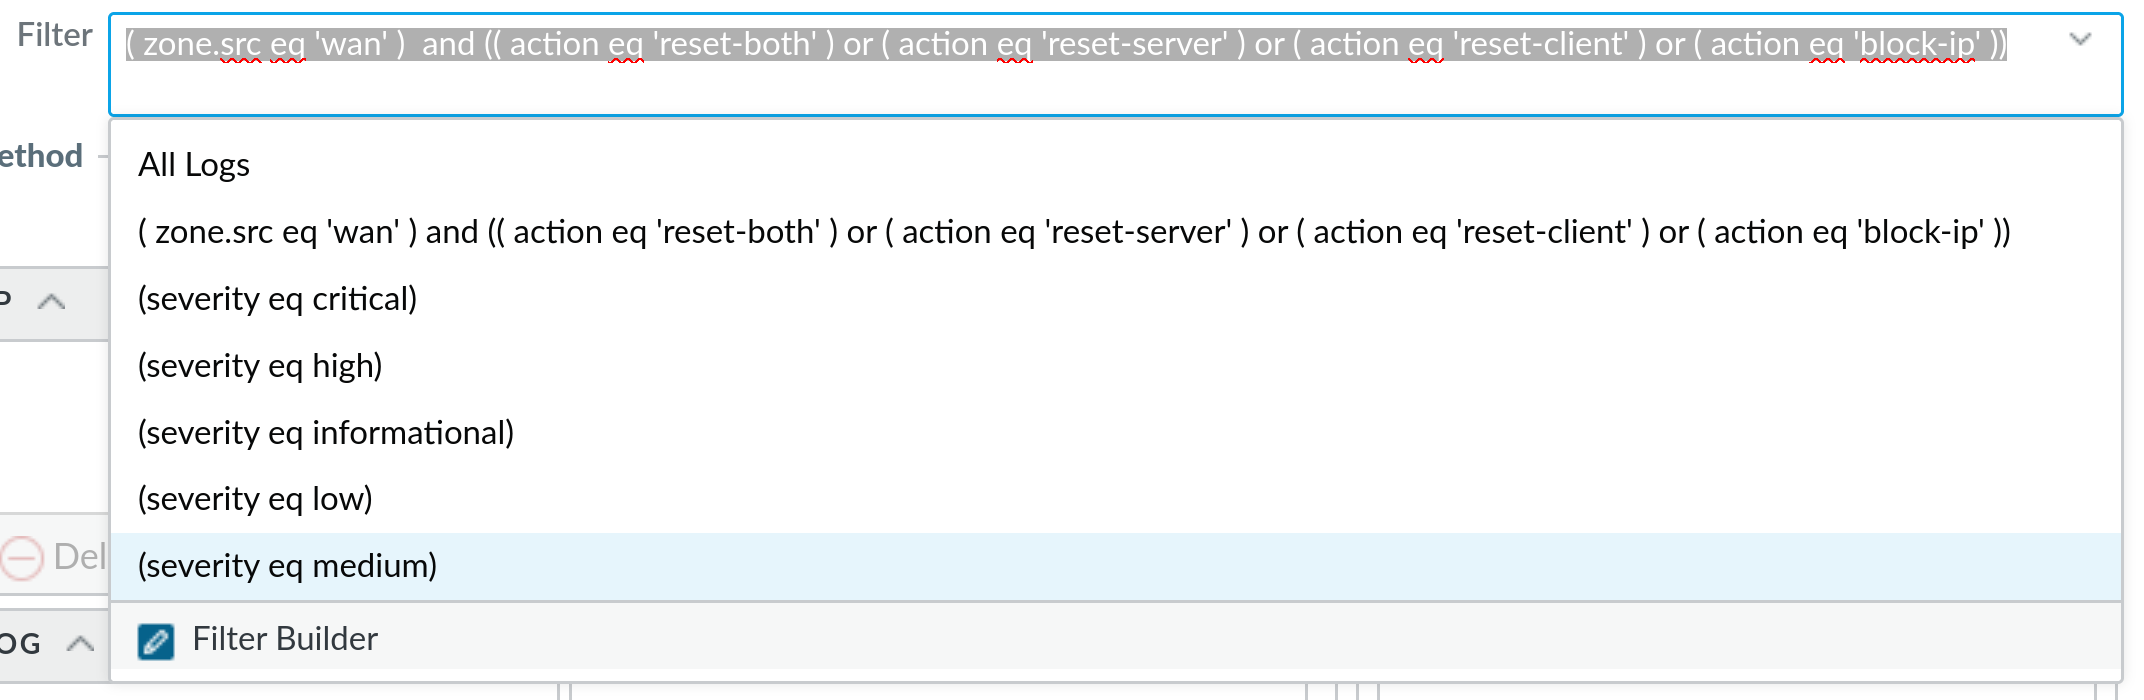
( action eq 'block-ip' ) or ( action eq 'reset-both' ) or ( action eq 'reset-client' ) or ( action eq 'reset-server' )and
( zone.src eq 'wan' ) and (( action eq 'reset-both' ) or ( action eq 'reset-server' ) or ( action eq 'reset-client' ) or ( action eq 'block-ip' ))These two filters are basically the same, with the addition of ( zone.src eq 'wan' ) in the second one. What this filter does is that it parses through the threat logs and looks for criteria specified in the log filter - in this case, action performed needs to be either reset-both, reset-client, reset-server or block-ip, and in the second example, we are additionally limiting output on WAN zone only. This means that the first filter will show the logs for all zones, including internal zones, while the second filter will only show logs for WAN zone. This also means that if the threat originated inside of your organisation, it will not be filtered with the second log filter, and it will show up by using the first filter. Of course, filters can be adapted to include/exclude whatever you want.
Next, you can click on the dropdown arrow under the Filter field and you can use any of the pre-defined filters, or you can click on a Filter Builder option:
Filter BuilderThis will open a completely new dialogue where you can use a form to build your own filter, but it also allows us to take a look at the logs based on the applied filter:
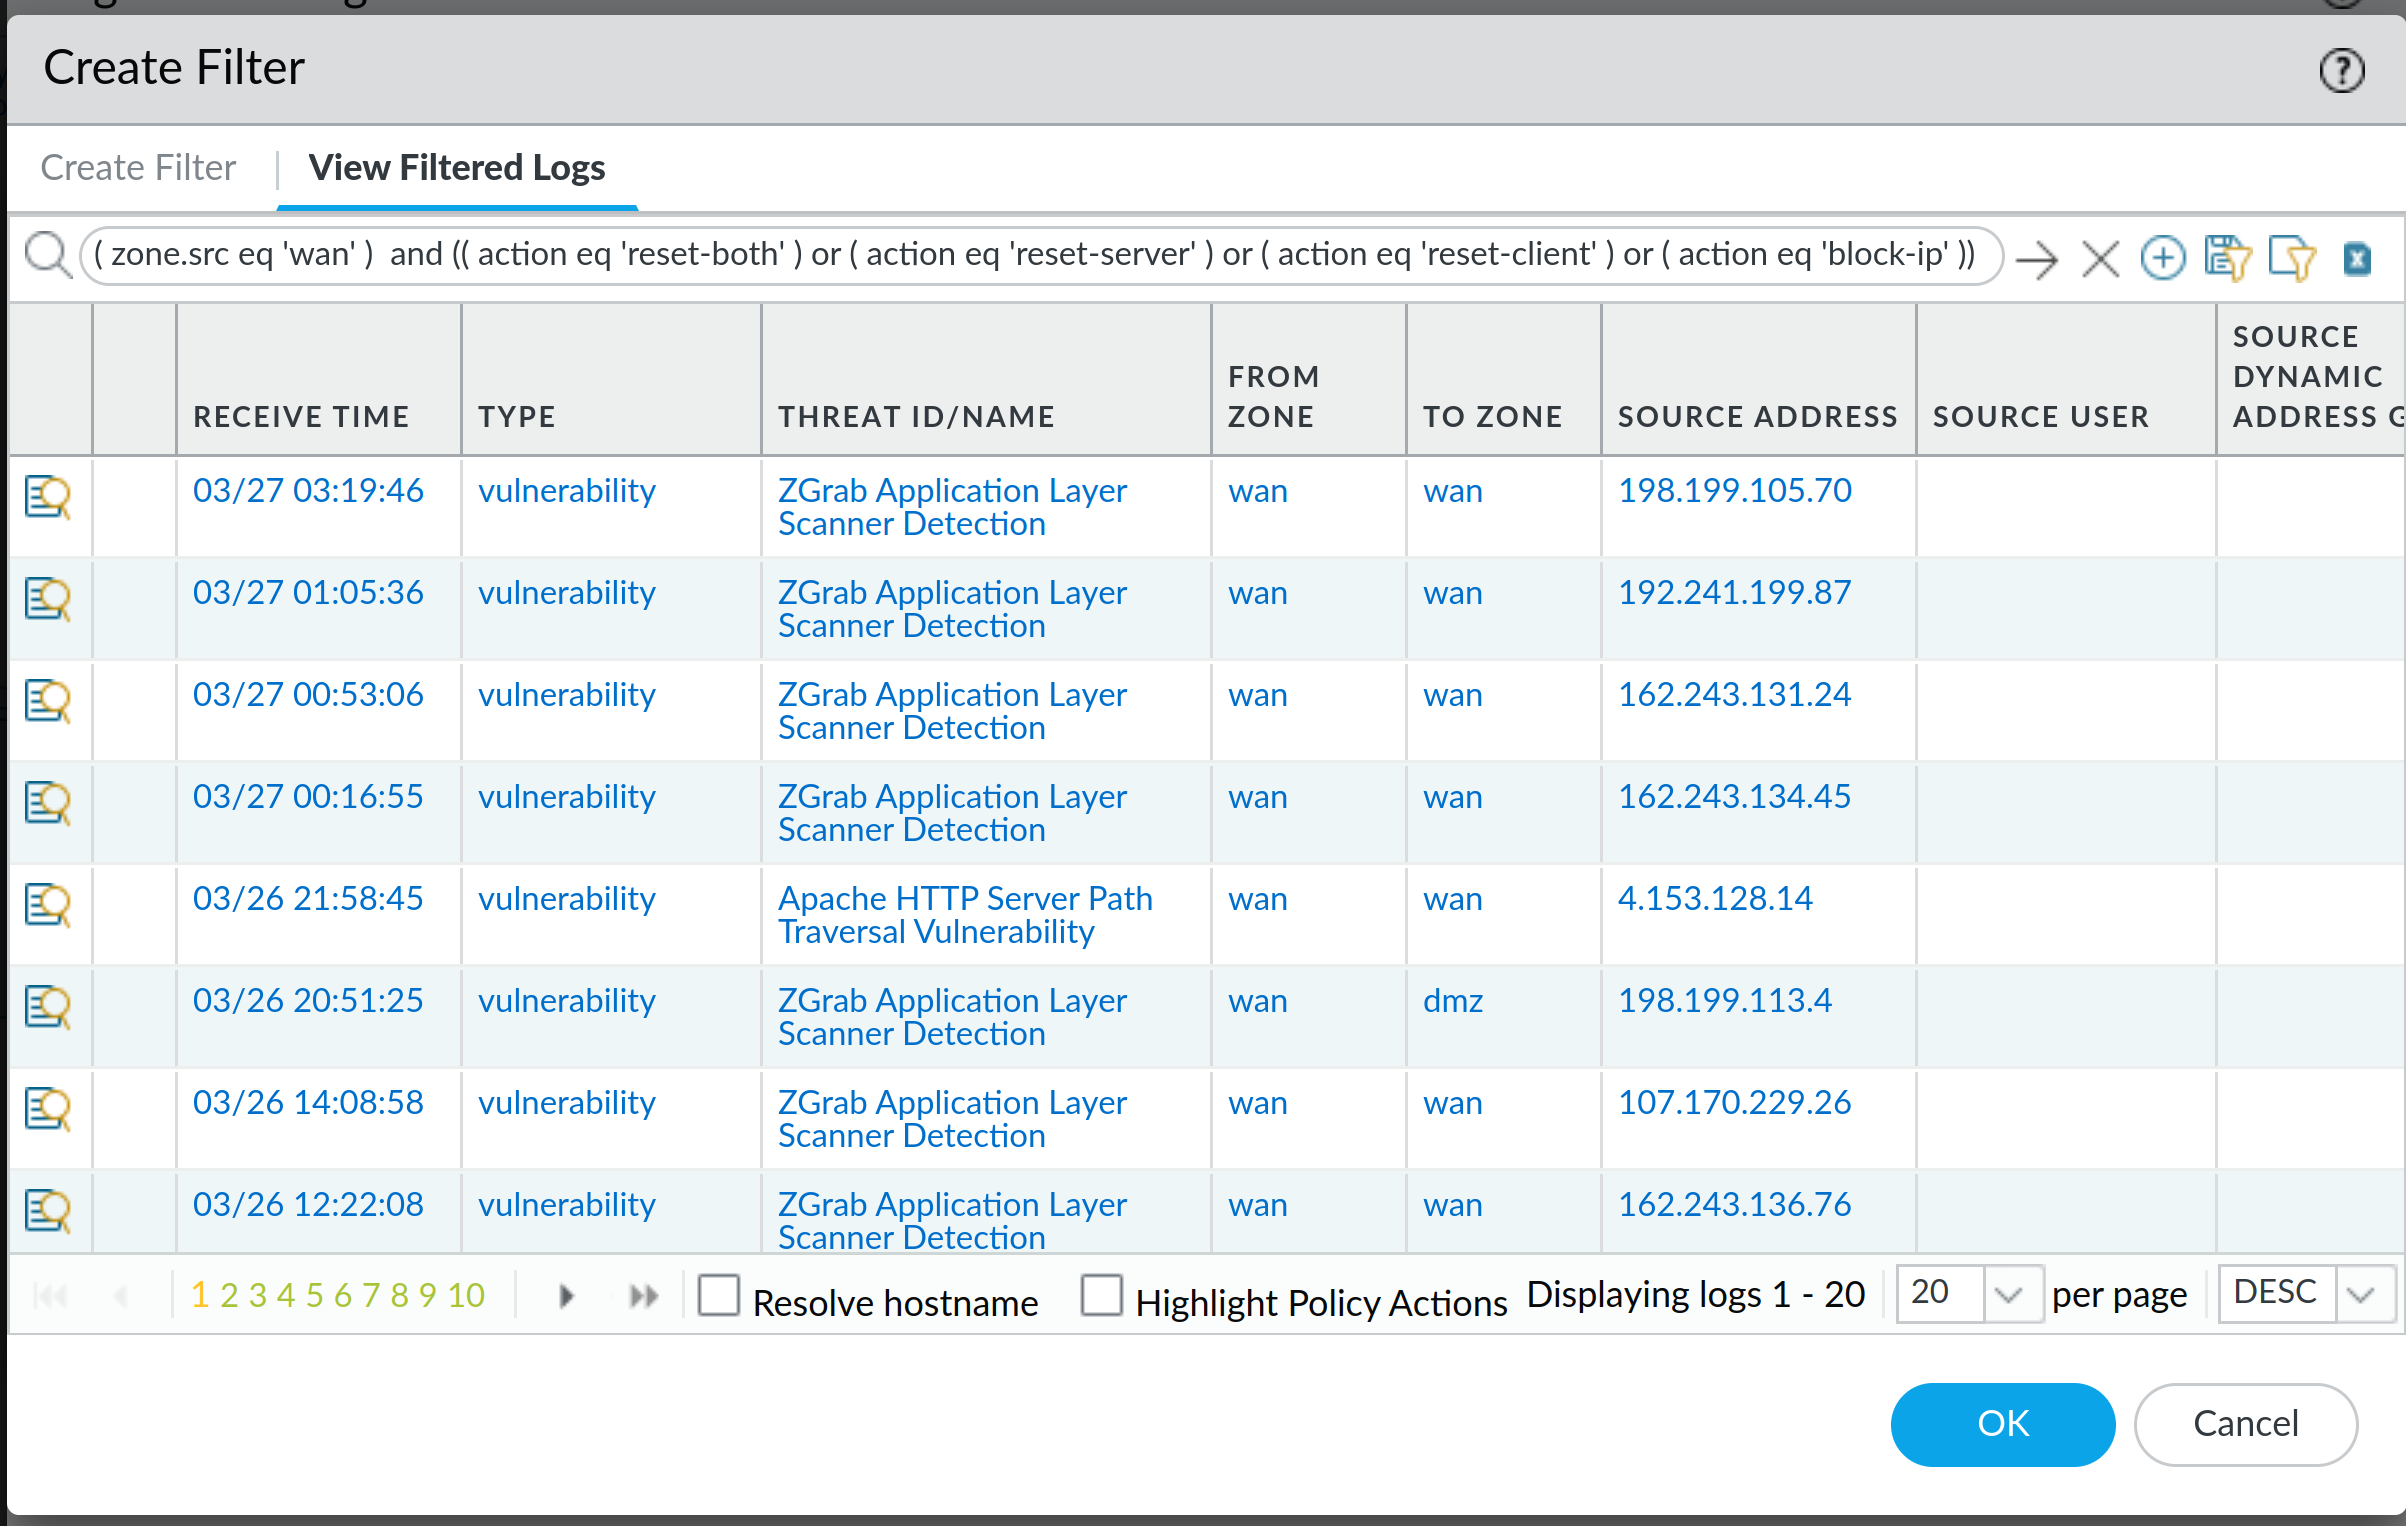
Please note that View Filtered Logs does not use your view settings (if you re-arrange columns or show/hide certain columns) that you may have under Monitor -> Threats.
Once you're satisfied with the filter, it's time to actually apply an action - we do that by using Built-in Actions section under the Log Forwarding Profile:
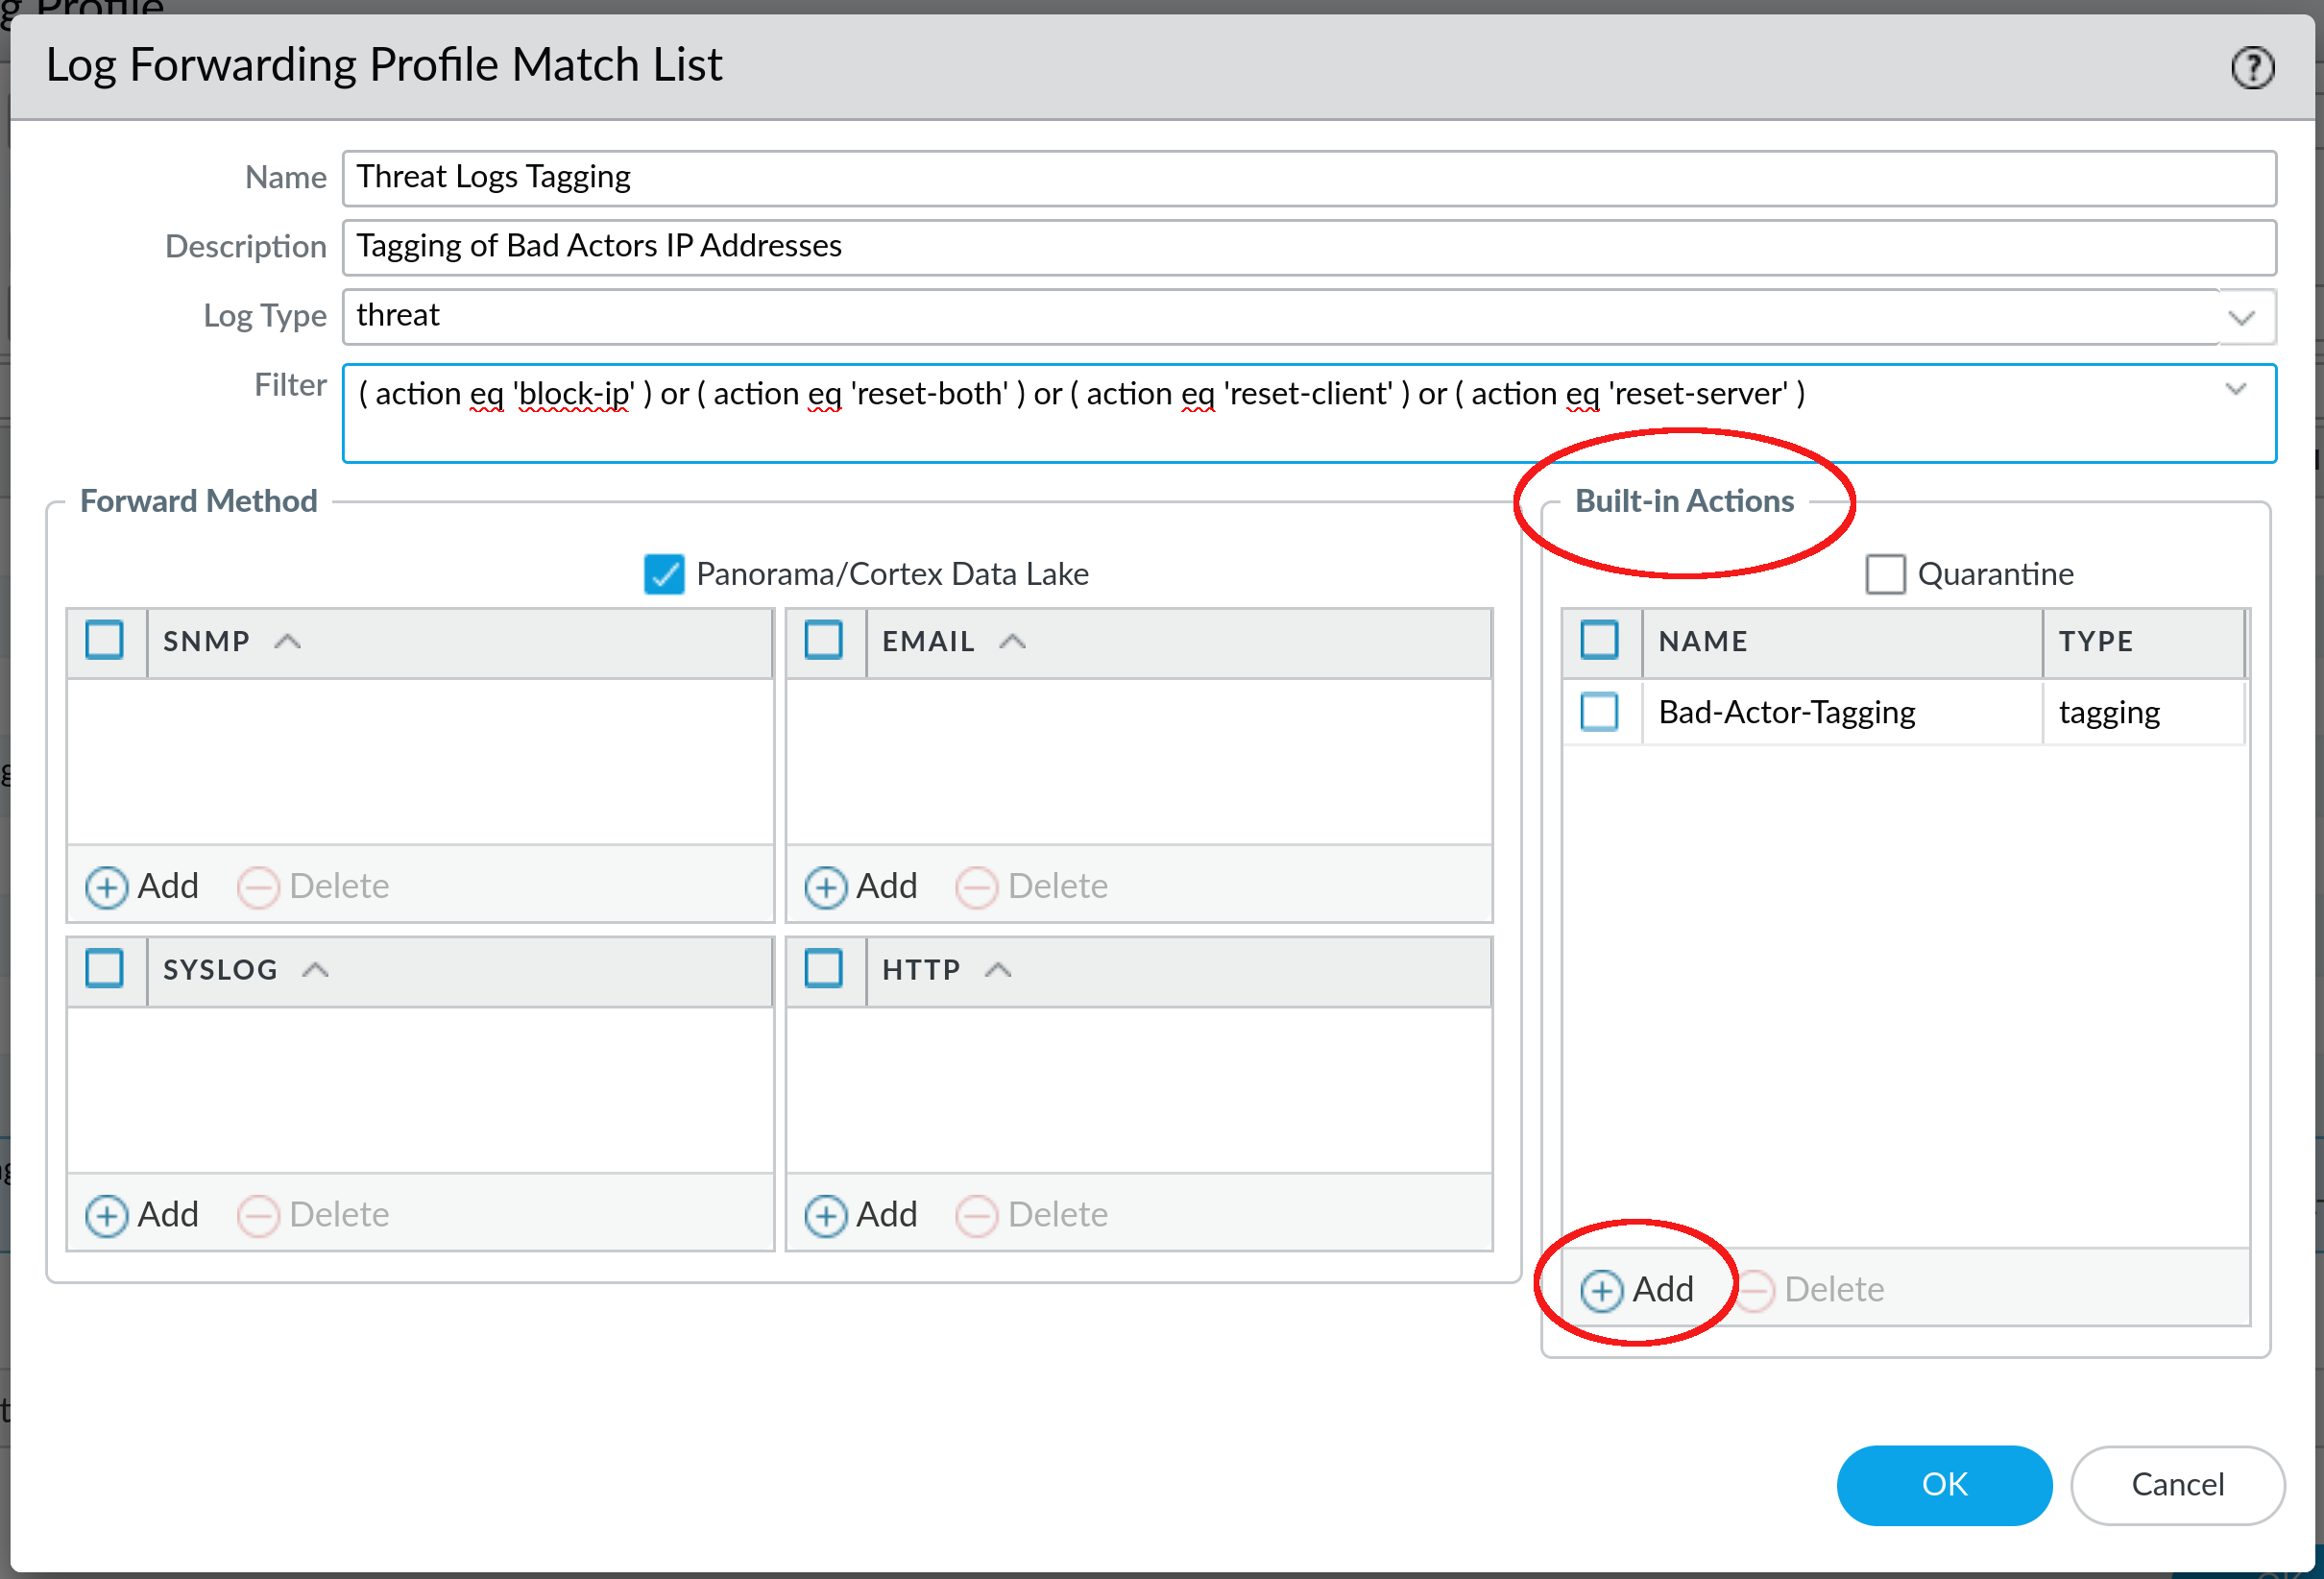
In my case I already have a built-in action, but if you press Add, you will be able to add one as well. This is where the magic actually happens:
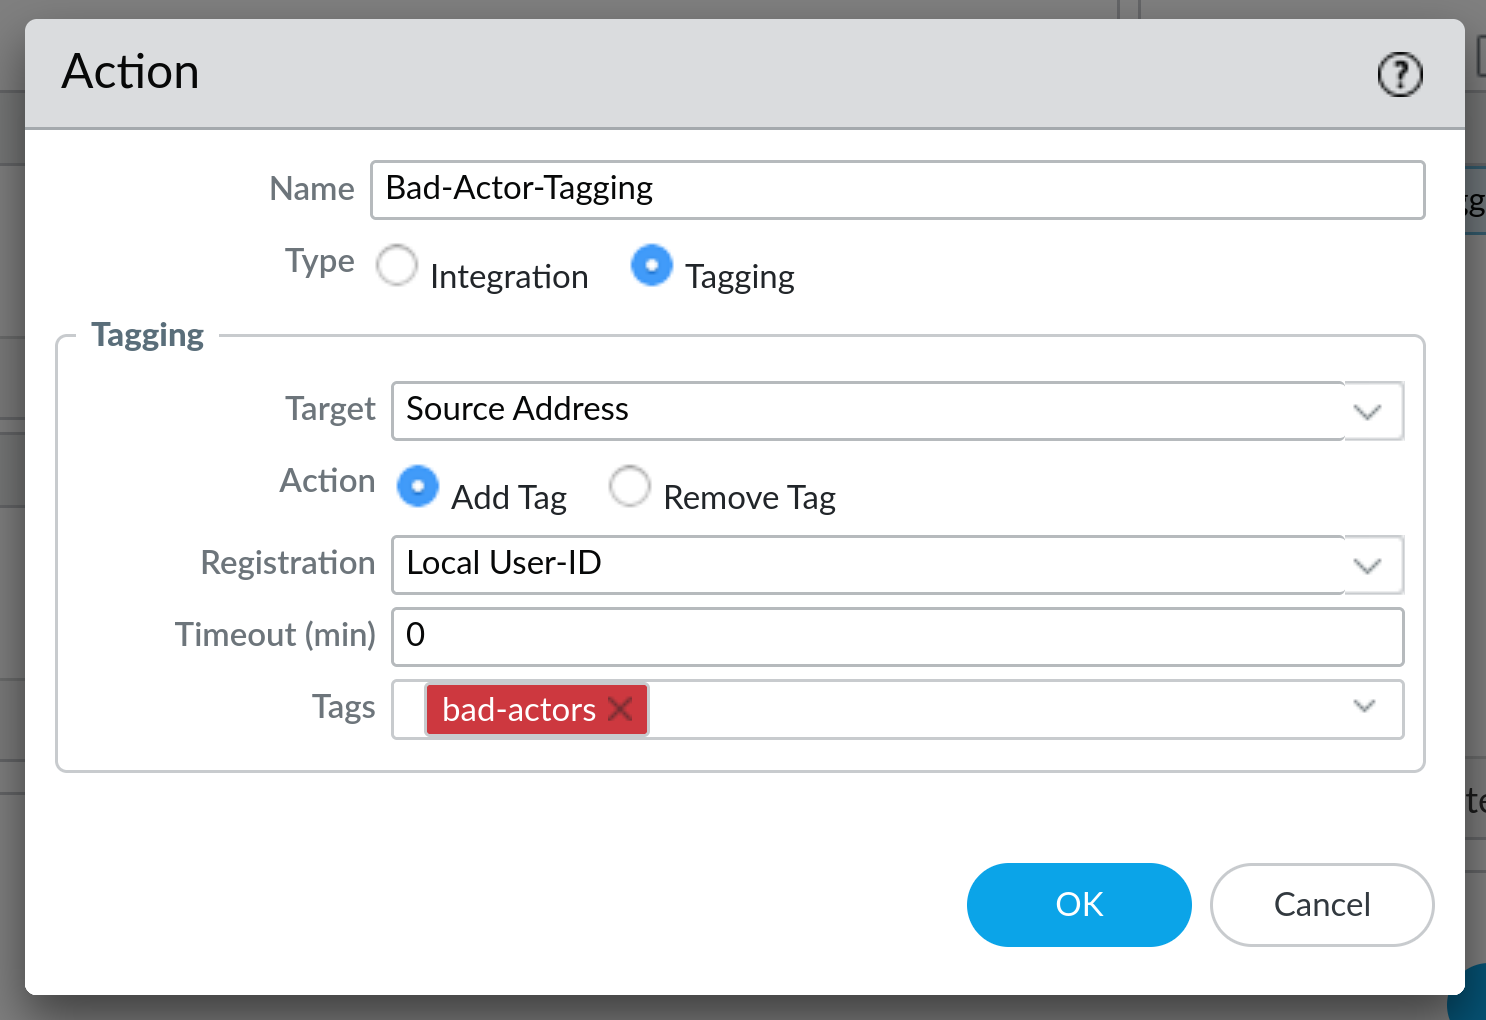
As you can see here, we provided a name of the Action (Bad-Actor-Tagging) and decided that we want to tag Source Address. IP-tagging is part of the User-ID technology of the Palo Alto firewall, so we will use Local User-ID here (other options are Panorama User-ID for Panorama-integrated firewalls and Remote User-ID). Timeout defines how long the tag stays in the system (0 means it will stay forever), and finally, tag will apply an appropriate tag to the IP address, in this case bad-actors.
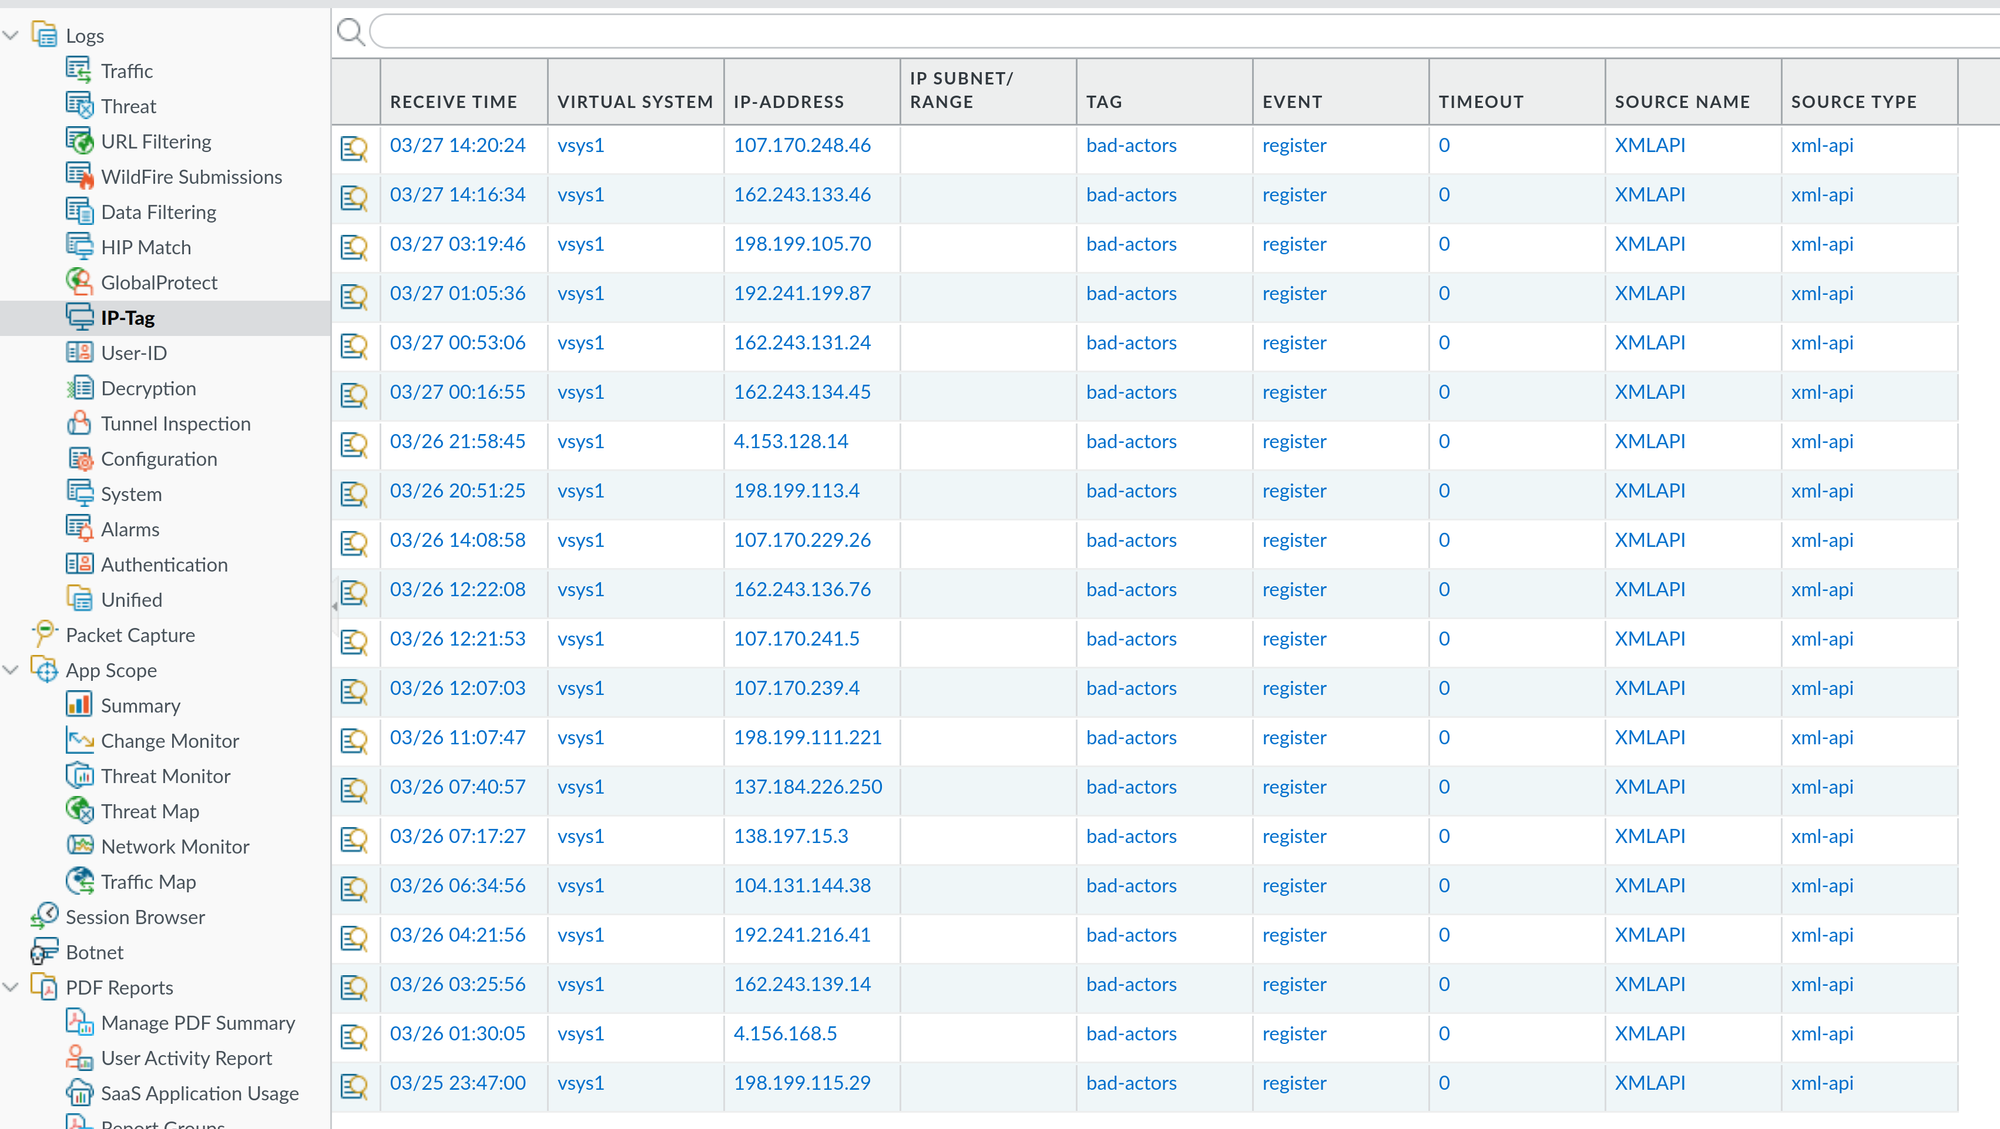
Once this is set up, and if the Log Forwarding Profile is already applied to your security policies, the only thing left is to commit the changes to the firewalls. After that, you should start seeing the tags being applied to anyone that is identified by the treat engine of the firewall where the resulting action is block-ip, reset-both, reset-client or reset-server (under Monitor -> Logs -> IP-Tag):
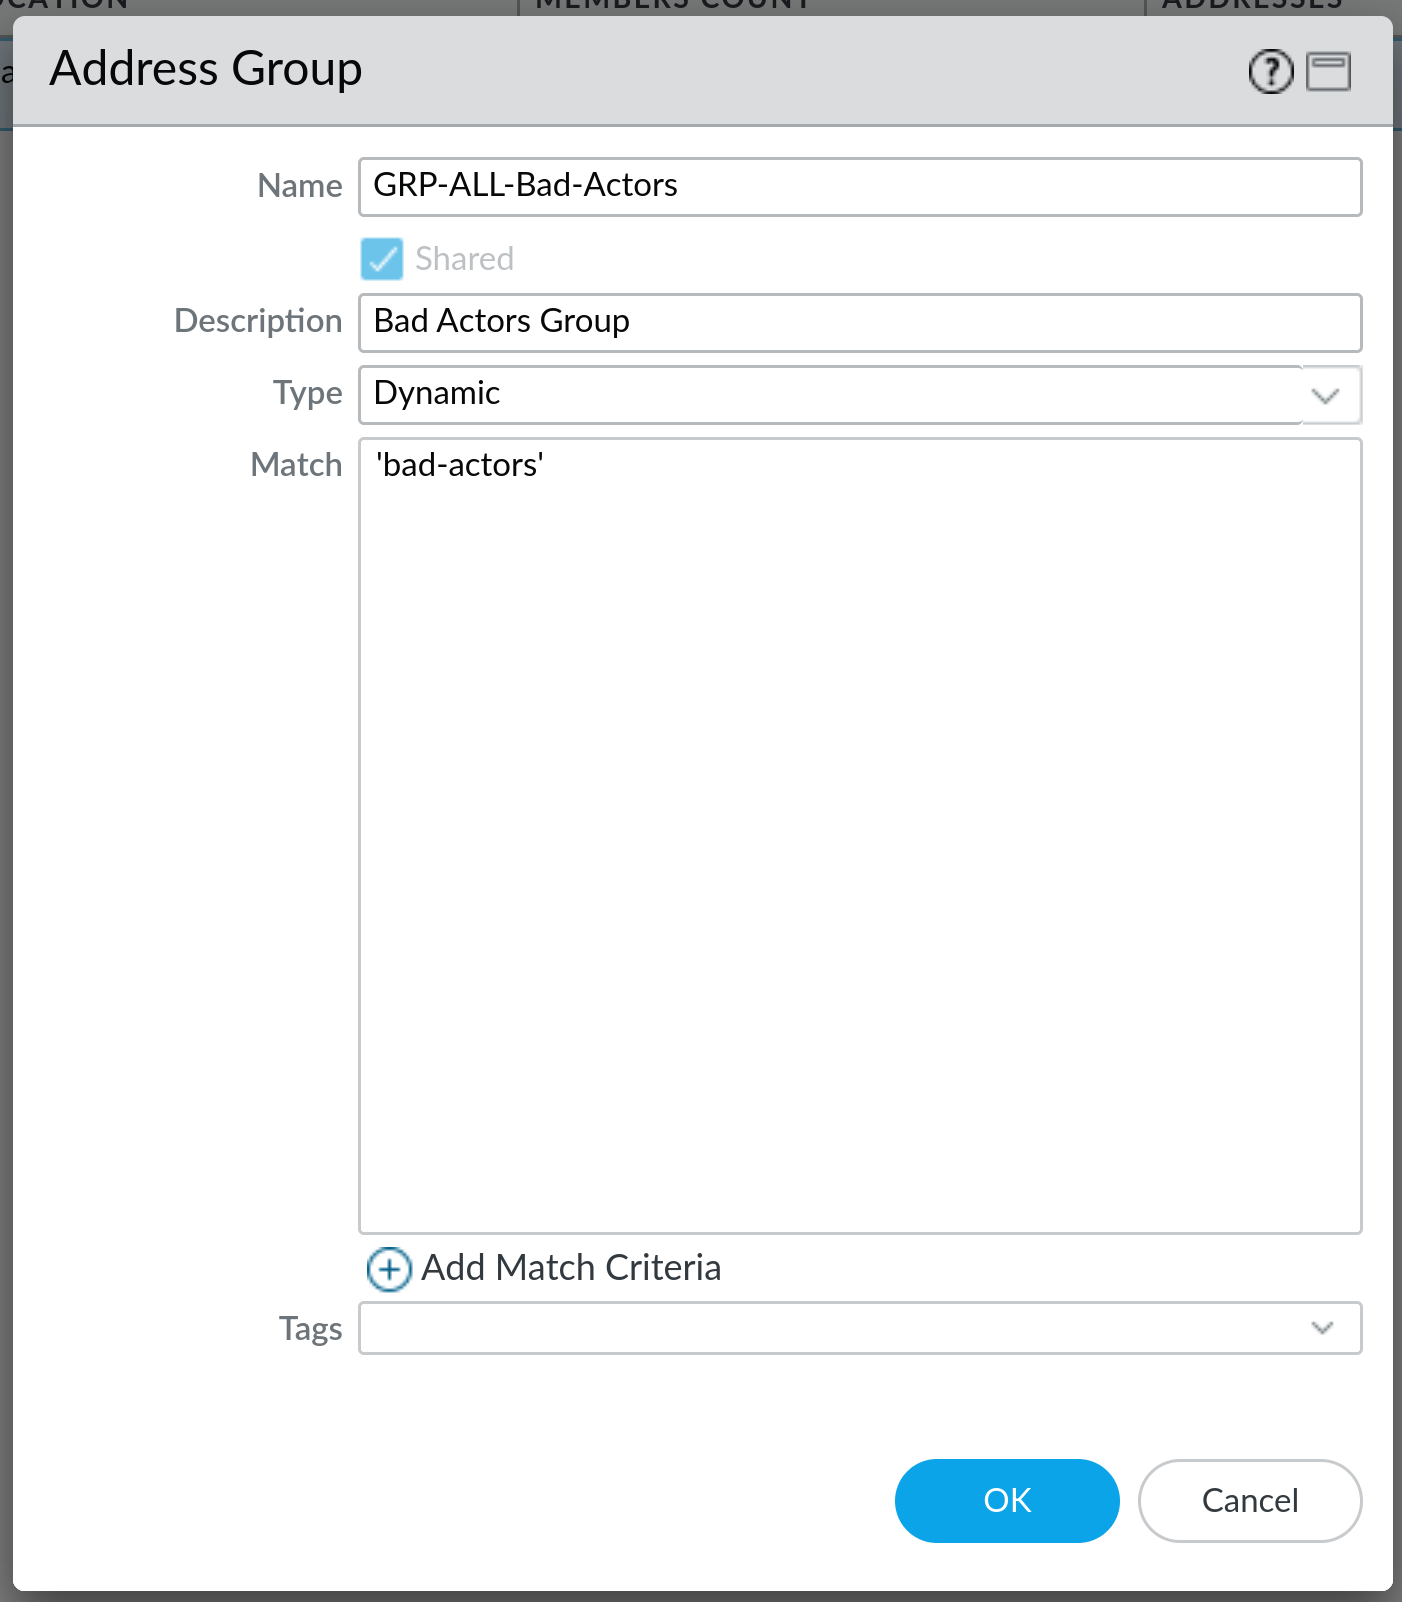
Now, once the tags are applied, we can use those IP addresses in our Address Groups - create a new group and set the type to Dynamic - this is the important part. Next, set the match to your tag name (bad-actors in my case) and click on OK. You now have a working dynamic Address Group that will be populated with IP addresses that are tagged by the firewall with bad-actors tag:
You will need to create an appropriate security policy first that uses this object, something like this:

Once you create the policy and commit the change, you can go back under Objects -> Address Group, find your dynamic address group for bad actors and click on more...:

more... to display IP addresses in the dynamic address groupAs you can see, there is already quite a number of IP addresses that are in this dynamic address group:
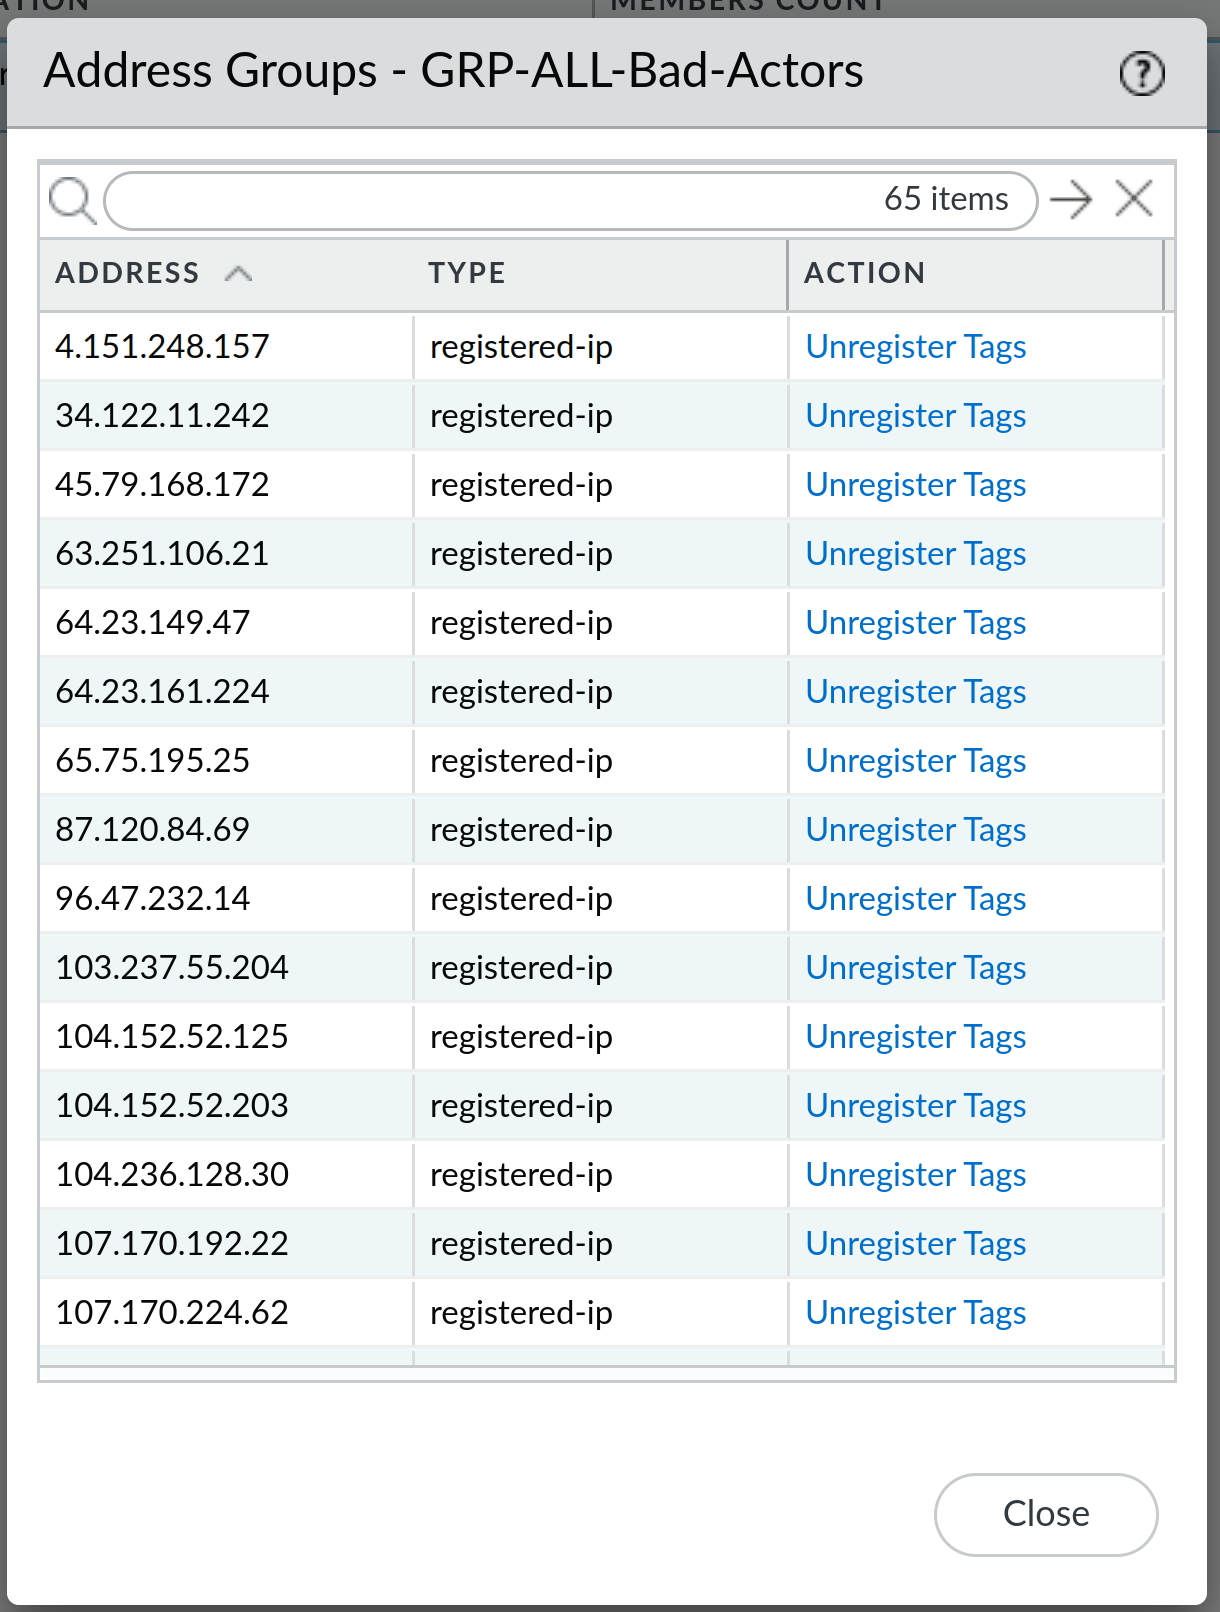
All of these are IP addresses that were previously identified by the Palo Alto Threat engine doing something that they shouldn't have been doing. Since it's highly unlikely that these are legitimate IP addresses, I have no problems with denying them any kind of access to the firewall (and services behind the firewall) in the future - that is what the Drop rule on top of my policy does. Basically, this means that these IP addresses will now never have a chance to reach any of the services behind the firewall, as they are implicitly denied (dropped) - no more scanning from them, zero-day vulnerabilities, etc. This of course means that you have your firewall patched to the latest preferred release so that the firewall itself is not vulnerable to attacks.
Unregister Tags under this view.There are other possibilities where you can utilise IP-tagging as well - you can use it on your internal network - for example, if you have sensitive information that only authenticated users are allowed to access, but you still see other IP addresses trying to access that service, you could tag them and create a new group for them where you limit their access explicitly. It's up to you to decide on how to use IP-tagging, but possibilities are very extensive.
Member discussion