Palo Alto SAML SSO with authentik
Palo Alto network appliances natively support SAML and can leverage providing identity to a SAML Identity Provider. This can be very useful in multiple ways - granting access to admin GUI interface, authenticating users for GlobalProtect (remote access VPN) and Captive Portal user authentication are just some that come to mind.
In this article, I will show you how to configure Palo Alto Firewall to provide admin GUI access to users with the help of authentik. You can read more about how to do initial setup of authentik here:

With that out of the way, let's start with authentik first. We need to configure two elements here - an Application and a Provider. This is the naming convention that authentik uses, and since we are going to use authentik in following posts, please keep in mind that these terms are related to authentik - other IdP's may use different naming conventions!
There is a couple of pre-requisites that we have to take care of first in authentik. If you followed my previous post about setting up your own authentik, you will already have one with at least one user. We will expand that by adding one more element - a group. This will be required later on to successfully pass SAML attributes to the firewall.
So let's create the group first. Navigate to Directory -> Groups -> Create. You should be presented with a screen like this:
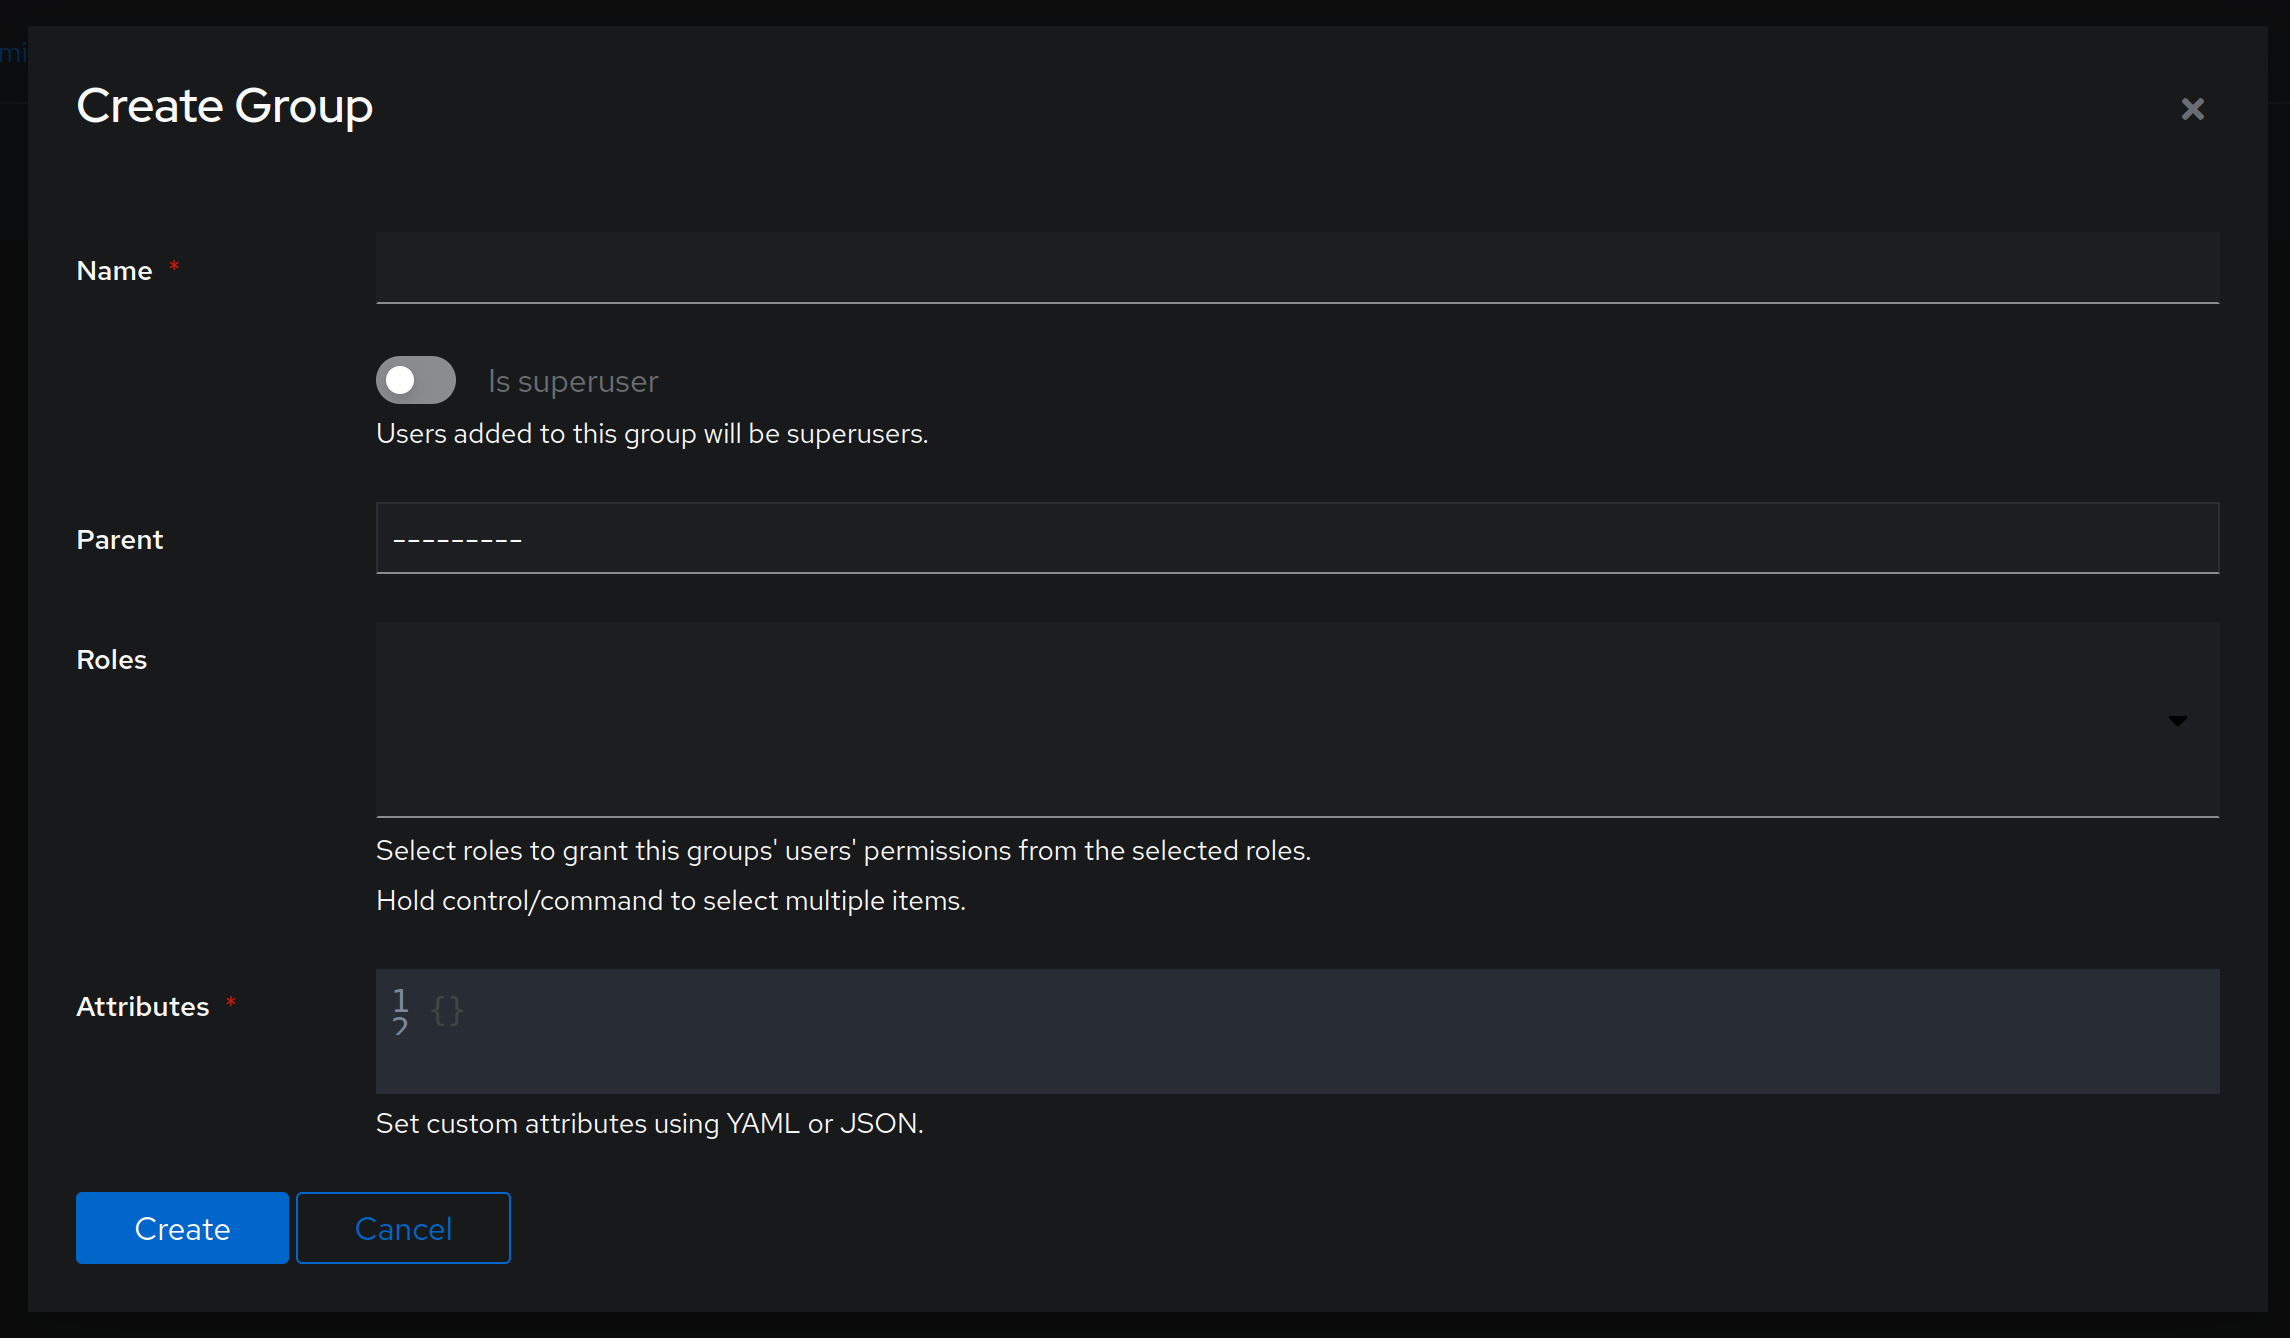
I will call this new group devadmin as it will only be associated with users that are device administrators. When done, click on Create and then click on the newly created group and select the Users tab. Click on Add existing user and add your previously created user.
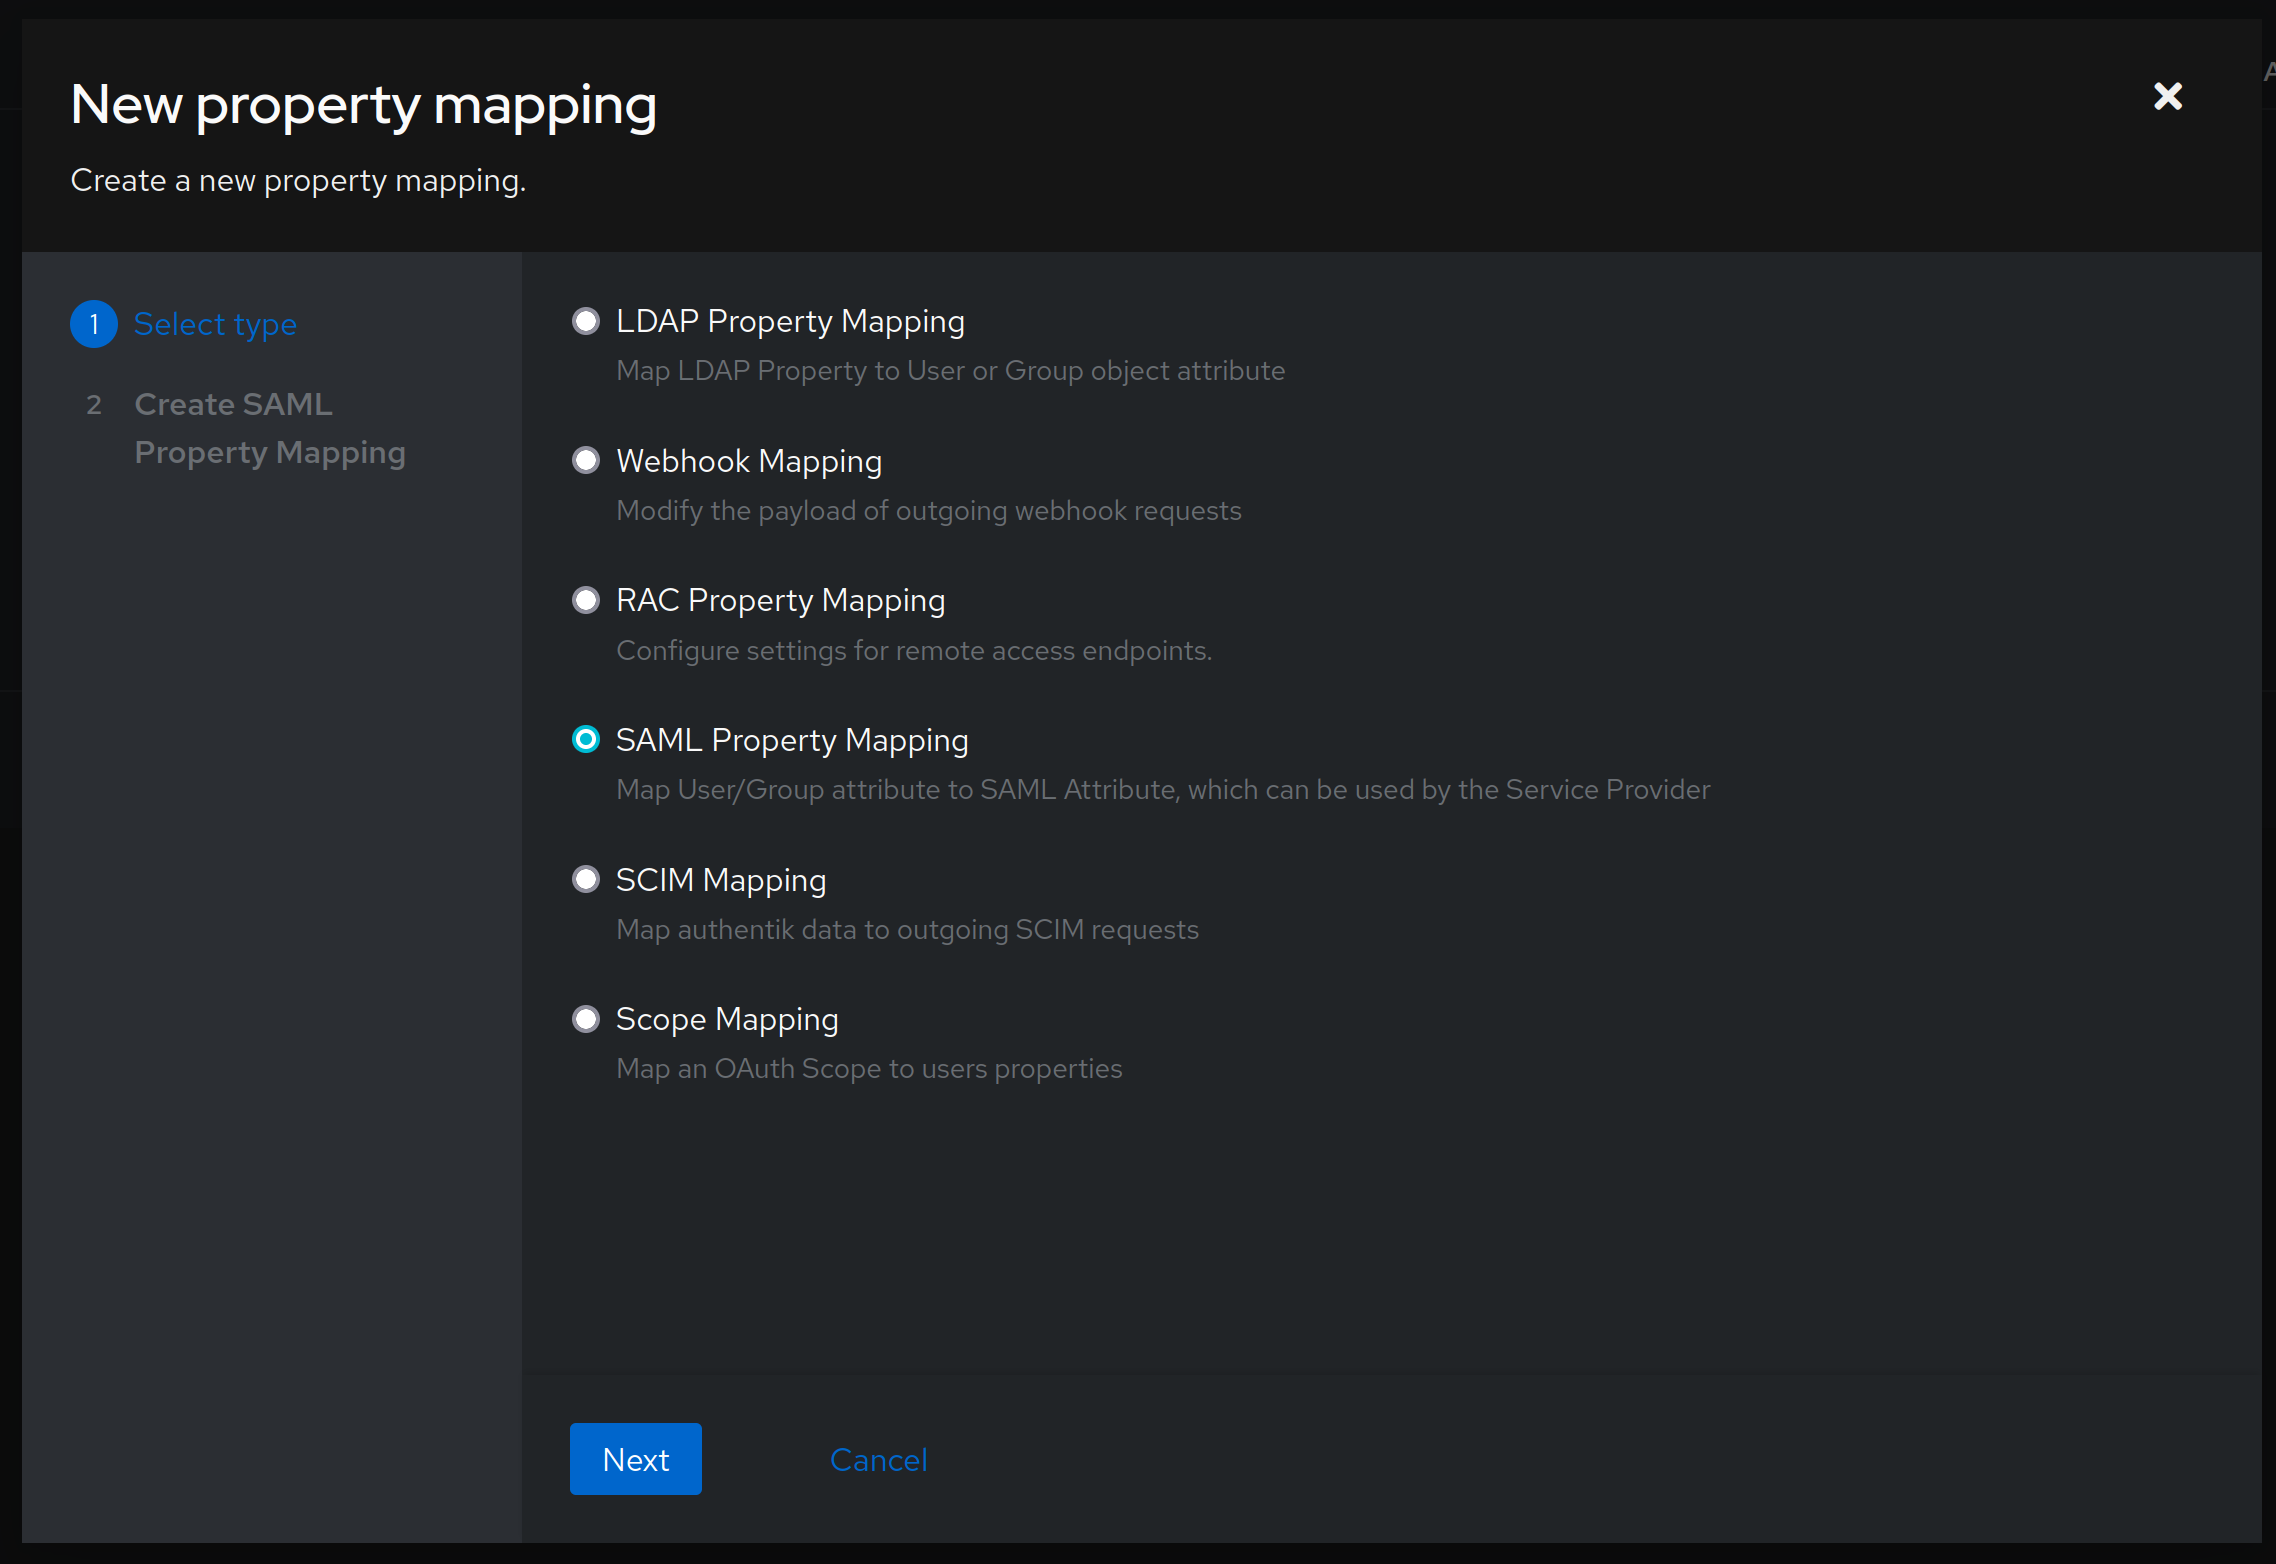
authentik is that you can use Ctrl key to select multiple options. Only ones that are marked are actually associated with the object!We now need to create a property mapping for SAML to identify if user belongs to a certain adminrole. To do that, click on Customization -> Property Mappings -> Create. In the first screen choose SAML Property Mapping:
Click Next and in the next screen fill out the details like this:
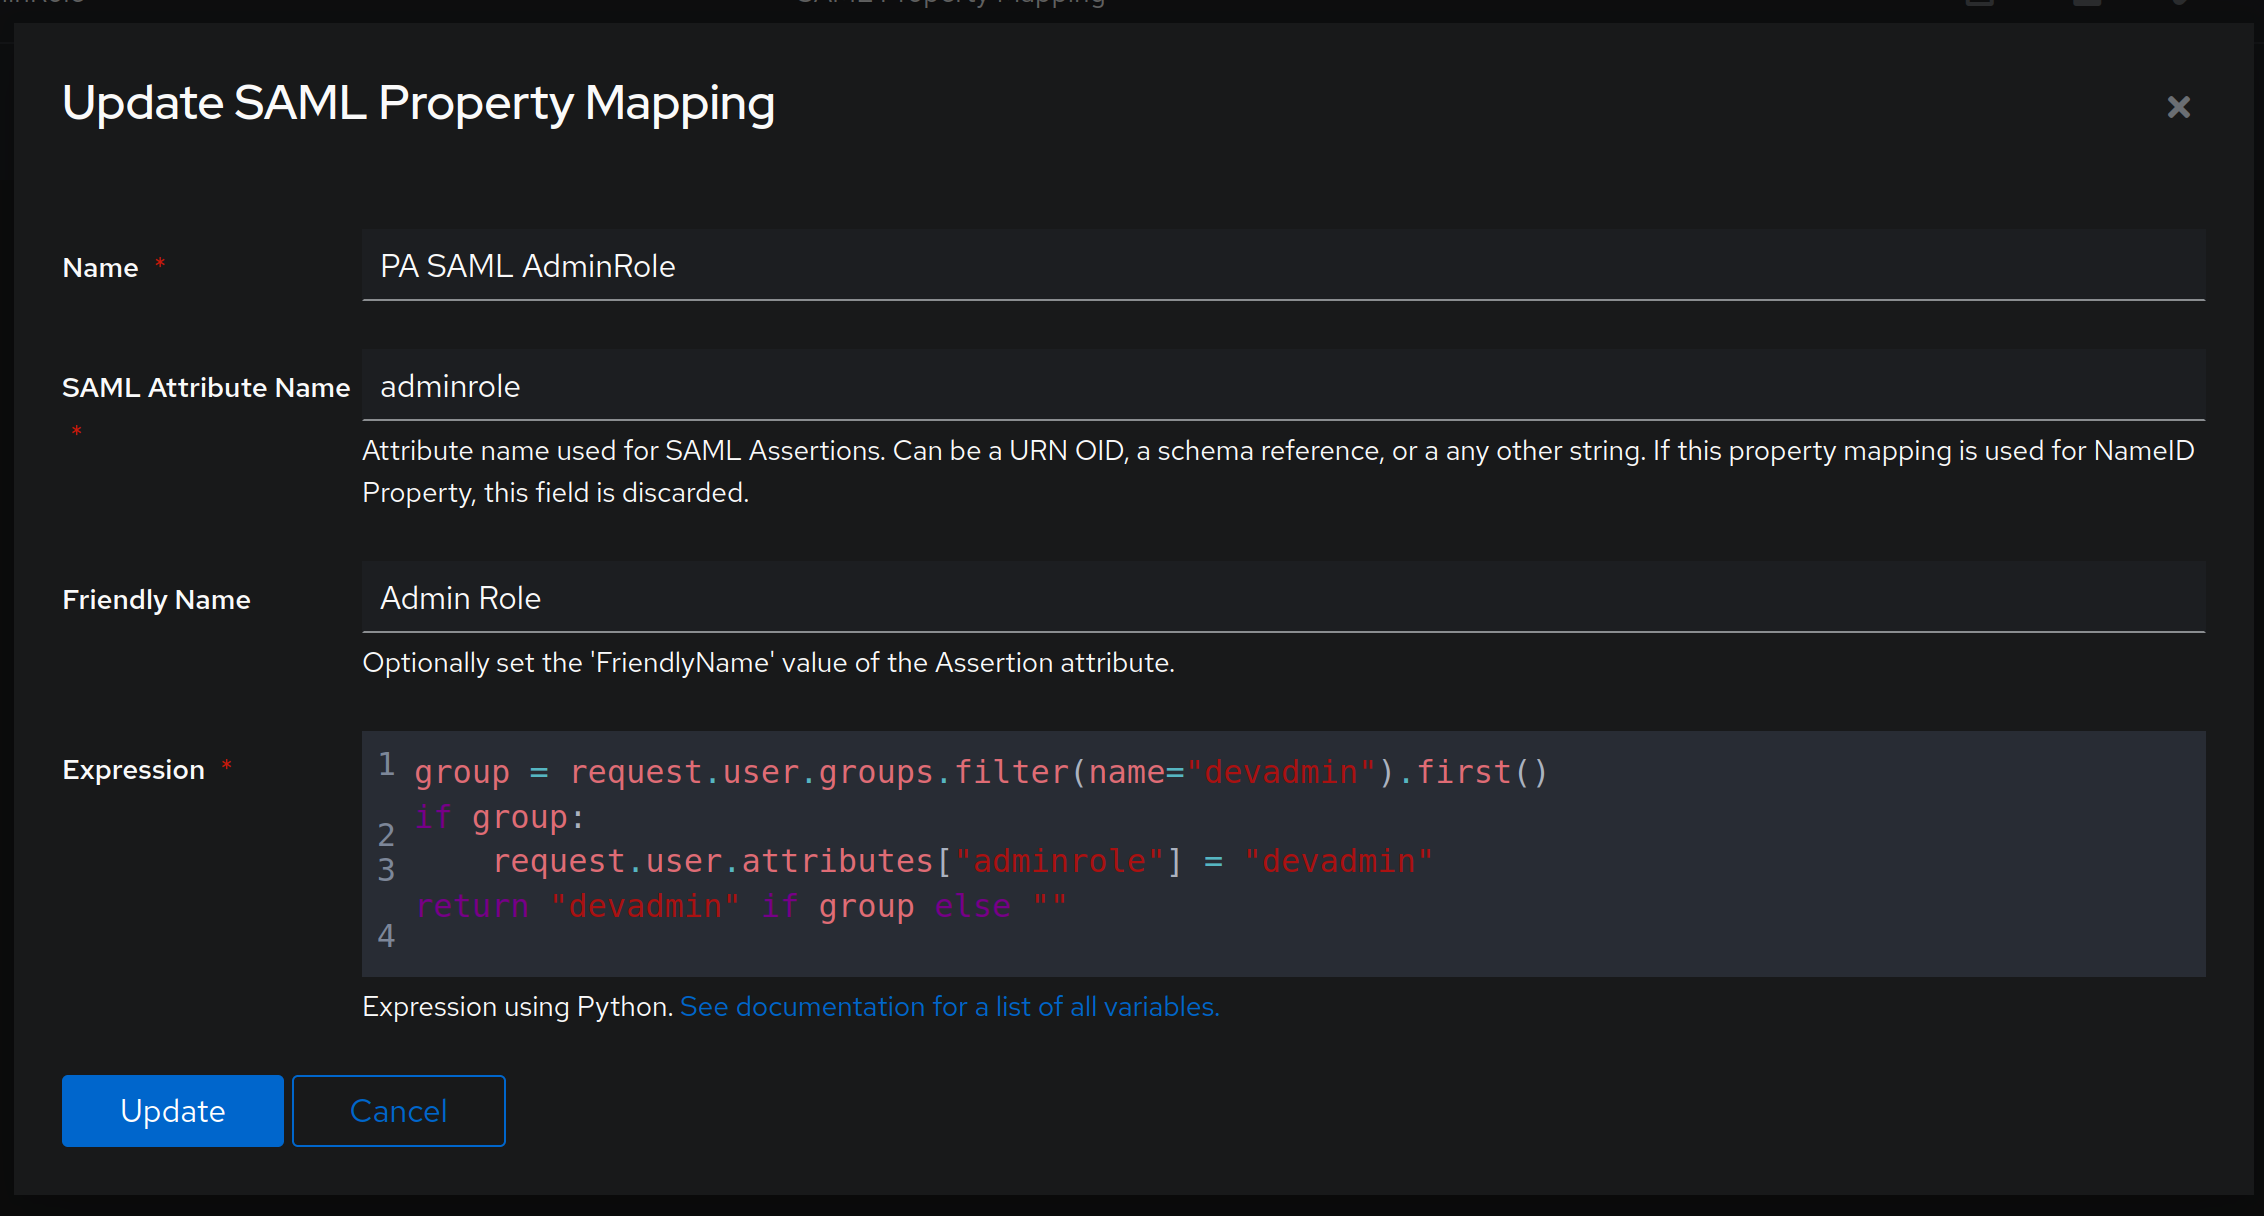
SAML Attribute Name that should correspond to whatever Palo Alto appliance expects - in this case, that would be an adminrole attribute, while the second one is an expression written in Python that checks whether user belongs to a group devadmin and associates the user with appropriate adminrole if they belong to it.The code that I used here is:
group = request.user.groups.filter(name="devadmin").first()
if group:
    request.user.attributes["adminrole"] = "devadmin"
return "devadmin" if group else ""
What this code does is that it checks whether user belongs to group devadmin - if they do, it dynamically sets the user's adminrole attribute to devadmin and it also returns the value of devadmin. We need to return this value as well, as it is expected as part of SAML Assertion when logging into the PA appliance. This is pretty nifty code that allows us to dynamically set the attribute of a given user, based on the group they belong to. You can additionally modify the code to check for other groups, in case you want to, for example, allow read-only access to certain groups.
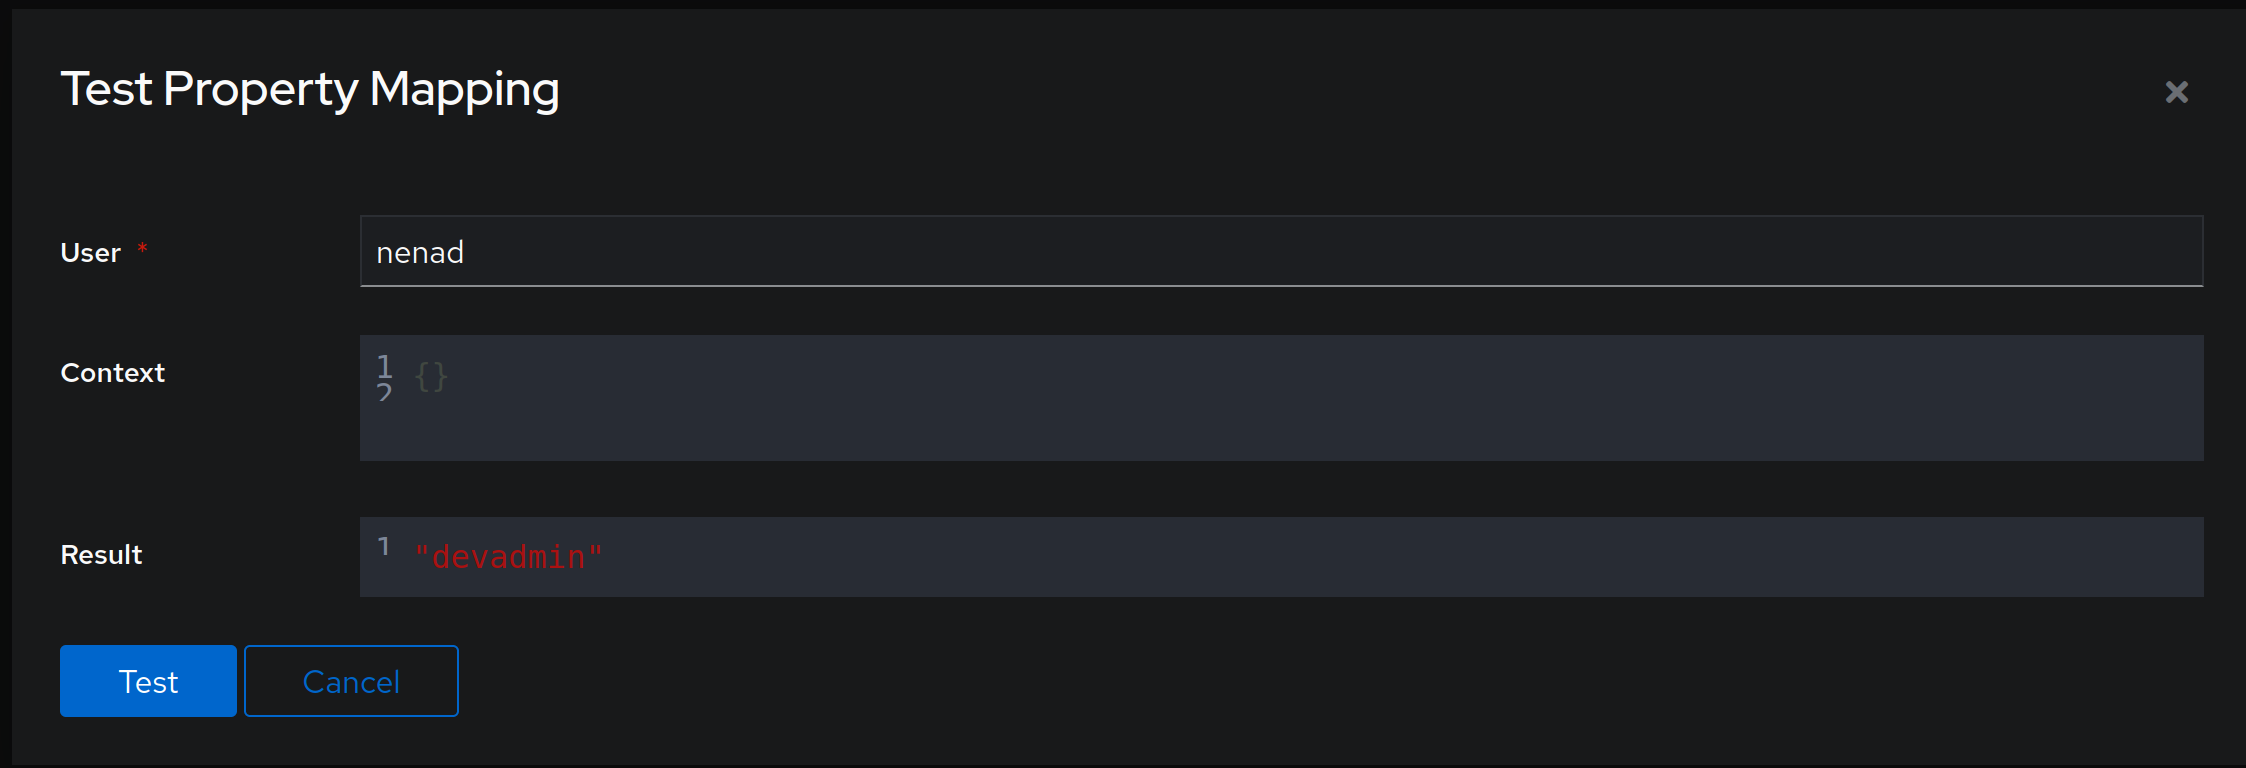
Finally, click on Finish and we now have a necessary attribute check configured. To test if everything went well, click on the right-most icon under Actions section (if you hover over it, a pop-up will show with the word Test):
We are now almost done with configuring authentik - the only thing left is to create our Application and a Provider!
Navigate to Applications -> Applications -> Create and fill out the form like this:
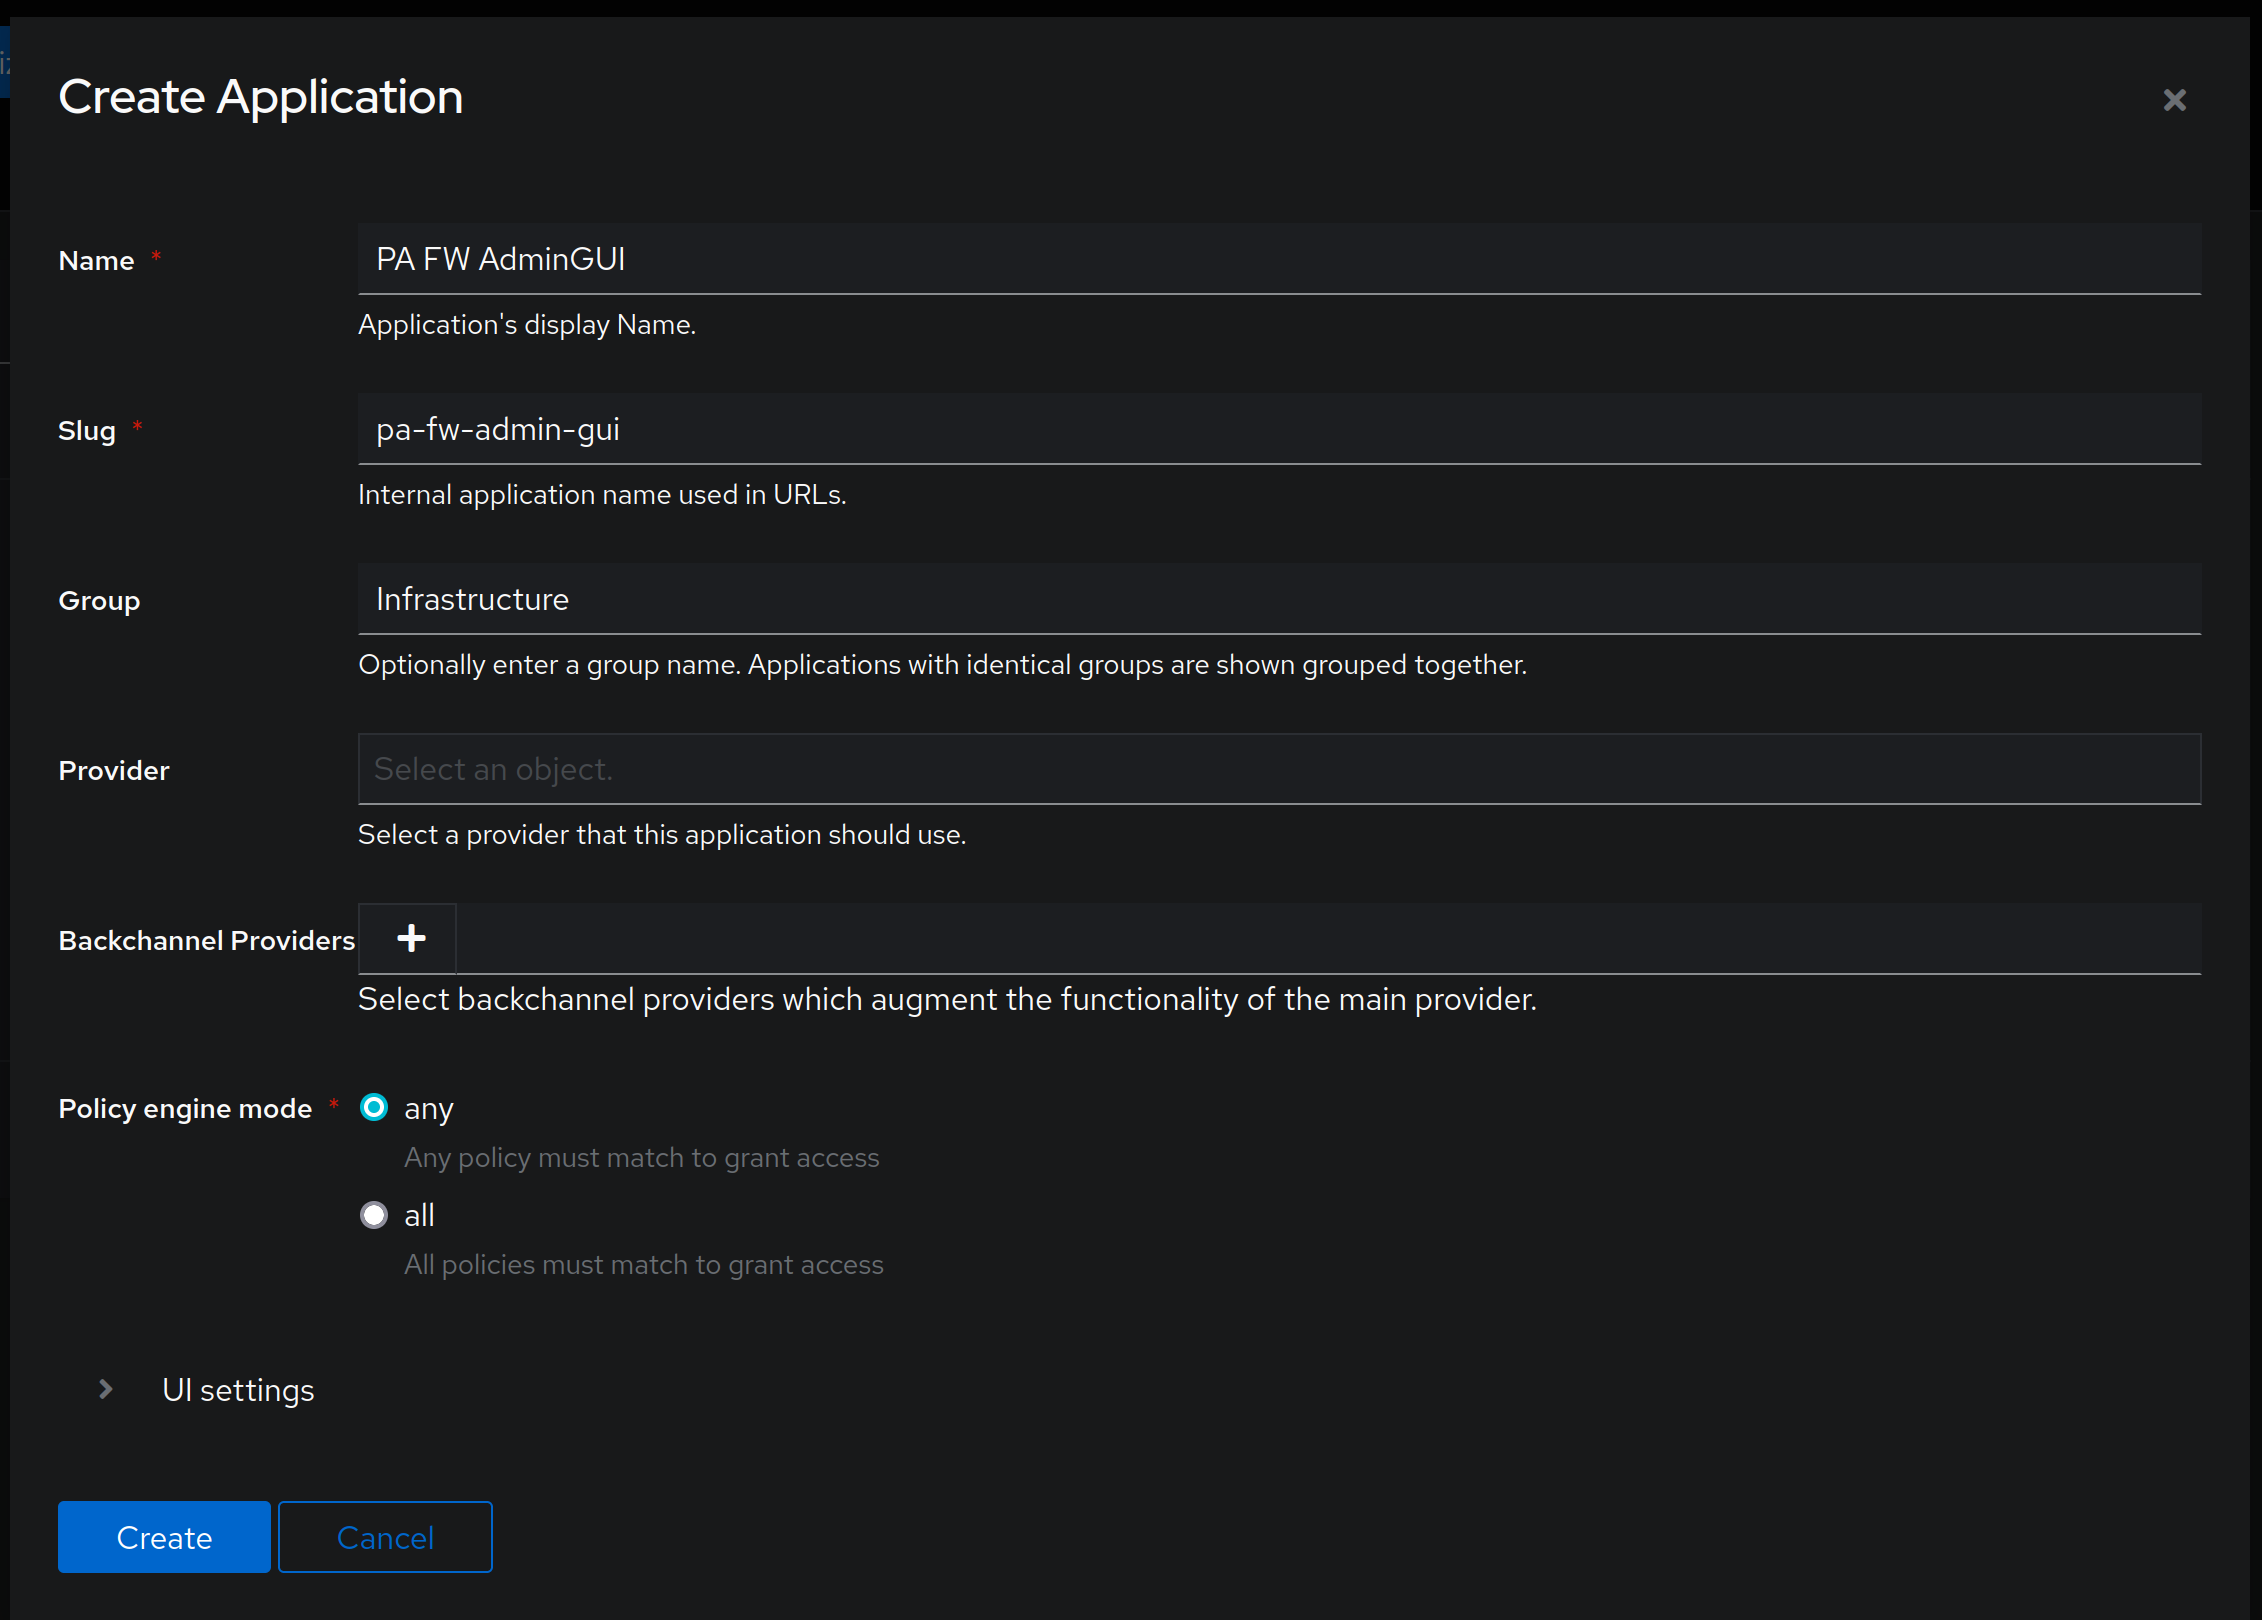
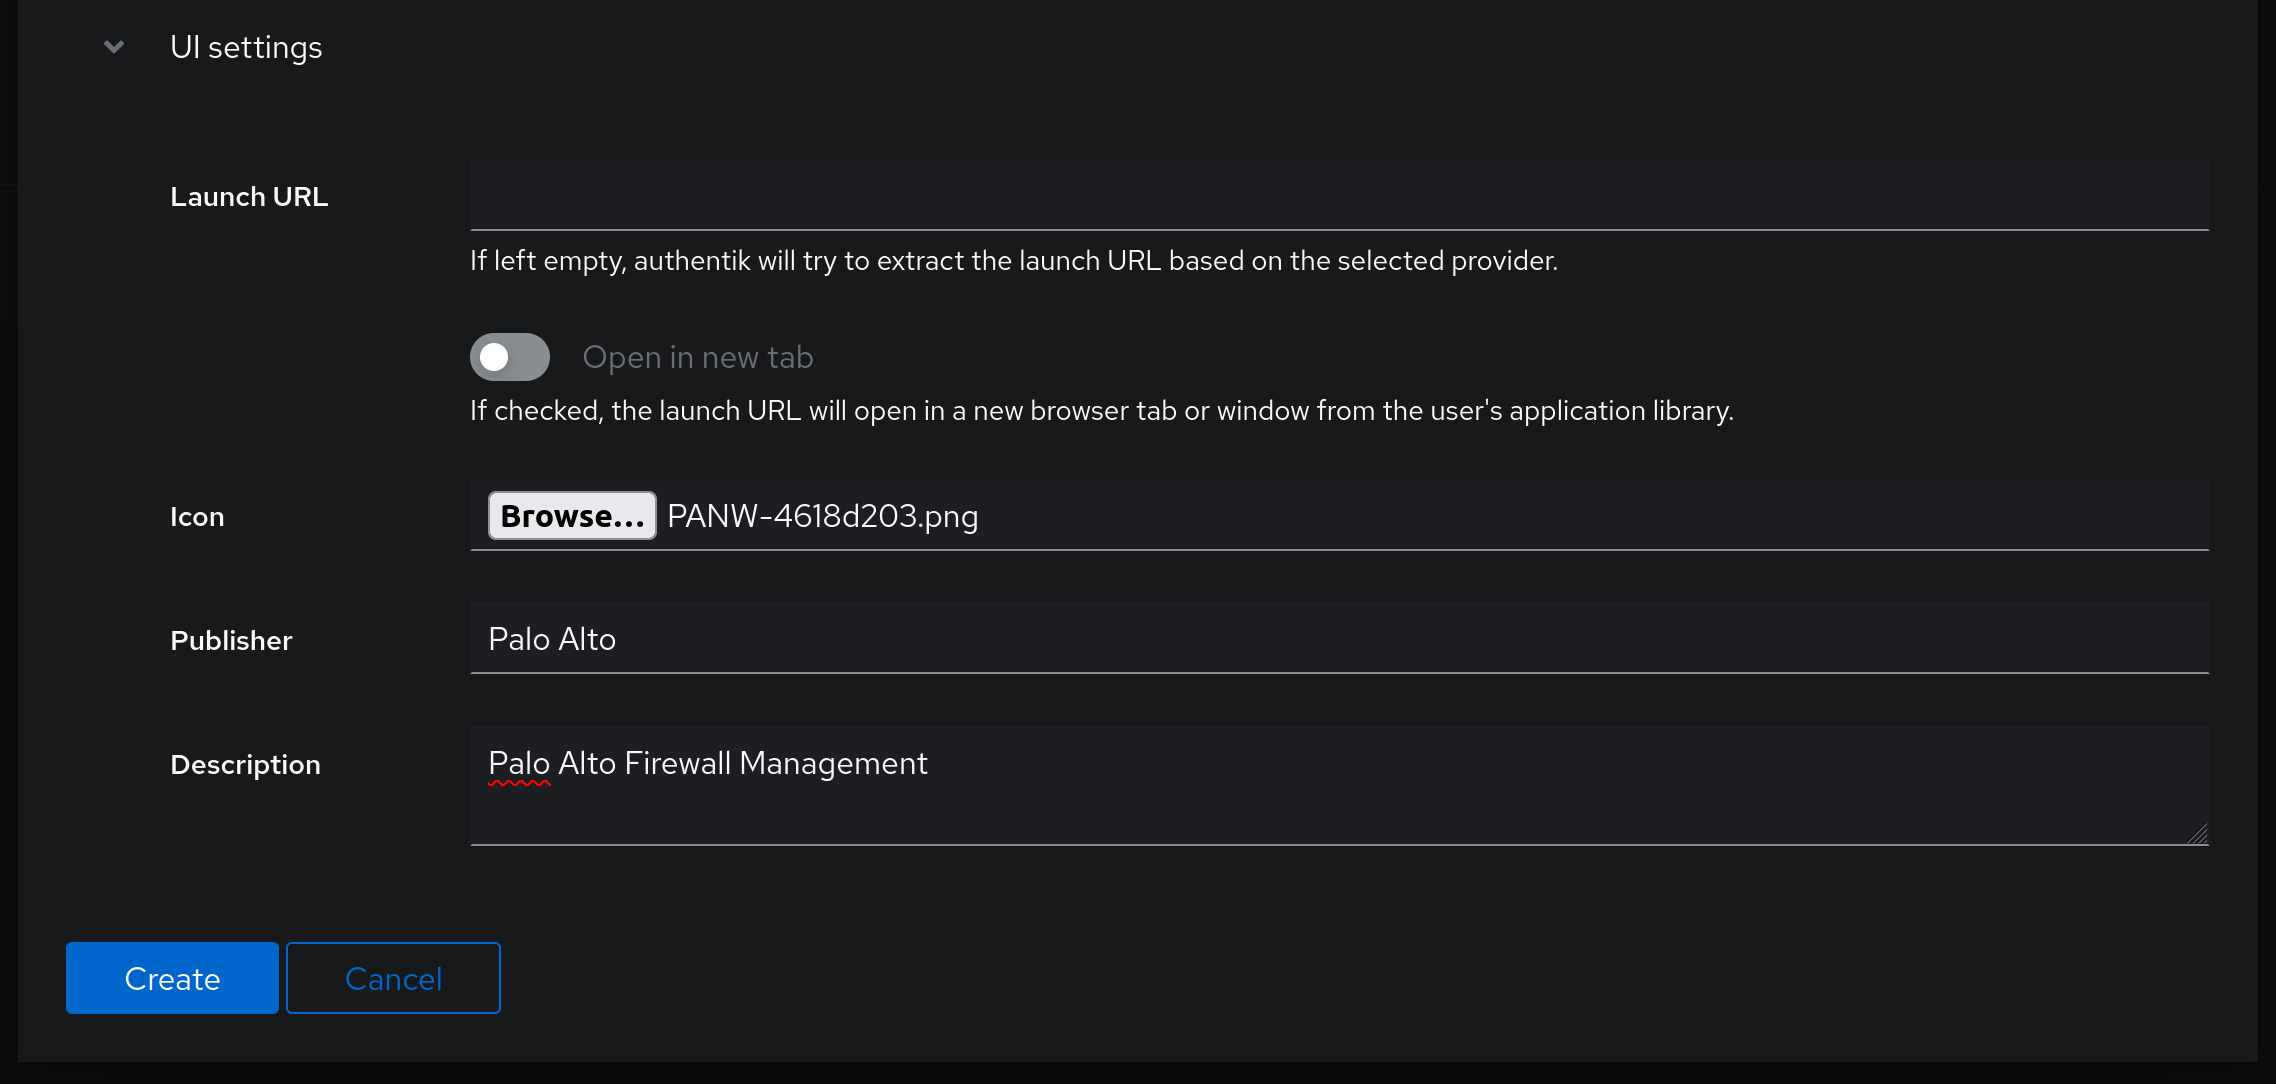
Assign a name to the application that will help you identify it. Slug is mostly important for code aesthetics, as it will be shown in the URL, while the group will help you with grouping of applications in the User interface screen. Provider will be empty for now, as we still need to create one, while the UI settings are there pure aesthetics - if you want to associate an icon with the application, download an icon representing the application - in my case I just downloaded a Palo Alto Networks icon; publisher is there so that you know what vendor you're working with, and the description just highlights the usage of the application. Leave the Launch URL field empty. It should look something like this when you're done:
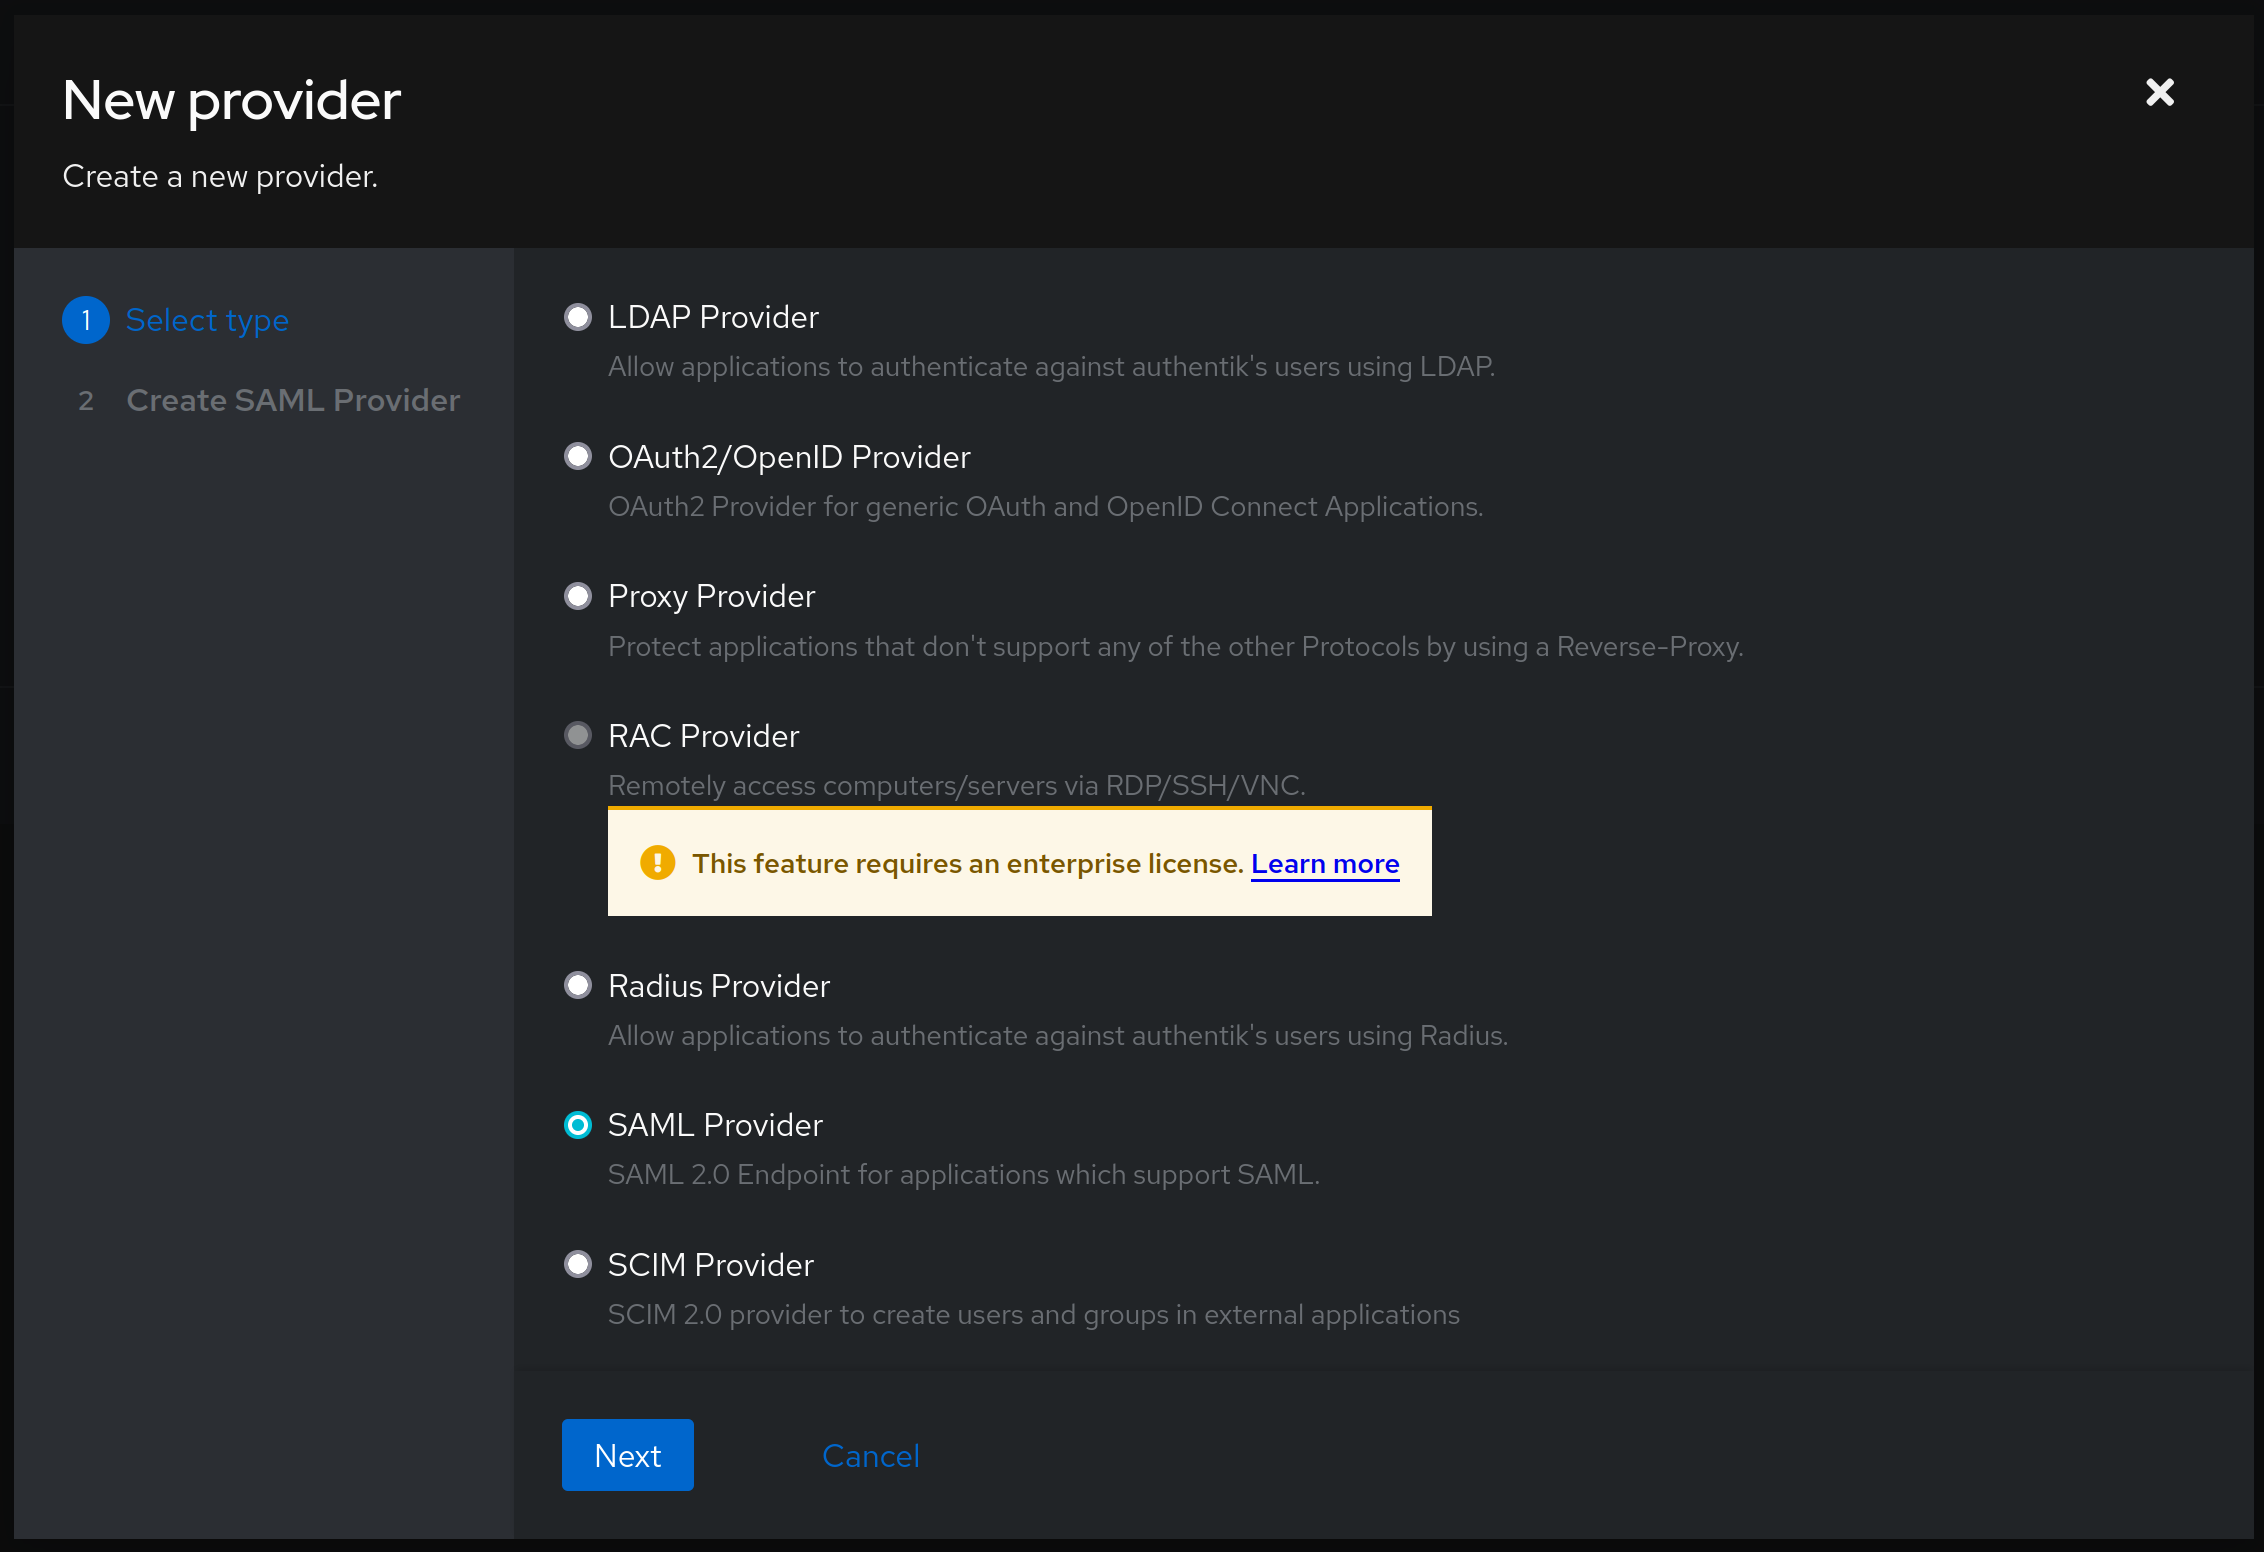
Finally, click on Create and move to the Applications -> Providers -> Create and select SAML Provider on the first screen and click Next:
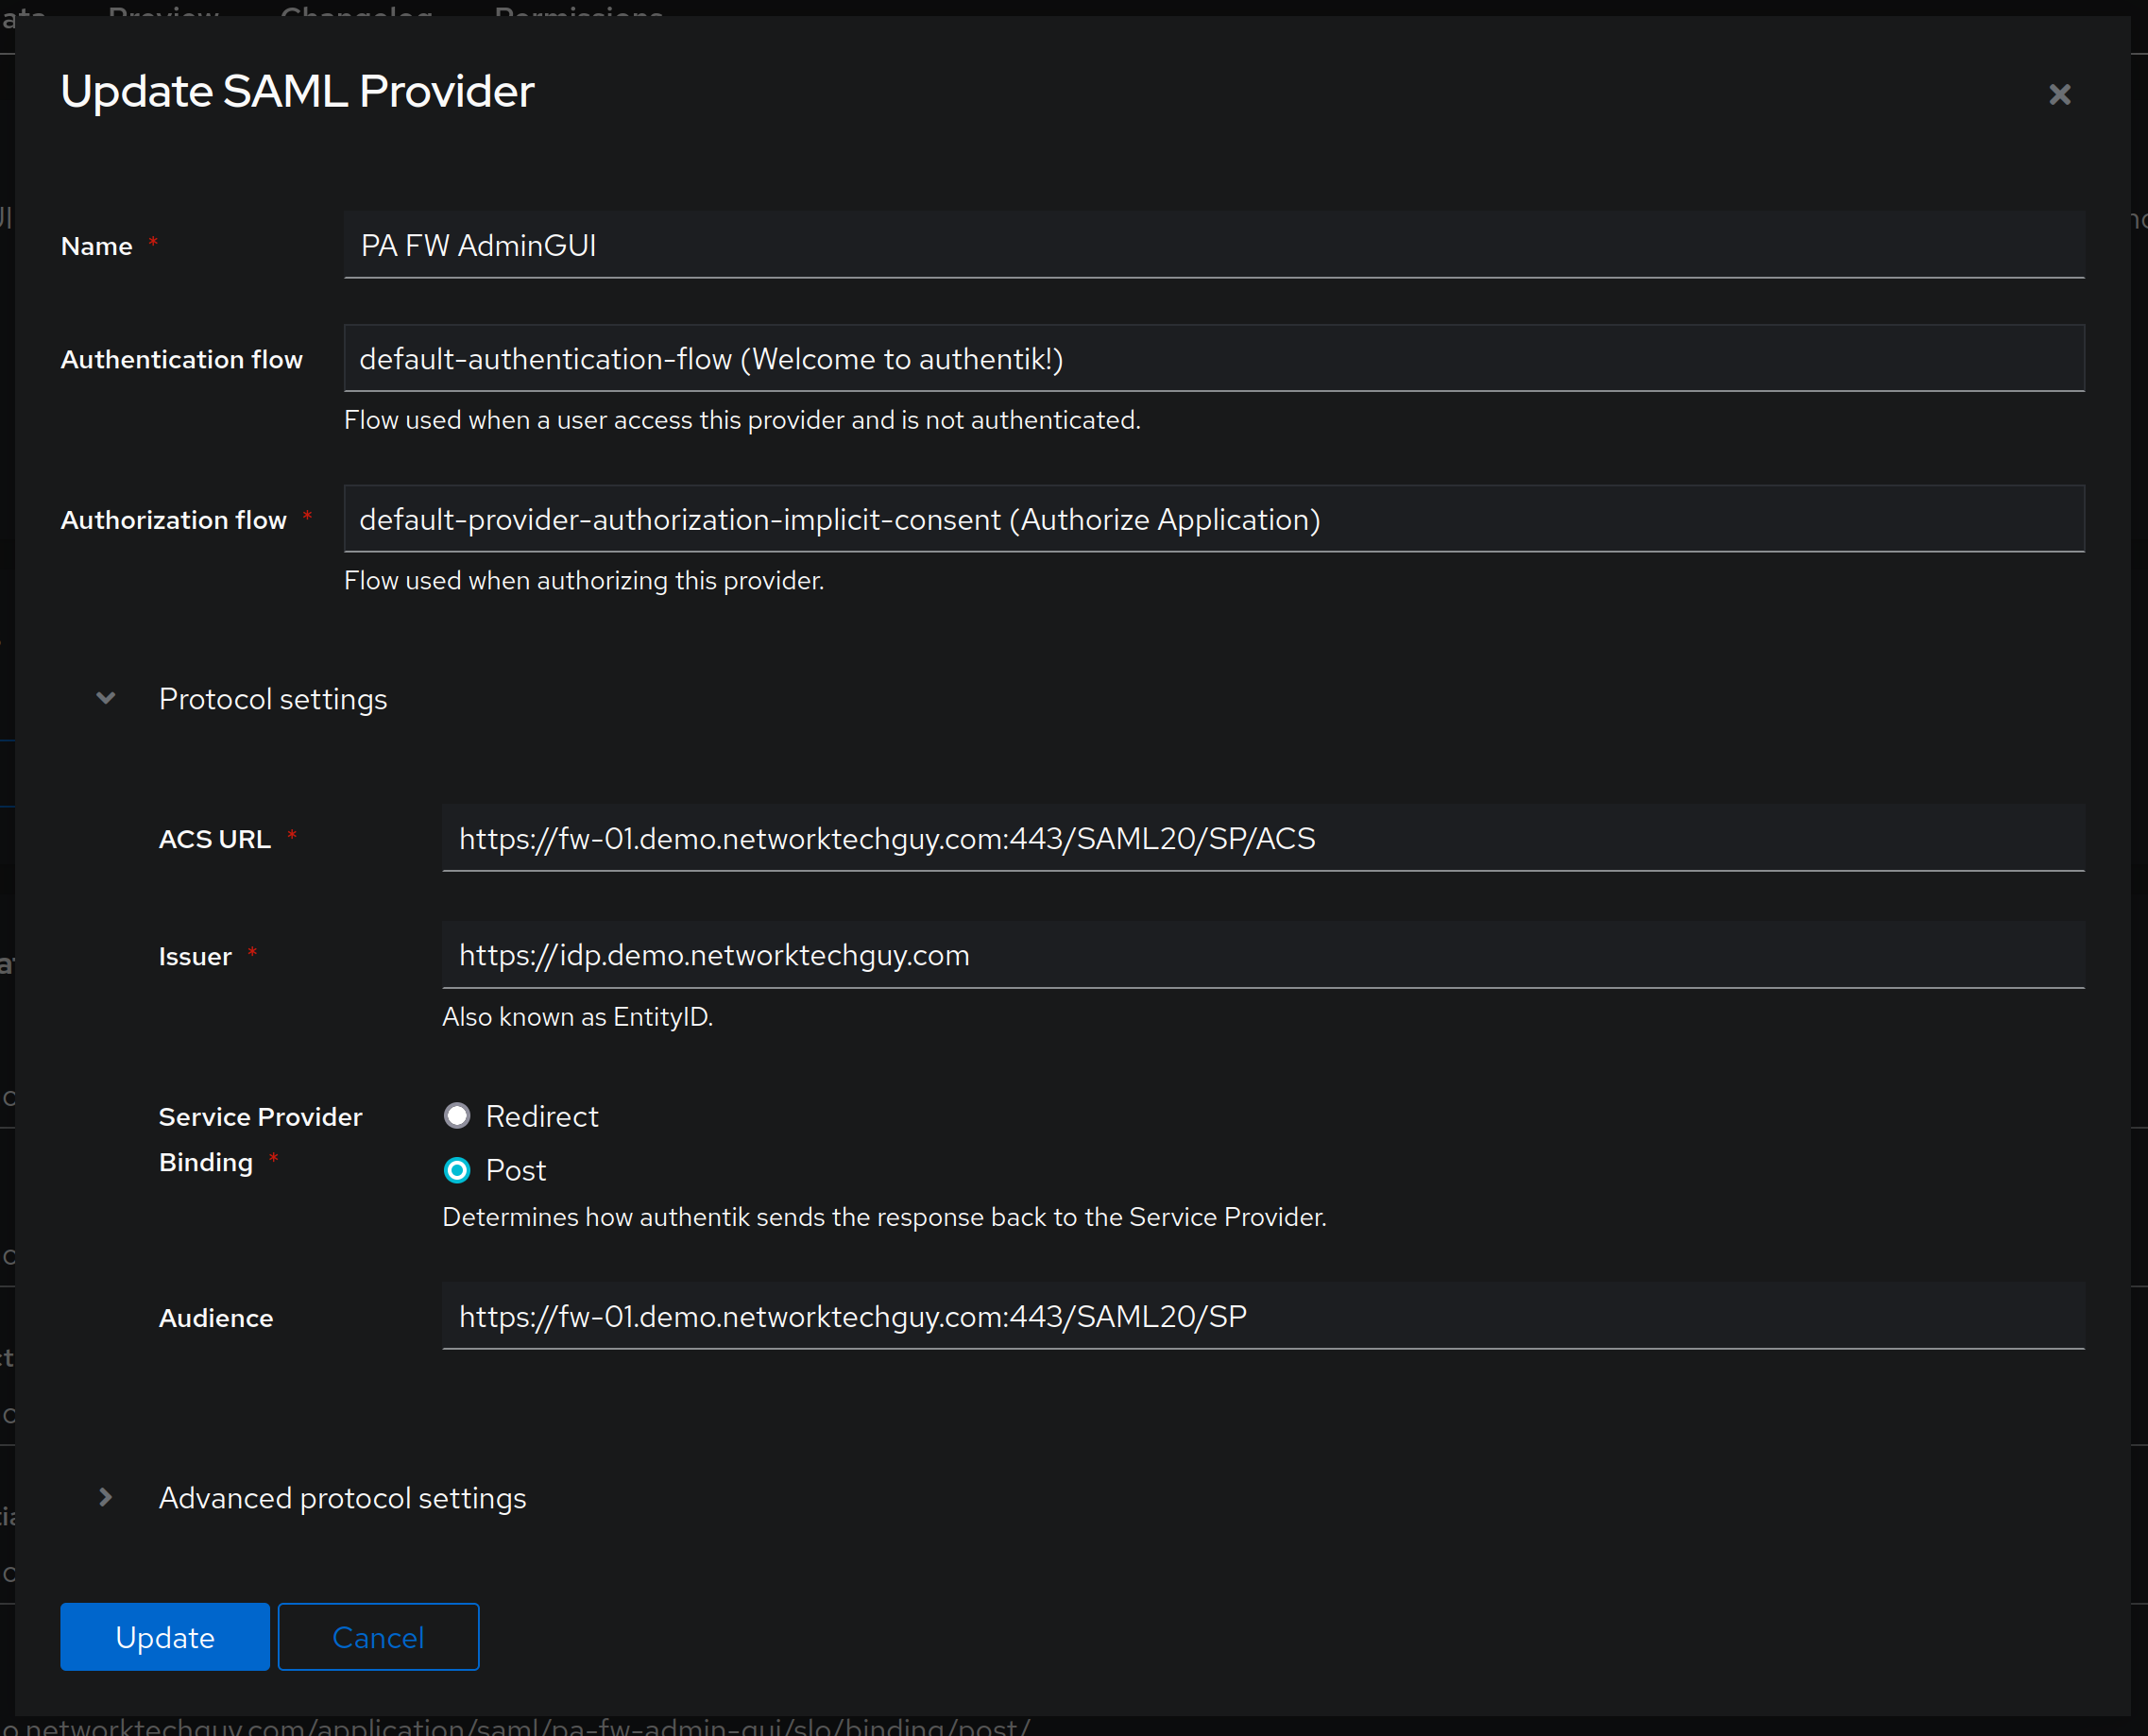
Fill out the form on the next screen, something like this:
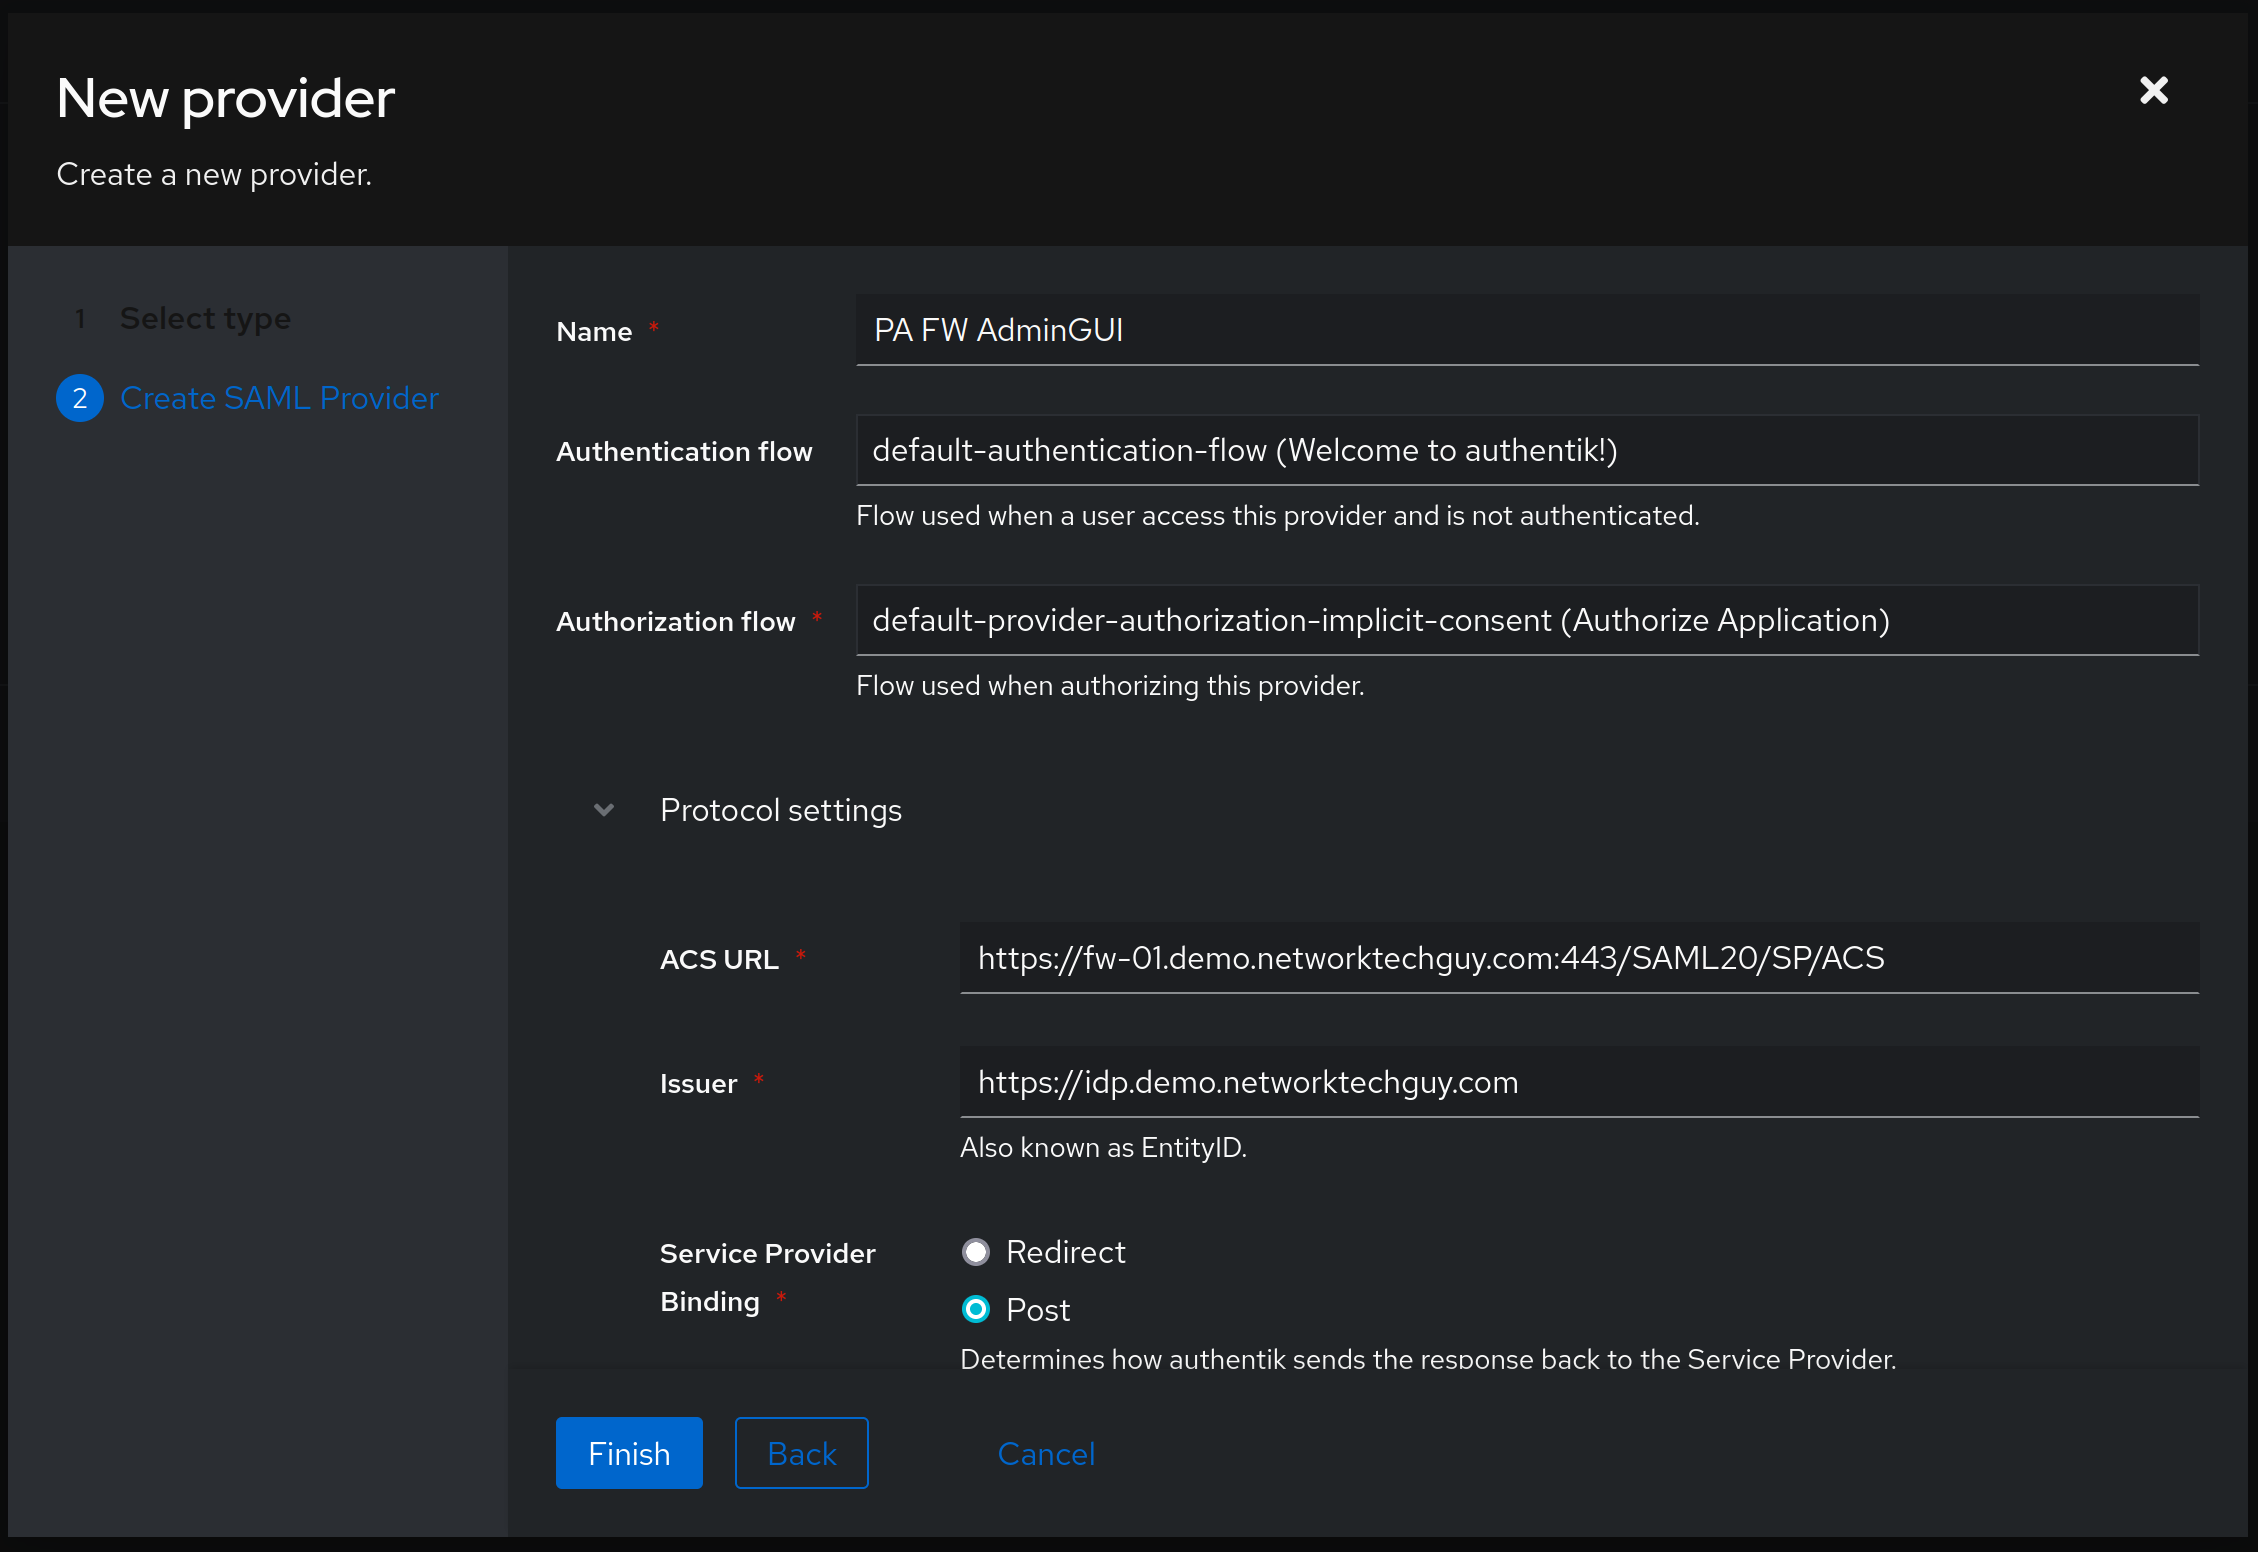
Notice a few things here - I tend to give the same names to the Providers as I do to the Applications, but that's just my preference. This way it's easy for me to find them when I need to make any changes and when I need to associate them. Authentication flow is set to default (as we haven't created custom ones, it's not part of this article). Authorization flow is also set to default, with implicit consent, as this way we won't need to press Continue when the user passes authentication.
ACS URL is quite important, and it is actually specific to a vendor that you are connecting to. Palo Alto Networks uses form https://FQDN:443/SAML20/SP/ACS for it, while other vendors may use something else. Also, please note that, depending on how you are accessing your firewall (whether through an IP address or through an FQDN), this will look different for you. In my case, since I created a DNS entry in my DNS server, I can use an FQDN to create an ACS URL entry.
For Issuer field it will be the same - if you're accessing your authentik instance via an IP address, you will want to change it here - if not, use an FQDN as well.
Service Provider Binding for Palo Alto firewalls should be set to Post. You can read more about this here:
Finally, click on Create and you should have your first provider ready. You will also notice that there's a yellow exclamation mark that says Warning: Provider not assigned to any application - we will change that right away. Go back to Applications -> Applications and click on Edit icon under the Actions column. In the field Provider select your newly created Provider and click Update.
Now go back to Applications -> Providers and edit the provider we created.
We want to add one more parameter to the main screen of the application, and that is Audience. This should be simple enough, as it is almost the same URL as it is for ACS URL value, just without the trailing ACS:
Next, Expand the Advanced protocol settings and then make modifications like this:
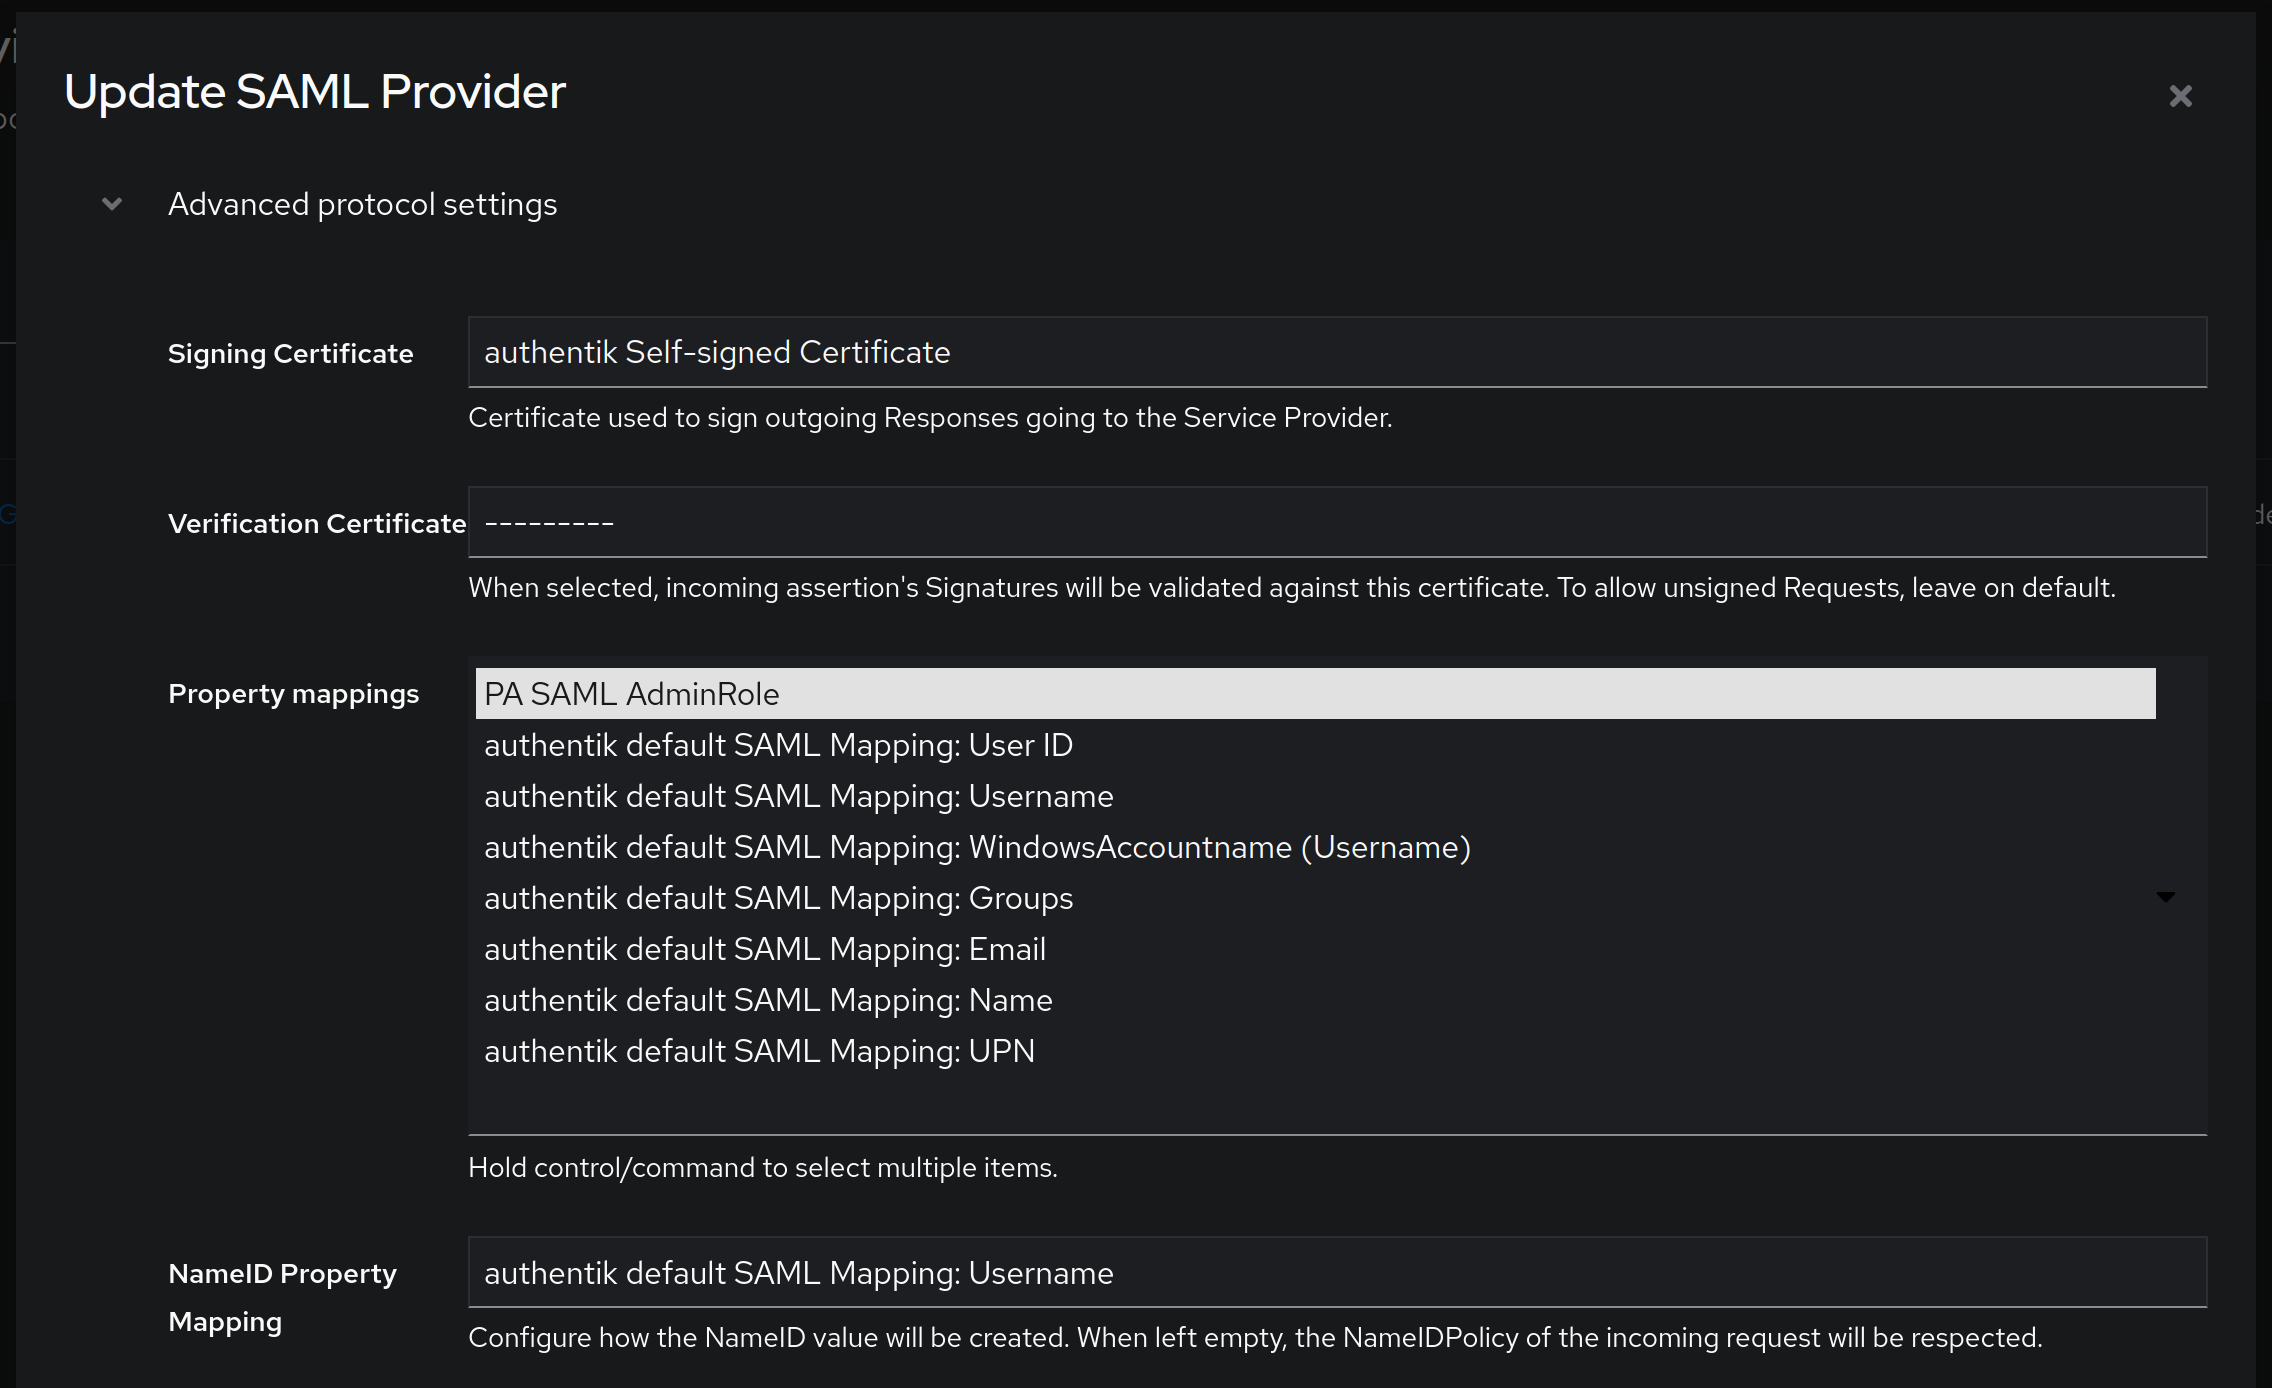
Important parts here are Signing Certificate - if you're not using your own certificate, the one provided with authentik should be sufficient. As for Property mappings, select only previously created mapping, in my case PA SAML AdminRole. NameID Property Mapping should be set to the default value of authentik default SAML Mapping: Username. Finally, click on Update.
Now, click on your Provider name and you should be presented with a screen like this:

You will notice that there is a number of URLs at the bottom of the screen - we will need only two of those - SSO URL (Post) and SLO URL (Post).
There are two things that we will need from authentik to start working on the PA appliance configuration (firewall or Panorama) - authentik certificate or if you want to import the metadata instead of manually creating the the SAML Identity Provider that will include the certificate. So, click on Download button under Metadata section and download it to your computer.
Now, go to your PA Appliance and under Device -> Server Profiles -> SAML Identity Provider click on Import. A form will open like and you should fill it out like this:
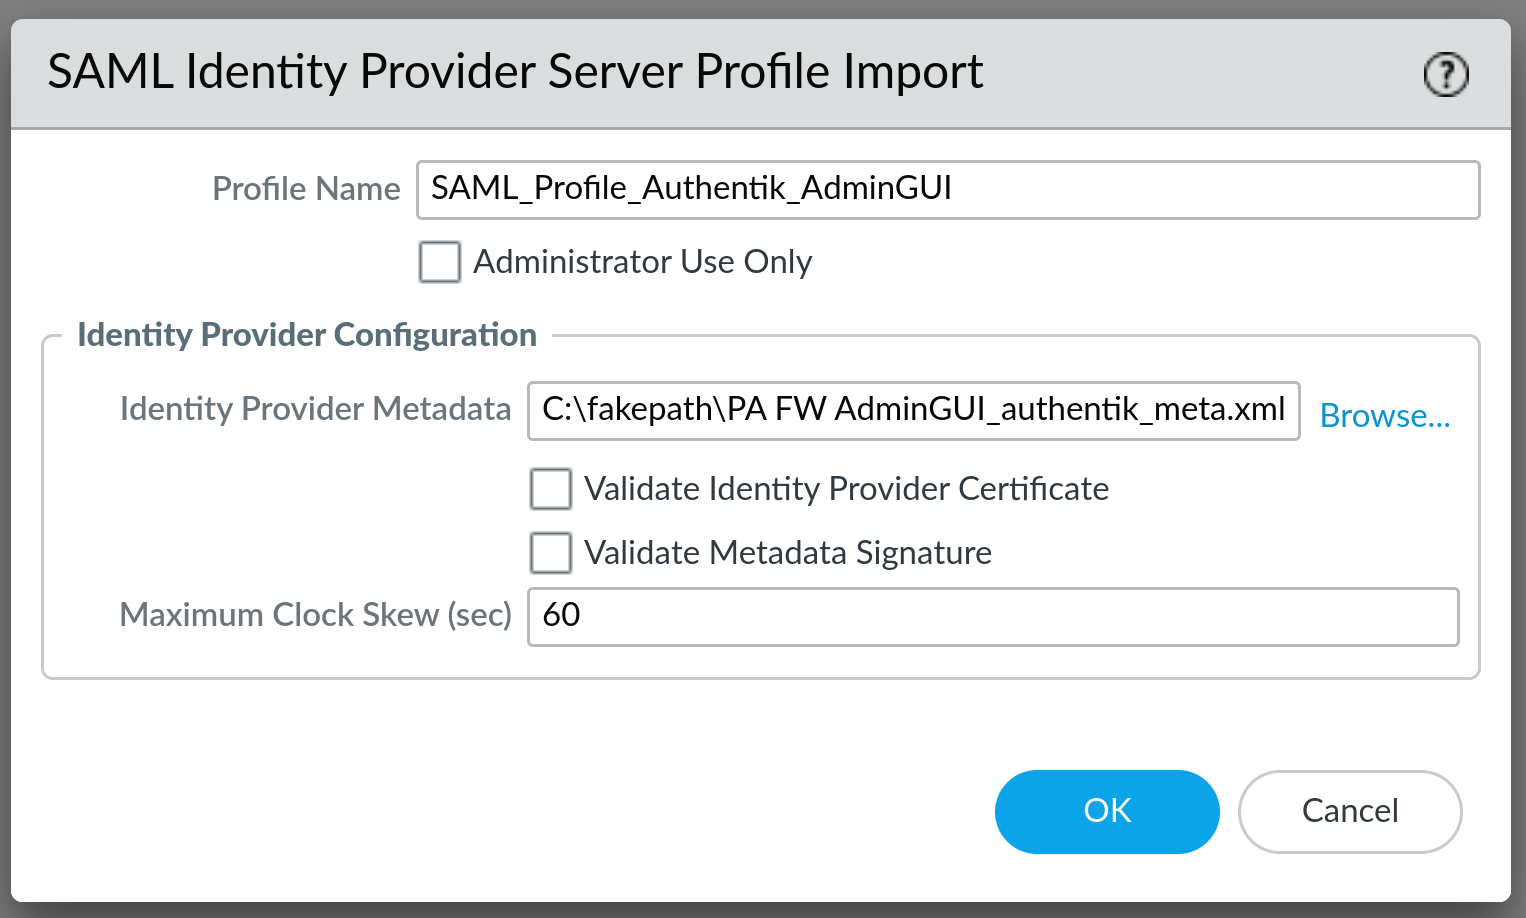
Make sure to un-check Validate Identity Provider Certificate and click on OK.
You will now have a new SAML Identity Provider Server Profile, but we need to make some changes to it before continuing:
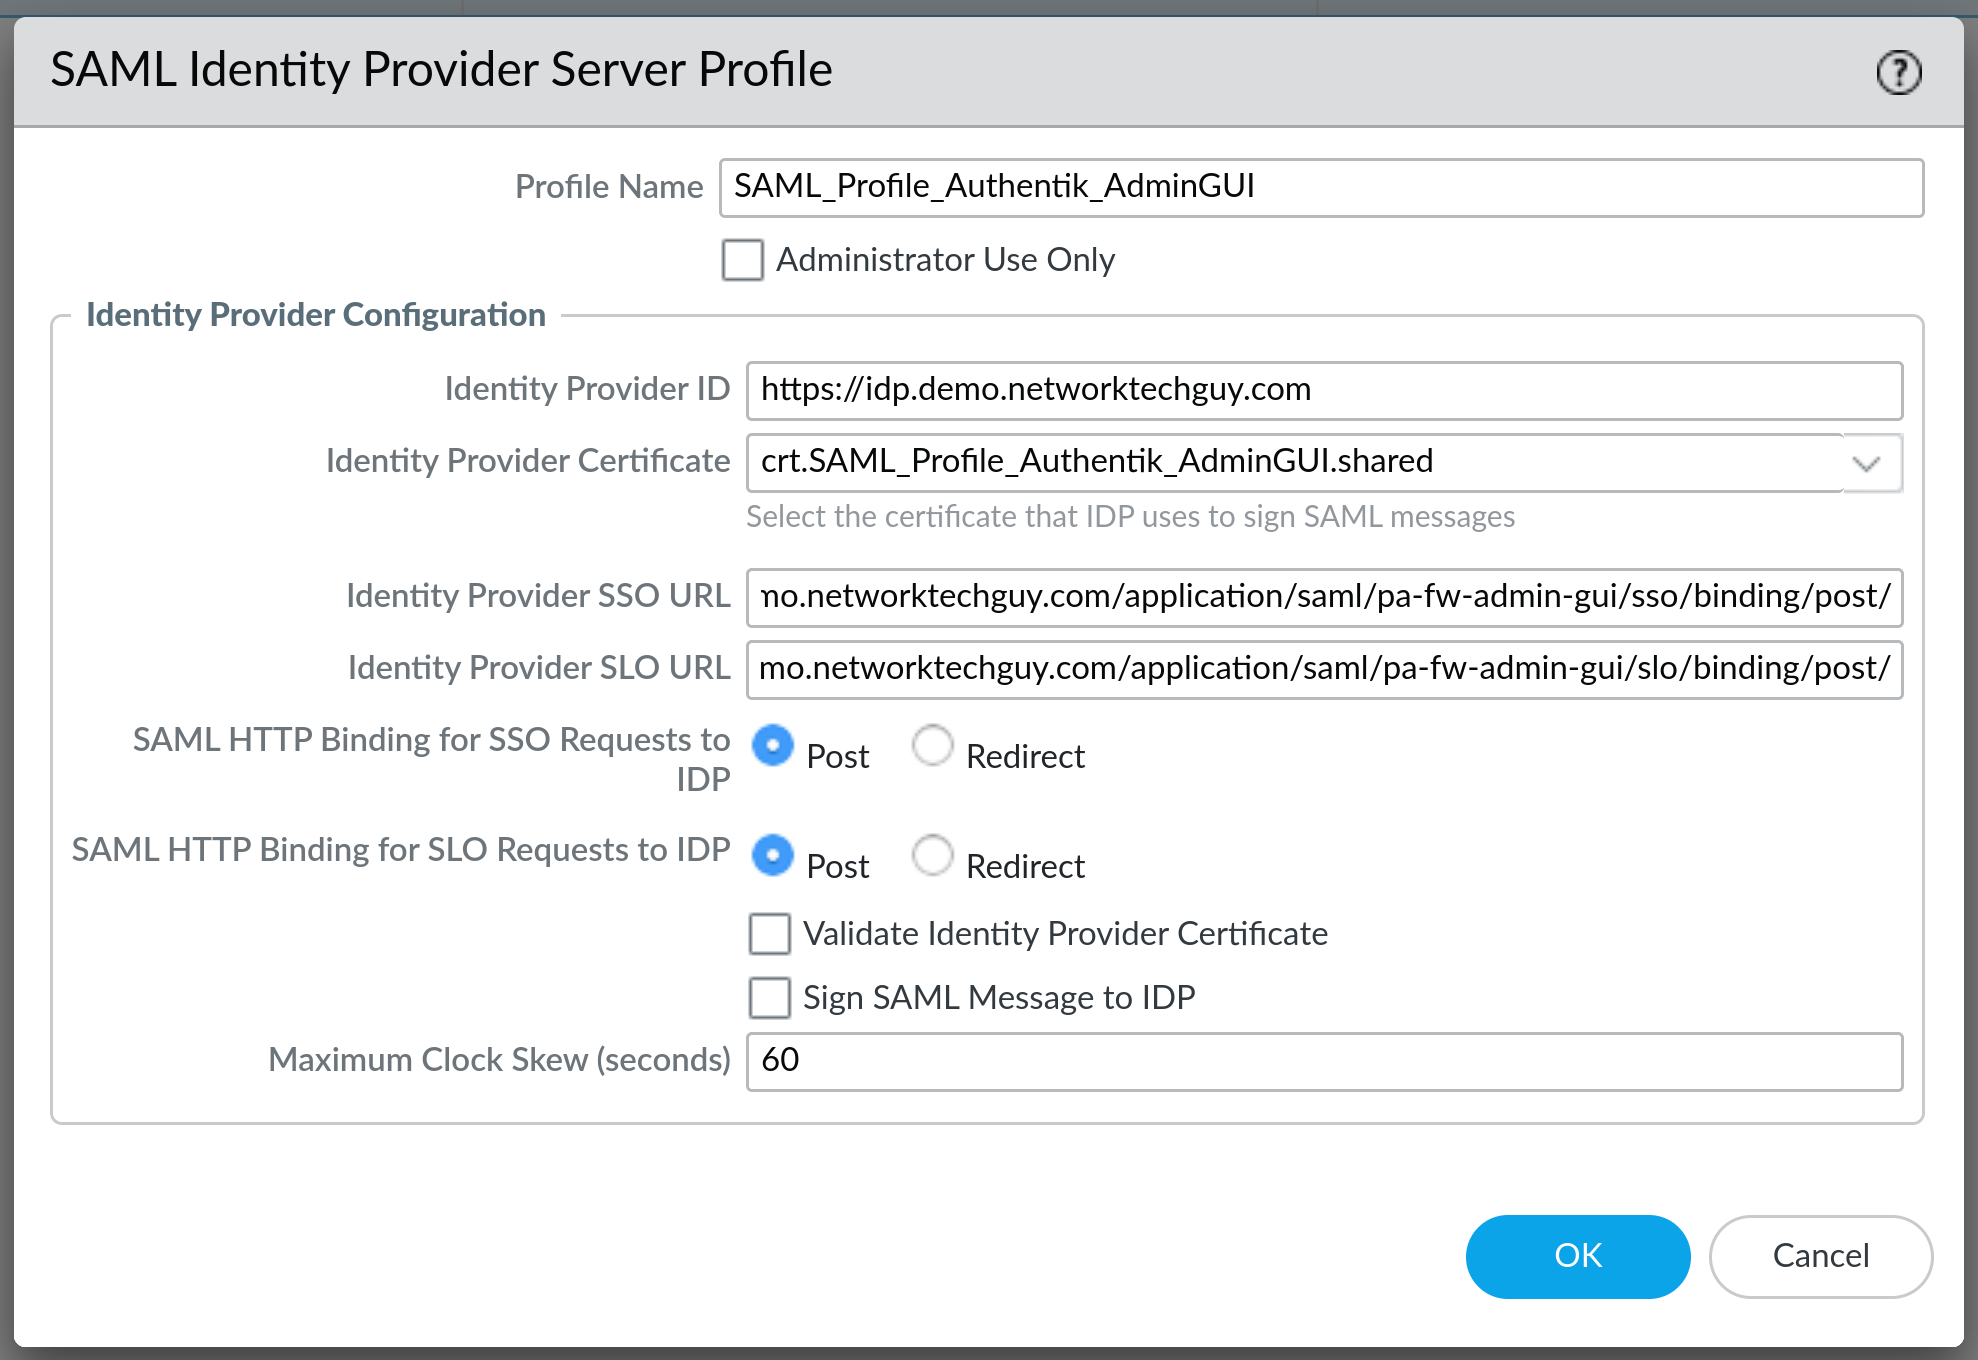
Notice the following necessary changes:
Identity Provider SSO URLshould be yourPostURL fromauthentikIdentity Provider SLO URLshould also be yourPostURL fromauthentikSAML HTTP Binding for SSO Request to IDPshould be set toPostSAML HTTP Binding for SLO Request to IDPshould also be set toPost
Click on OK and you are done with the SAML Identity Provider Server Profile. Metadata file downloaded from authentik for some reason forces Palo Alto appliance to automatically select Redirect as an option, so for that reason I prefer to create the profile manually, without importing it from metadata file. Result is the same, but the only thing you have to remember is to upload the certificate as well if you're not importing a metadata file. If you did, the certificate will also be uploaded automatically, but you lose the option to name it whatever you want:
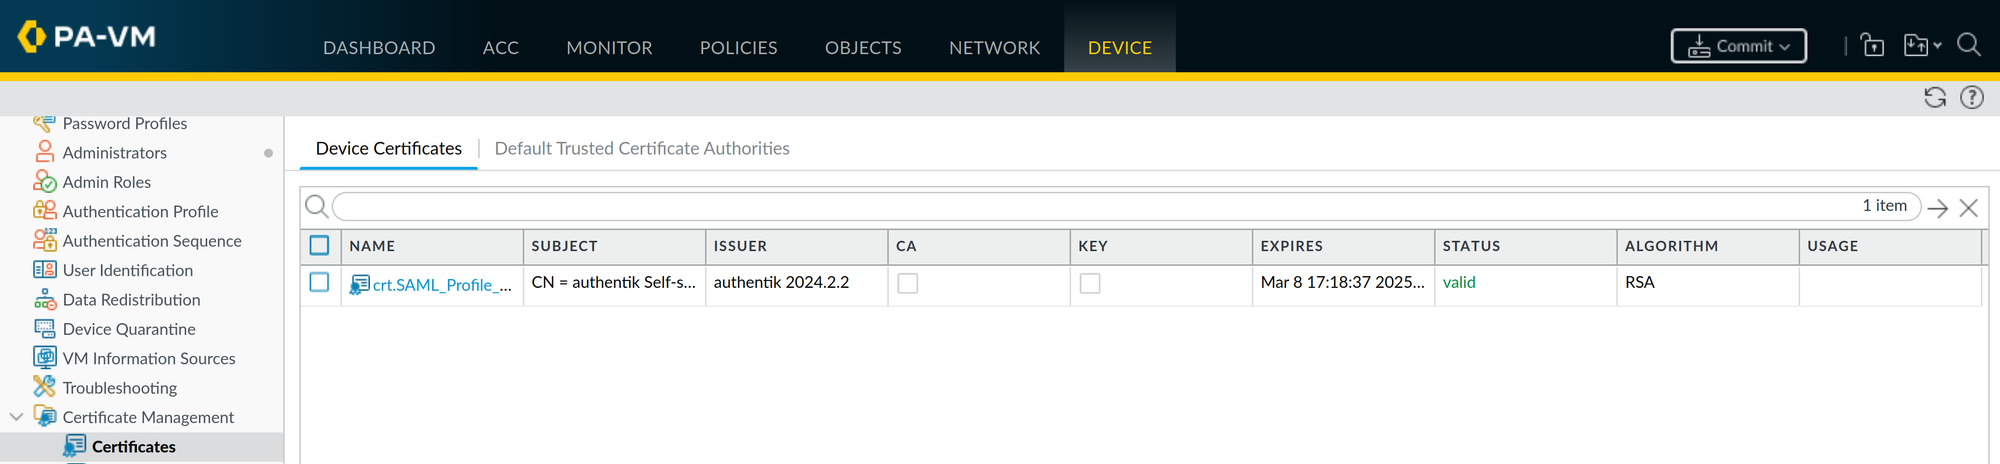
authentik-signed certificate - it has a one year validity and you need to make sure to change the signing certificate before it expires - this needs to be done in both authentik and in all of your Service Providers. Personally, I run my own CA in my environment and I just created a 5 year server certificate for authentik and other devices and servers.
Next thing to do is to create an Authentication Profile - it is located under Device tab as well. Create a new profile and fill it out like this:
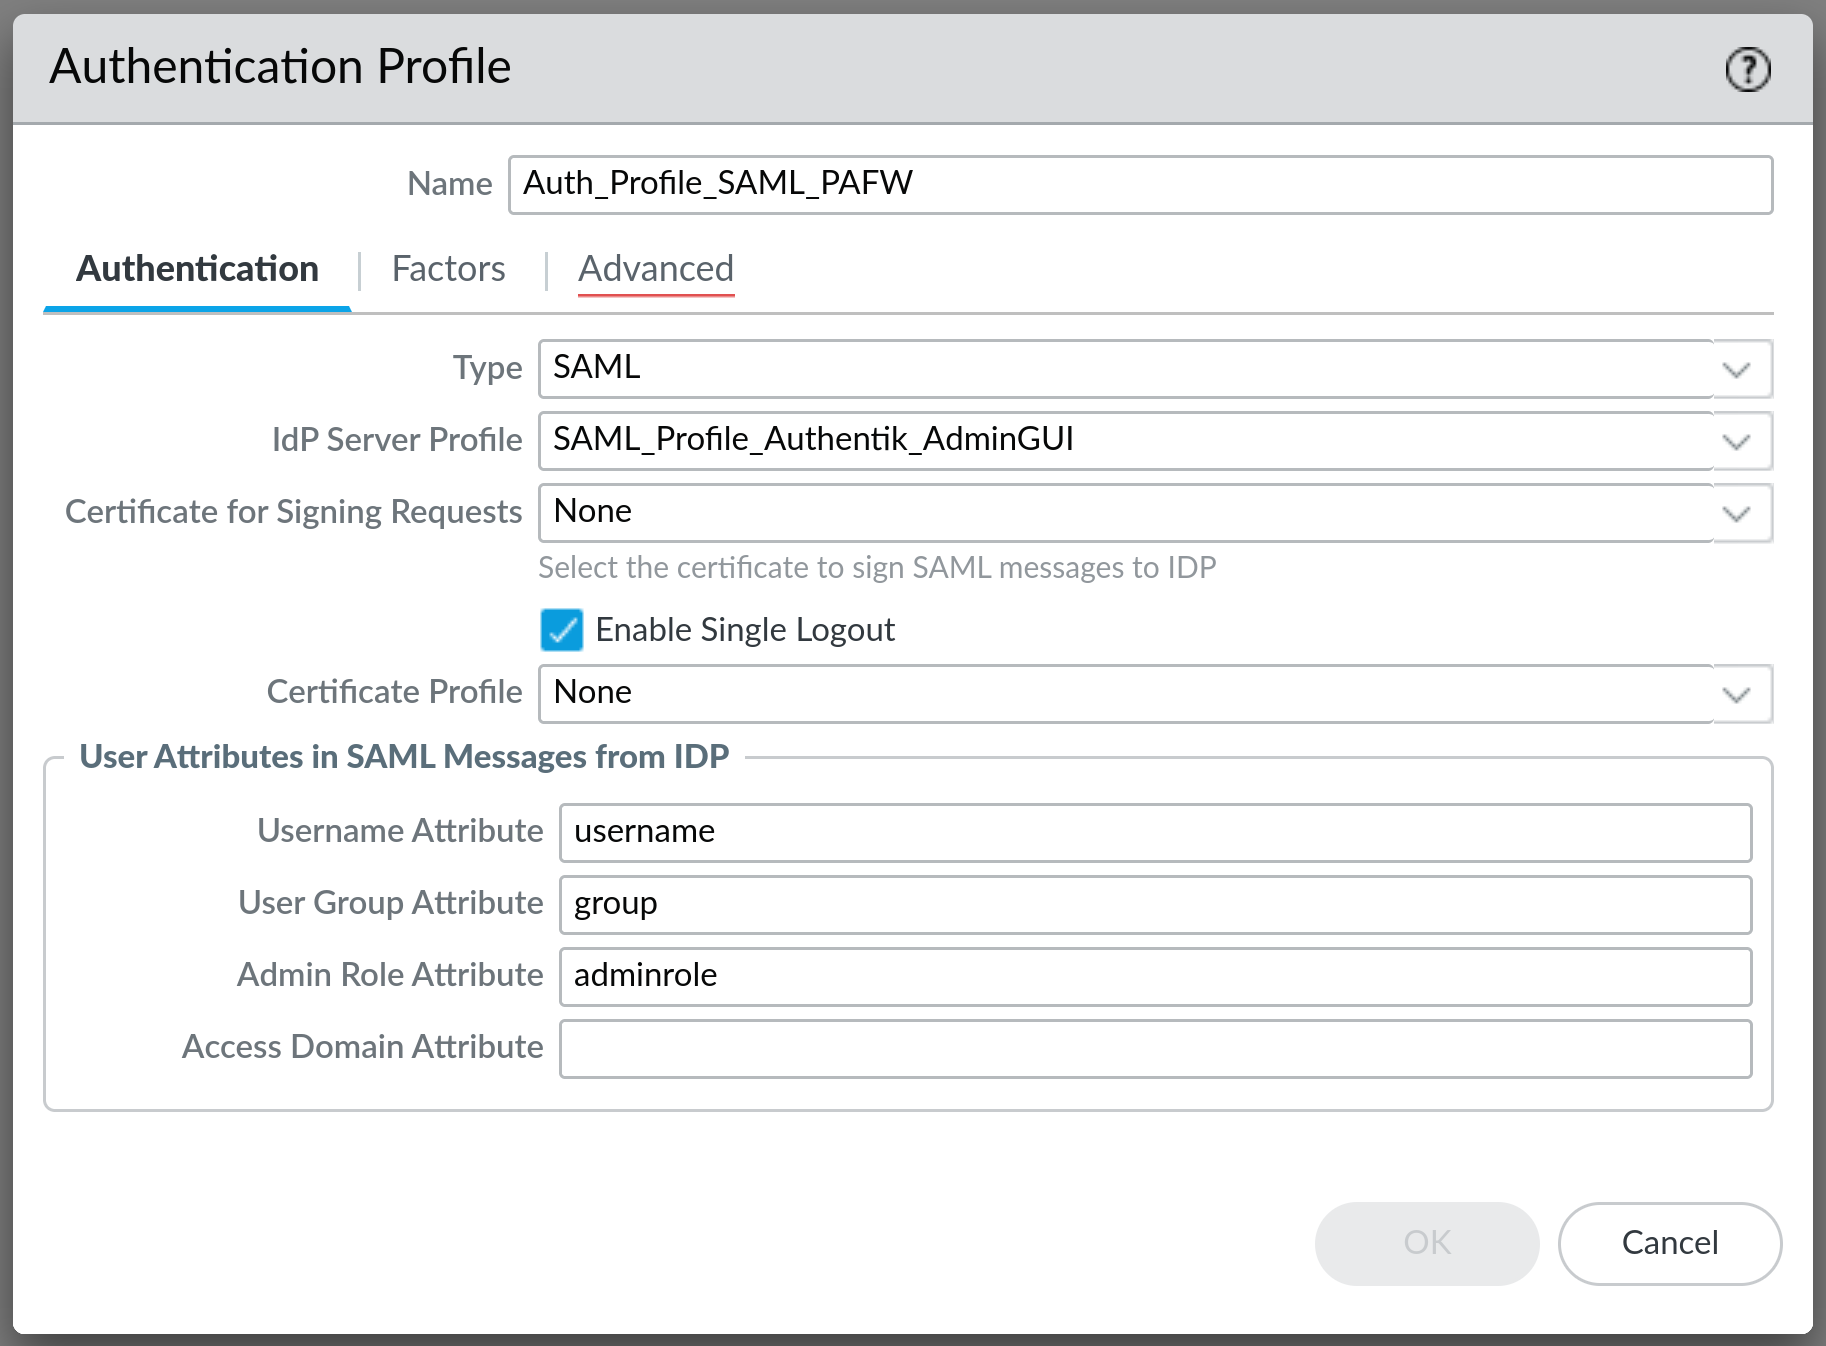
Choose the name of your liking, select SAML as the Type, select your previously created IdP Server Profile and fill out the rest of the options.
Next, select the Advanced tab and under Allow List add new item with all as option:
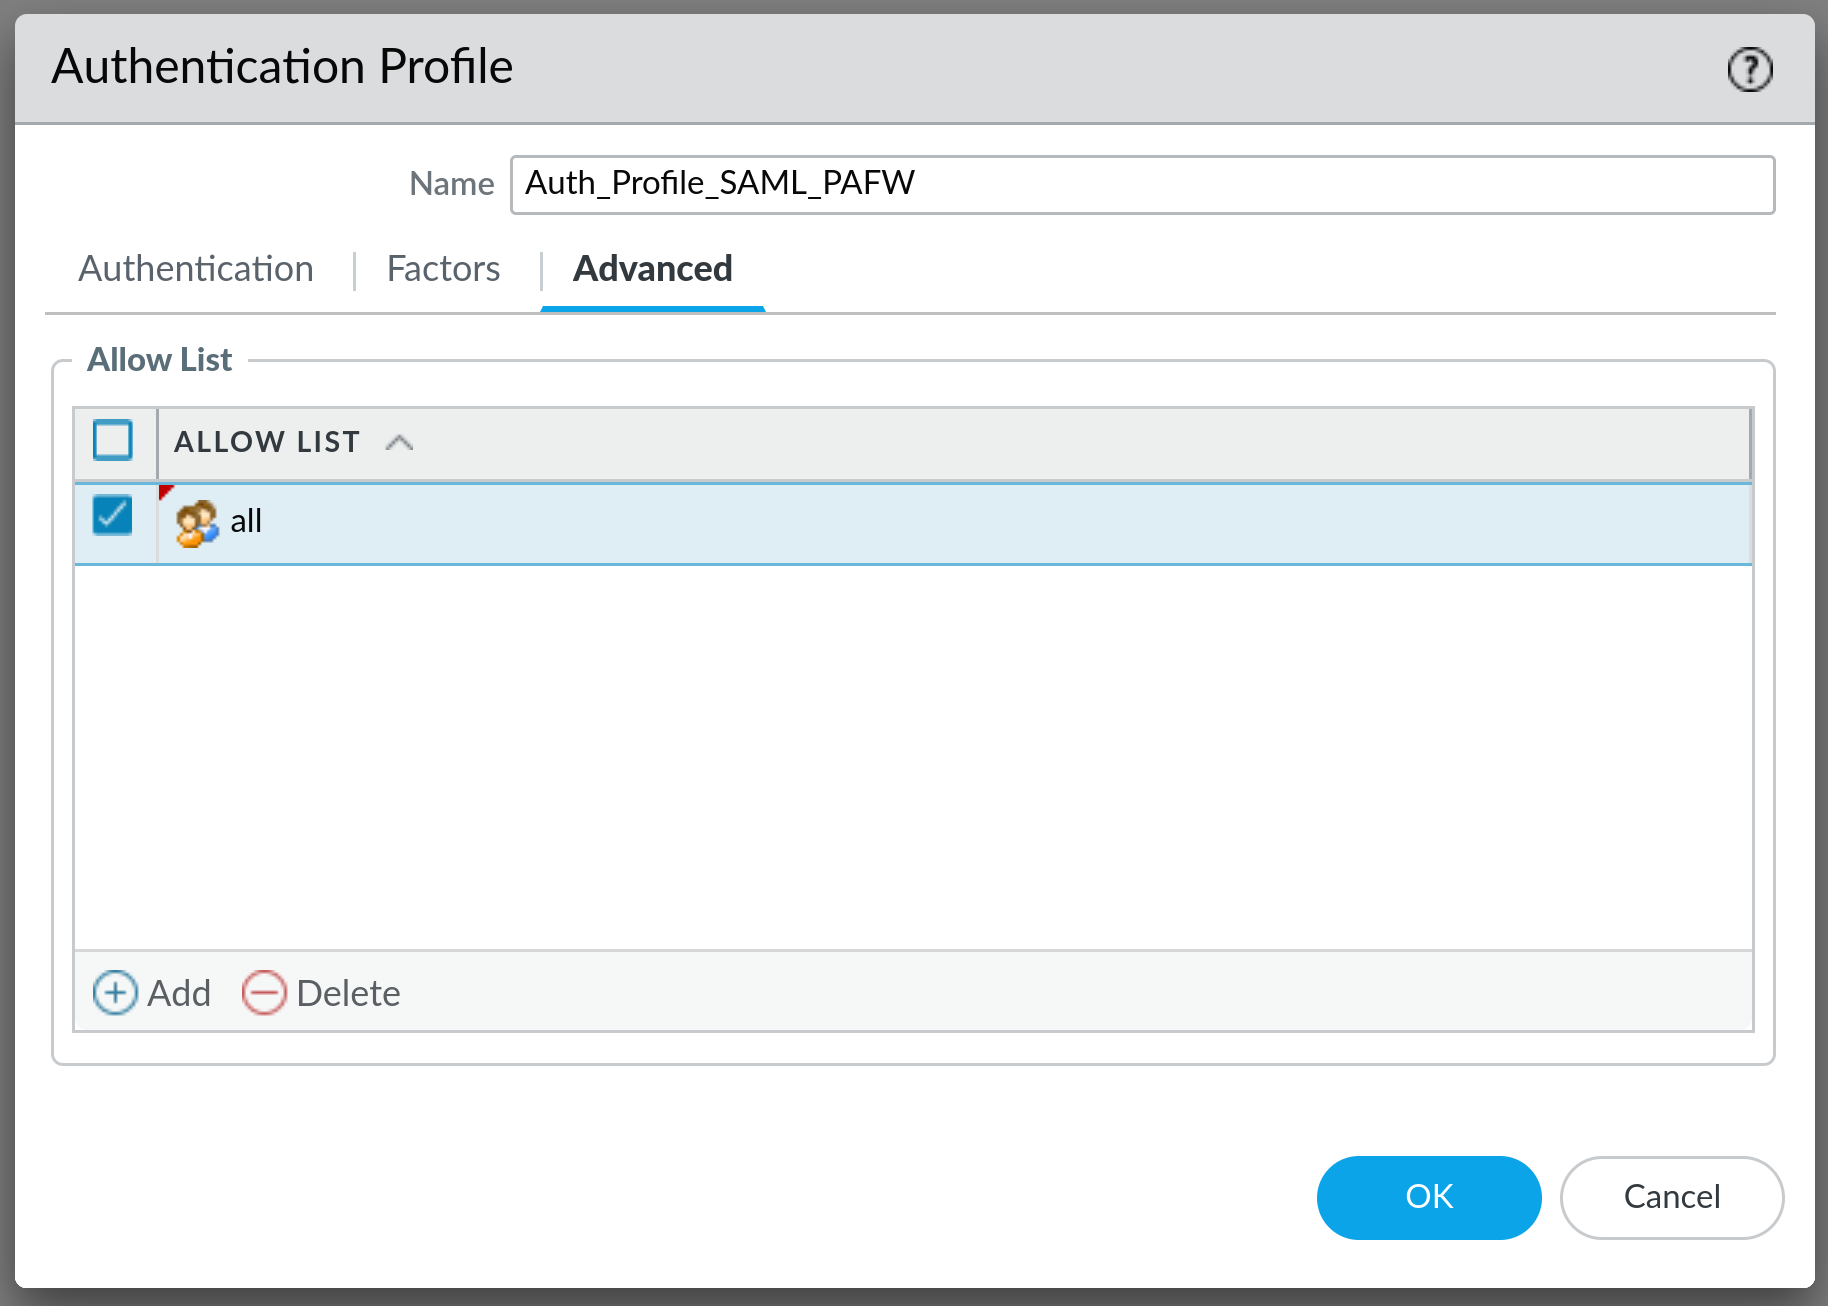
Click on OK and that will finish the creation of the Authentication Profile.
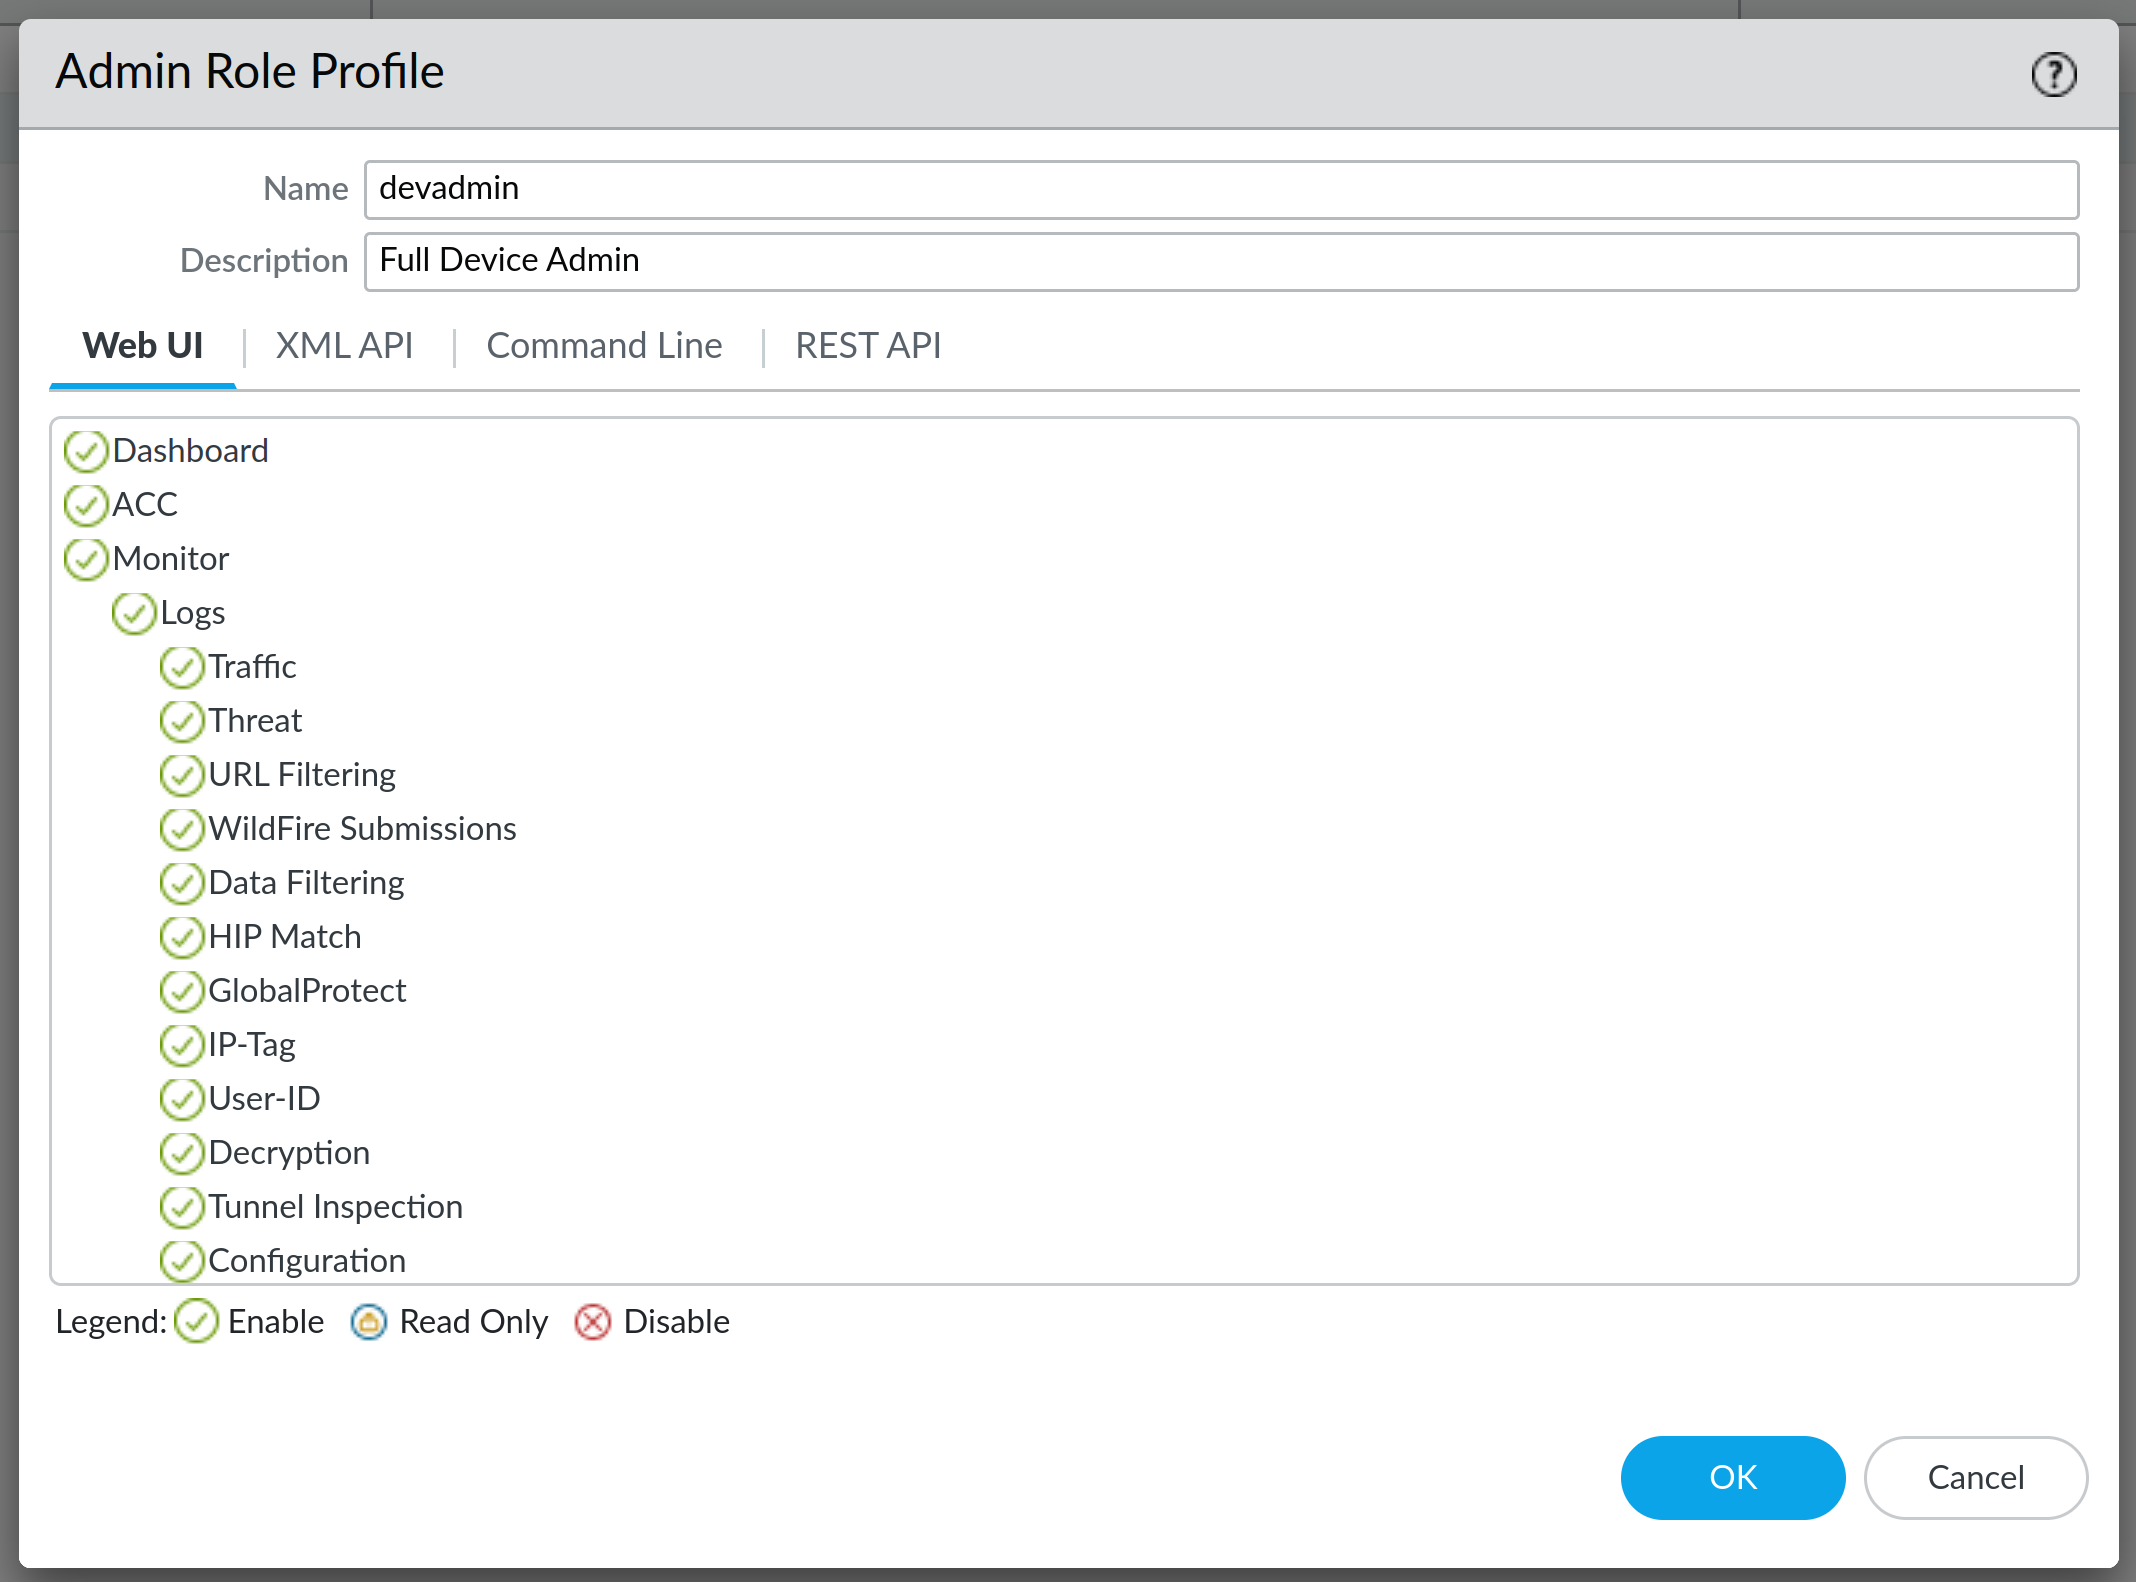
Next, select Admin Roles and click on Add to create a new admin role. We will create an admin role called devadmin (same as name of the dynamically assigned attribute in authentik) and grant all privileges to it. By default all privileges are granted to the role (green check mark sign next to the function), except for the XML API:
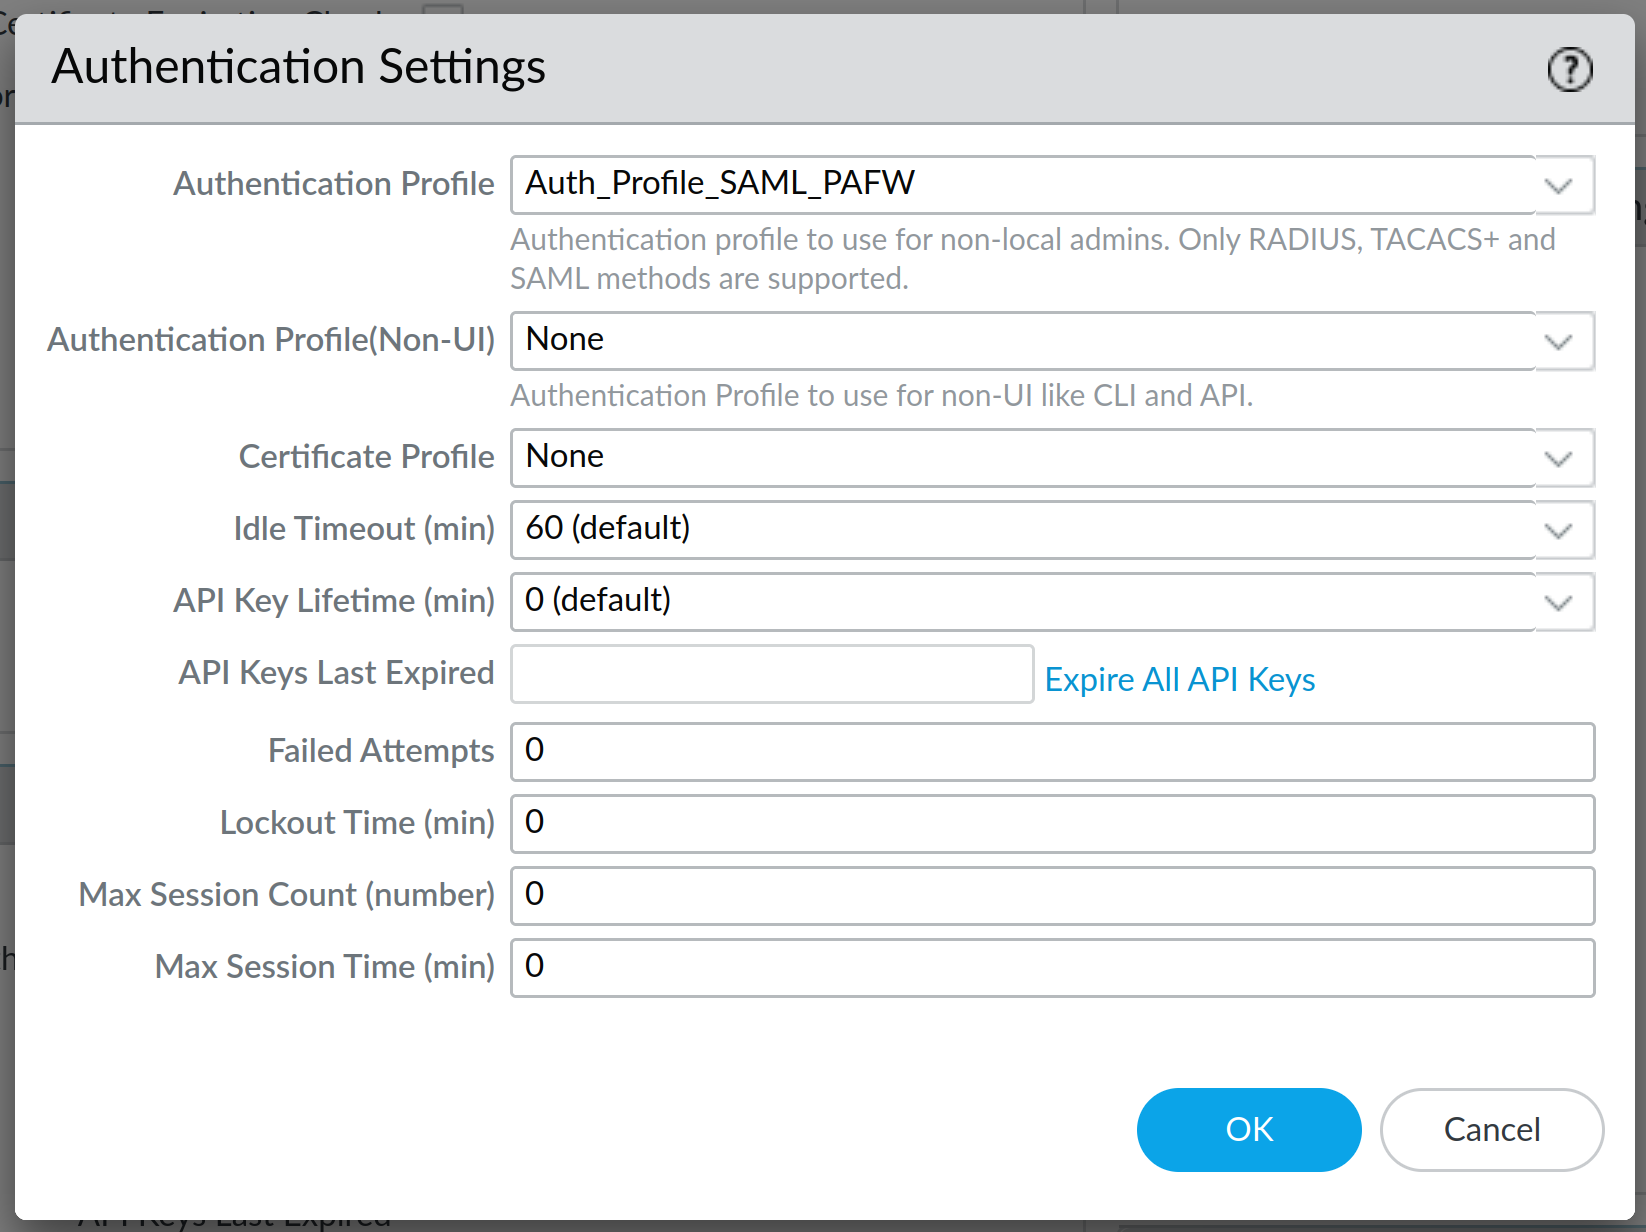
One more thing to do is to change the Authentication Settings under Setup - the only thing needed here is to select the SAML Authentication Profile we created:
Click on OK and Commit the change to your appliance. Log out of the system and you should be presented with a slightly modified version of the login screen:
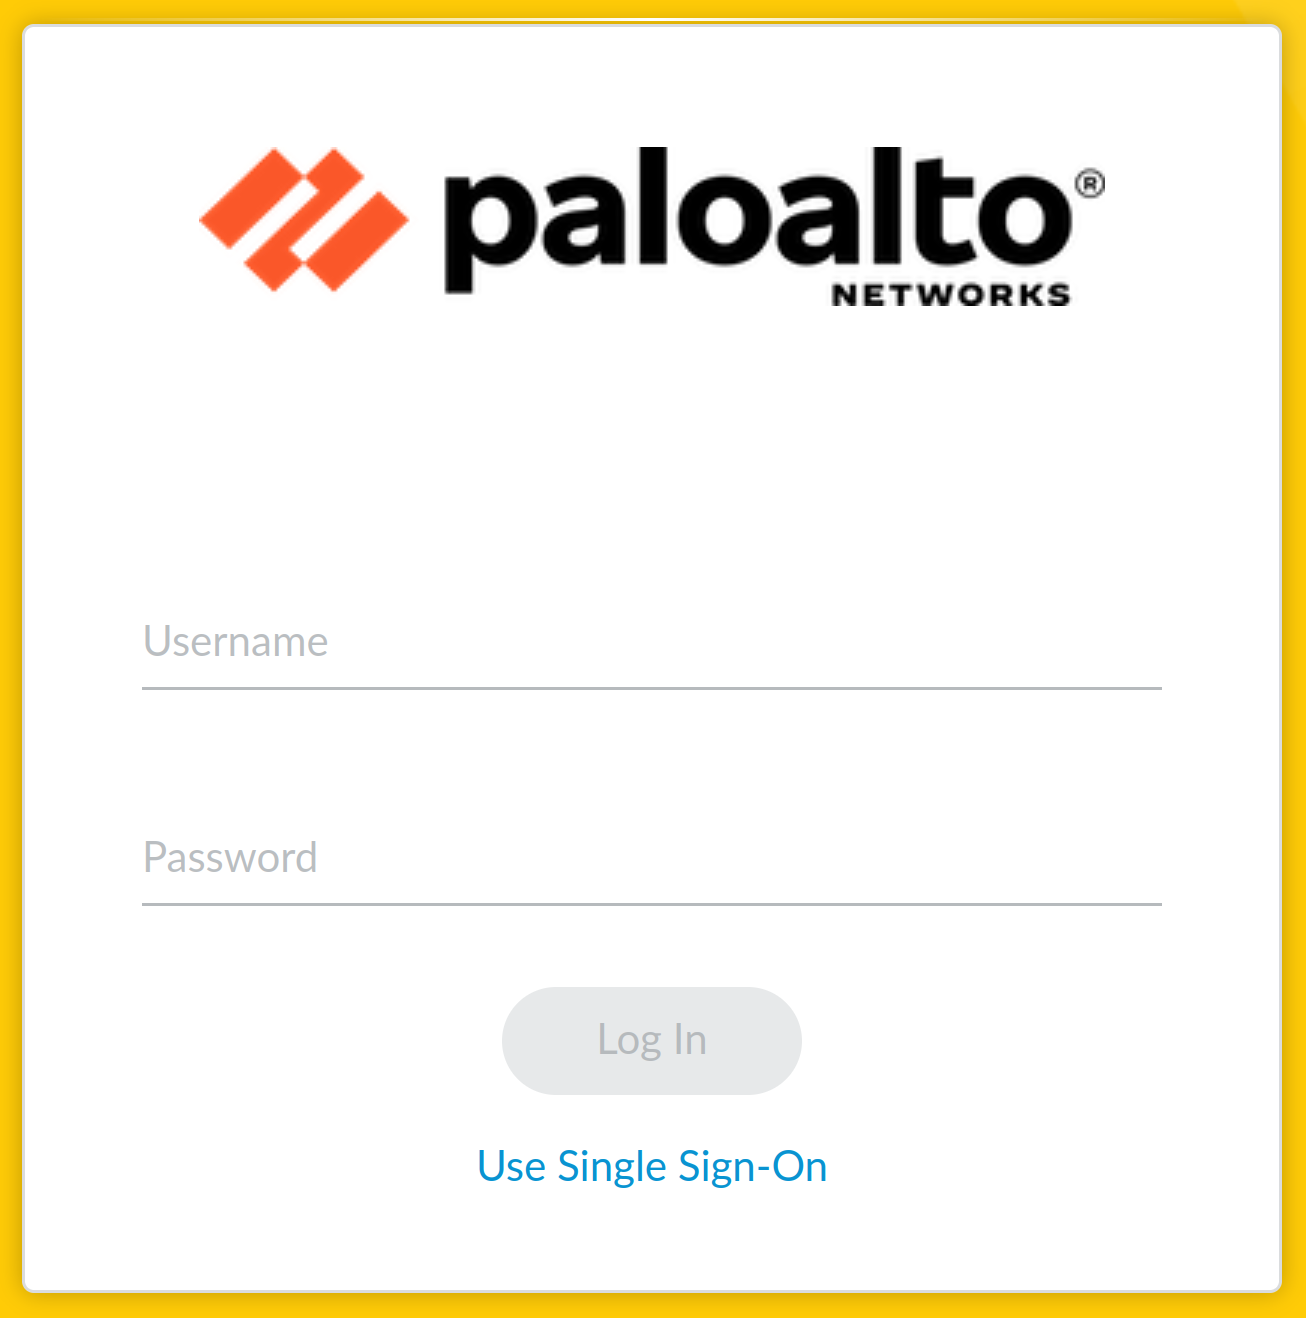
You will now notice a brand new option on the screen - Use Single Sign-On. Click on it and you should be presented with a screen like this:
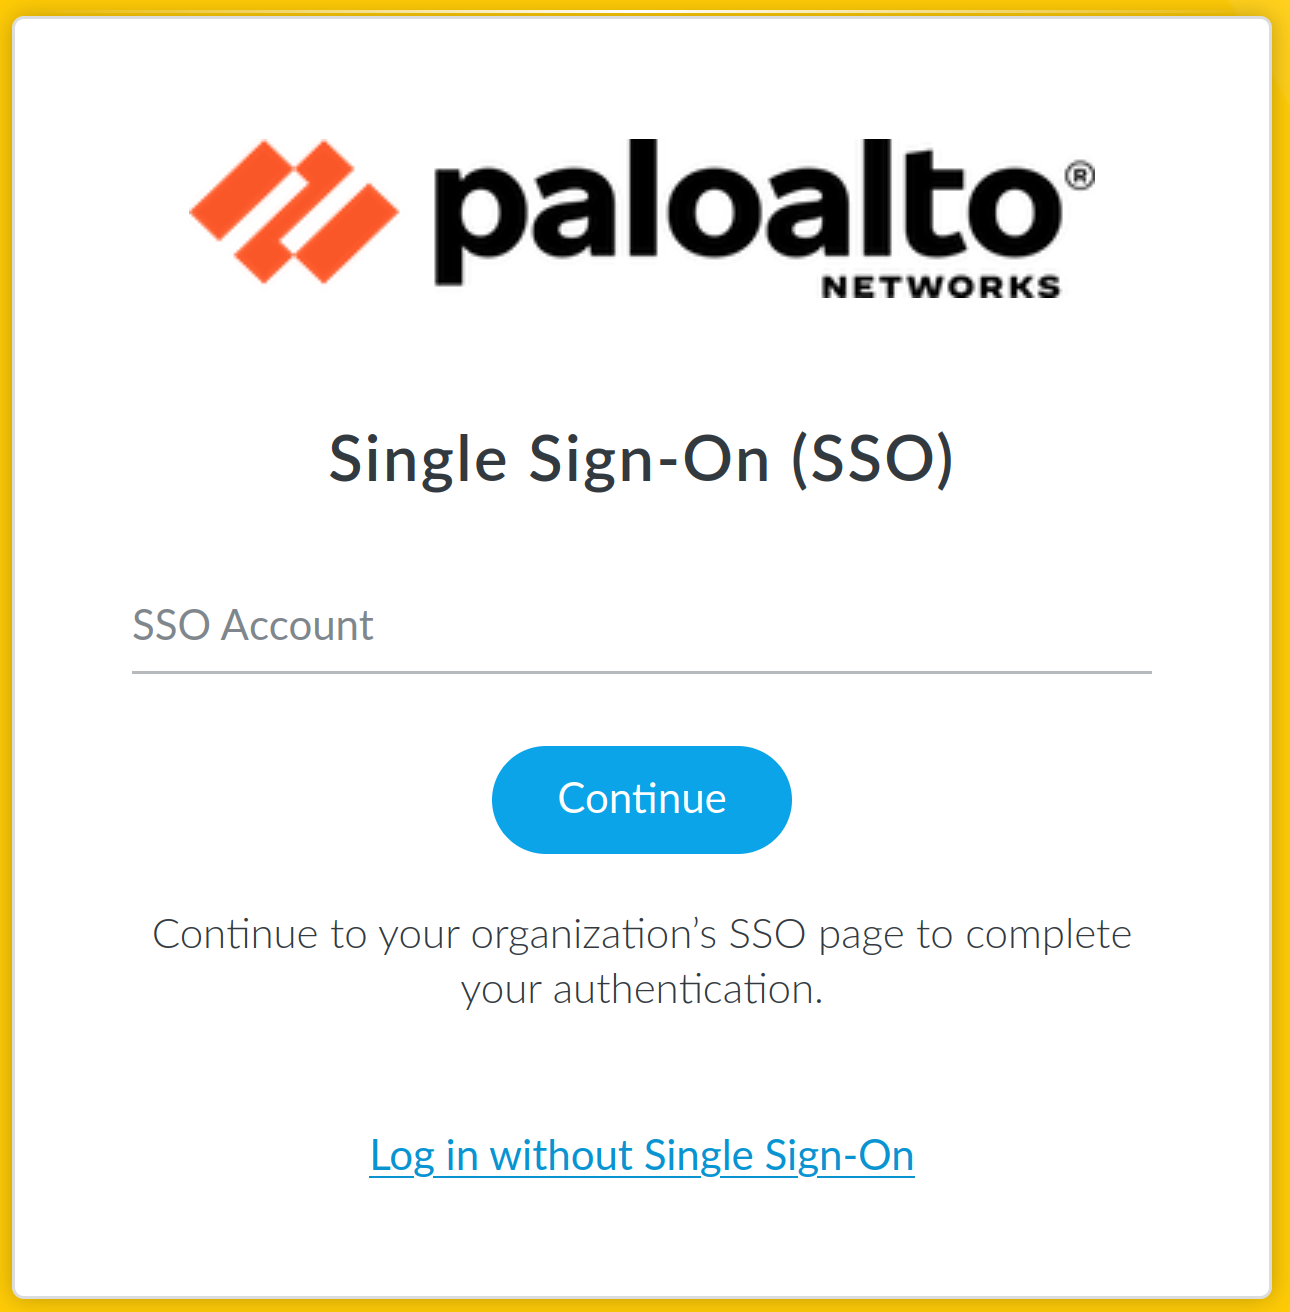
This may be a bit misleading, as it presents you with an option to enter your username, but there is no actual need to do that - just click on Continue and you should be good to go. First you will be redirected to your IdP's address, and if you're already logged in, it will automatically redirect you back to PA Admin GUI interface. Under Monitor -> Logs -> System you can find important information regarding your login attempt:

As you can see here, the process is pretty straightforward: client (you) is first redirected to the IdP for SSO because of the settings set in the Authentication Profile. Once authenticated, authentik will send SAML Assertion for you as a client. Next, SAML Assertion is validated against the IdP certificate that we uploaded and, finally, user is granted access with admin role set to devadmin.
And this is it - your authentik users can now log into the firewall with their authentik credentials. The only thing that I wasn't able to figure out is on how to log back into the firewall once you log out:
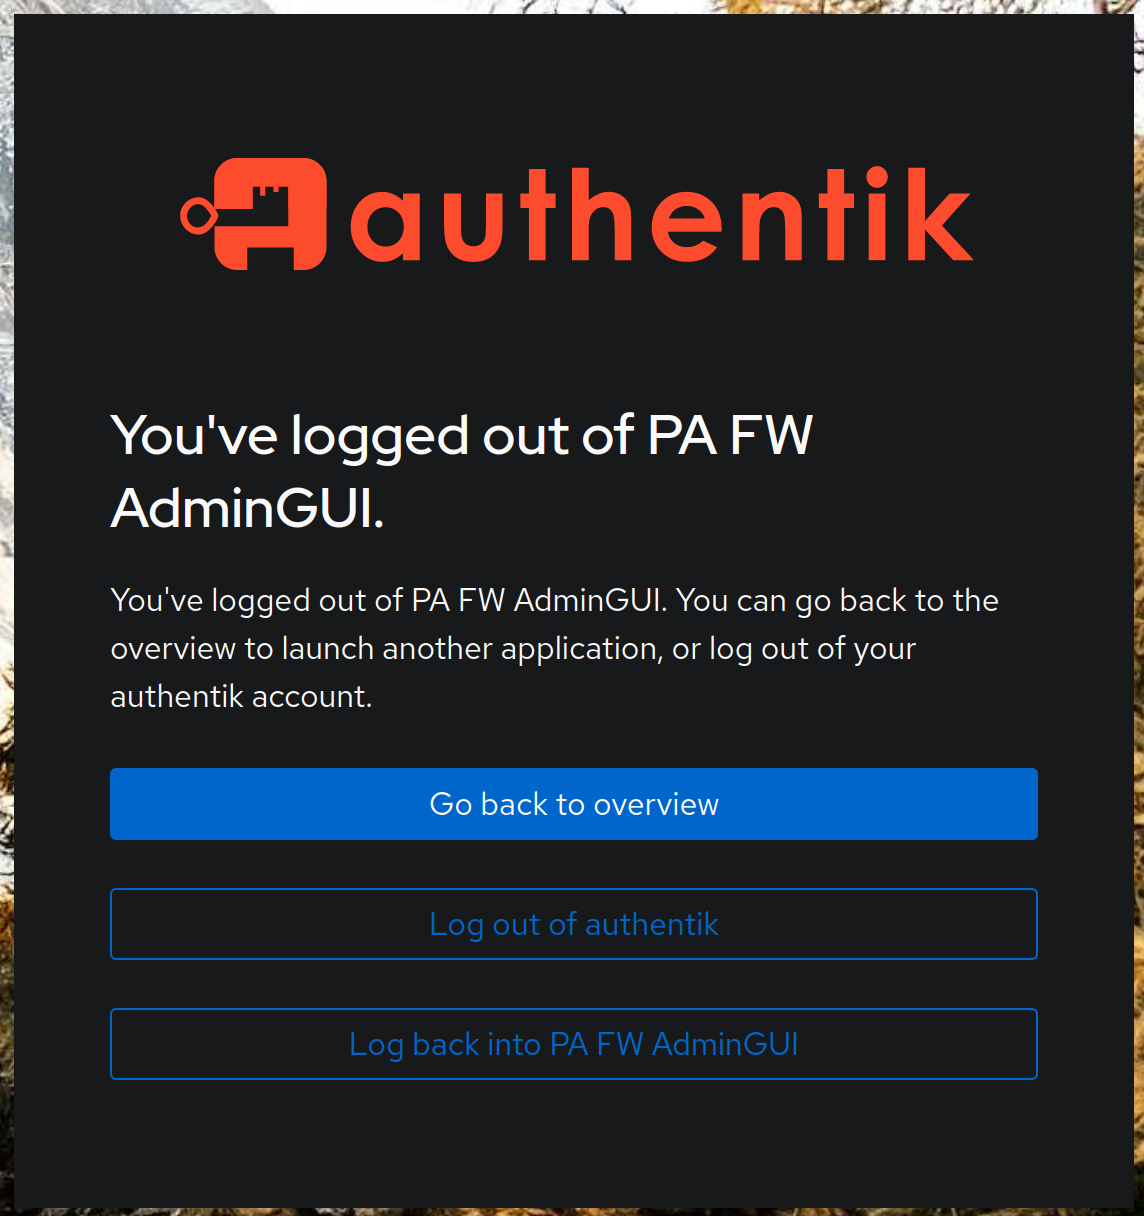
The third option here, Log back into PA FW AdminGUI will not work for some reason:

It's not that big of an issue for me, as I can always just go back to the main PA login screen, but would be nice if this worked as well. If any of the readers here know how to correct this, please let me know.
UPDATE: It seems that this is something that PA Appliances just don't support. By investigating link for the 3rd option, you can clearly see that the URL it leads to ends with /sso/binding/init, which is used for something called IdP Initiated Login, which PA just doesn't support. So that clears it up!
The only issue that I encountered with SAML users is that, since they are assigned a role, they are not treated as superusers. Certain options and settings in the firewall may be unavailable unless you use a superuser account. It's an easy fix for this - go under Device -> Administrators and add an administrator account that has the same username as your user in authentik (you have to do it with a built-in admin account or with another account that is already a superuser):
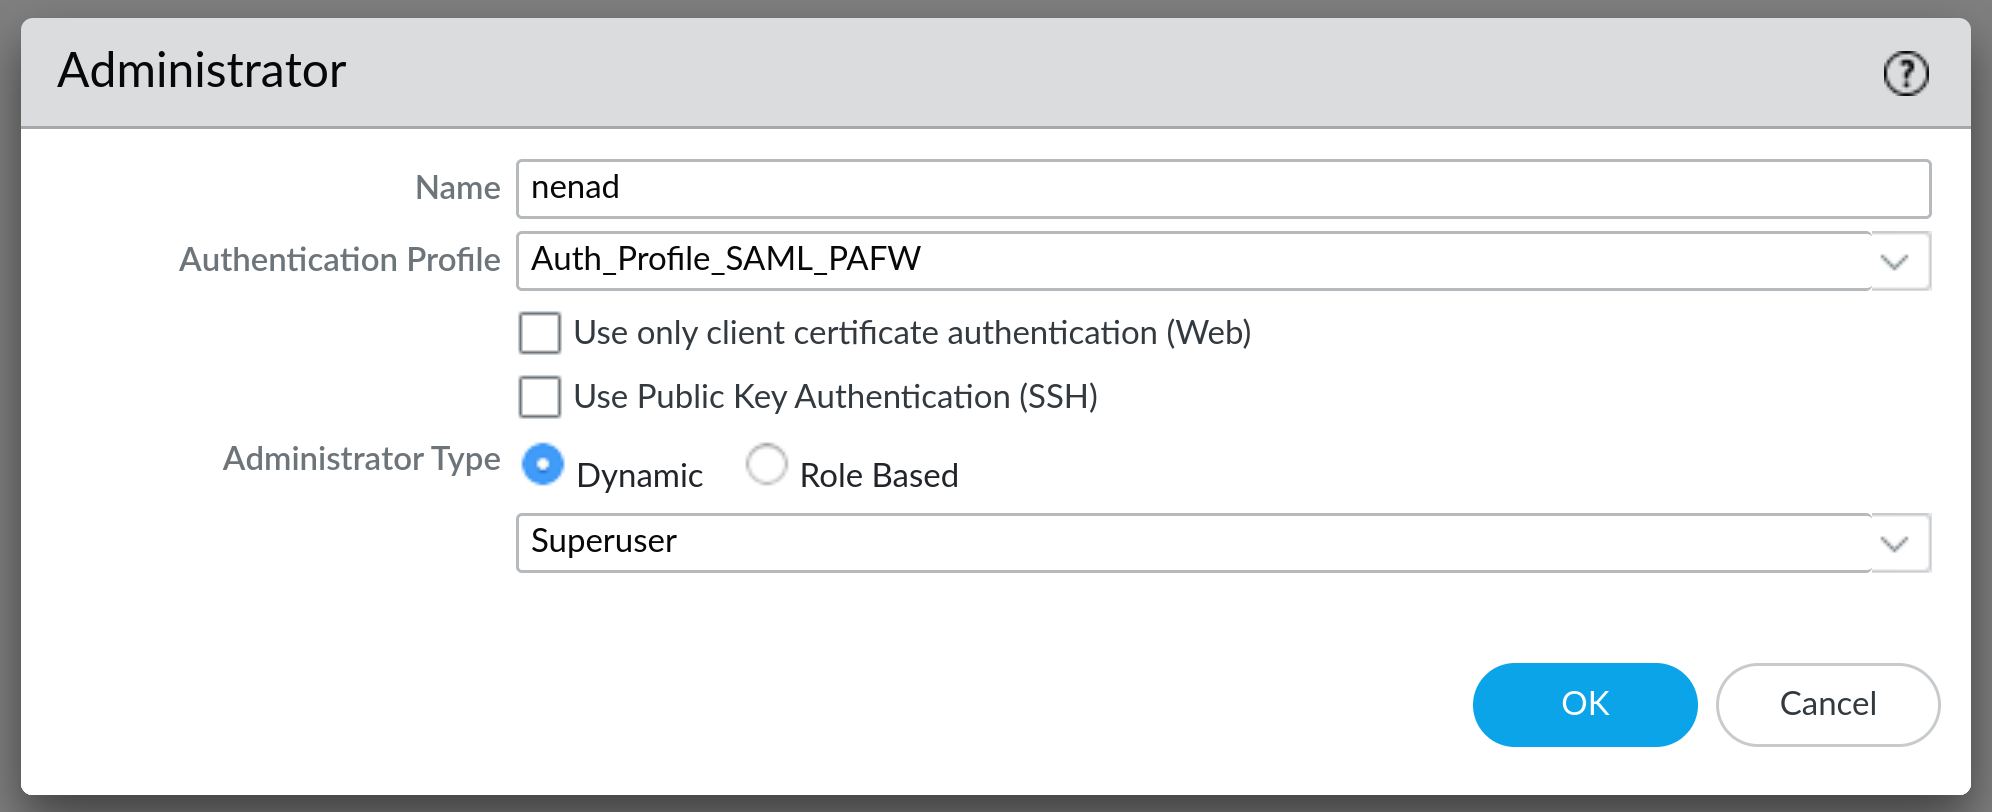
Two things to notice here: Authentication Profile should be set to whatever the name is for your SAML Authentication Profile and Administrator Type should be set to Dynamic with option Superuser selected. Press OK and commit the change. Now, when you login with your SAML account that is pre-configured to be superuser, you will no longer have limitations on what you can administer.
I may have missed something in the configuration that would resolve this, but this workaround works for me.
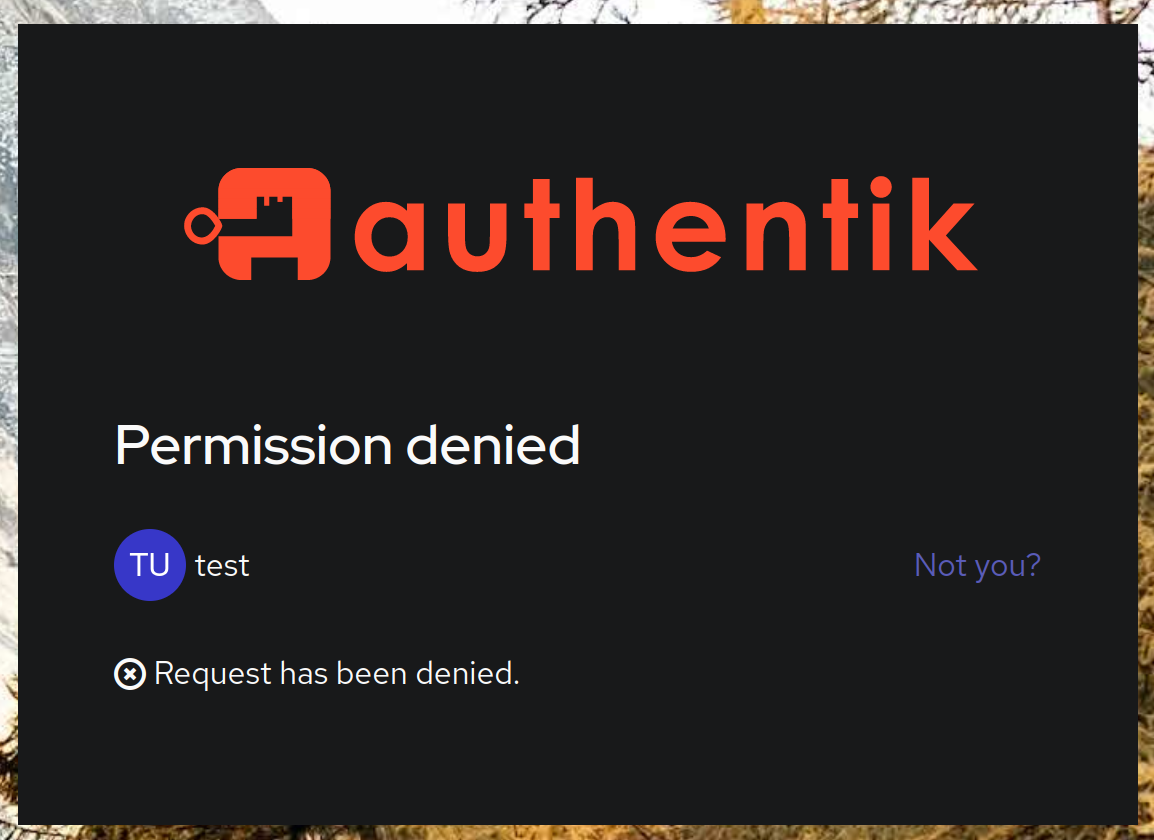
One more thing to notice is that, because we are using group/adminrole associations in authentik, we effectively control who has access to the firewall as well. If you create a test user and don't assign it to the devadmin group in authentik, if they try to log into the firewall, they will be presented with the following screen:

This is because, if my understanding is correct, PA appliance expects to receive an adminrole attribute from authentik, and because the user is not associated with the appropriate group, it does not send that attribute to the PA appliance. Additionally, I would suggest that, in cases of infrastructure Service Providers, you limit visibility/authorisation to those Applications in authentik itself. This can be done by going to Applications -> Applications and then selecting the appropriate application, then selecting second tab (Policy / Group / User Binding) and clicking on Bind existing policy. Here, we need to select Group and then under Group field select the appropriate group - in my case that would be devadmin. Other options can be left at default values:

Click on Create and now this application will only be available to devadmin group users.
Now if you try to log into the firewall that you are not authorised to in authentik, you will immediately receive the following error once you are authenticated:
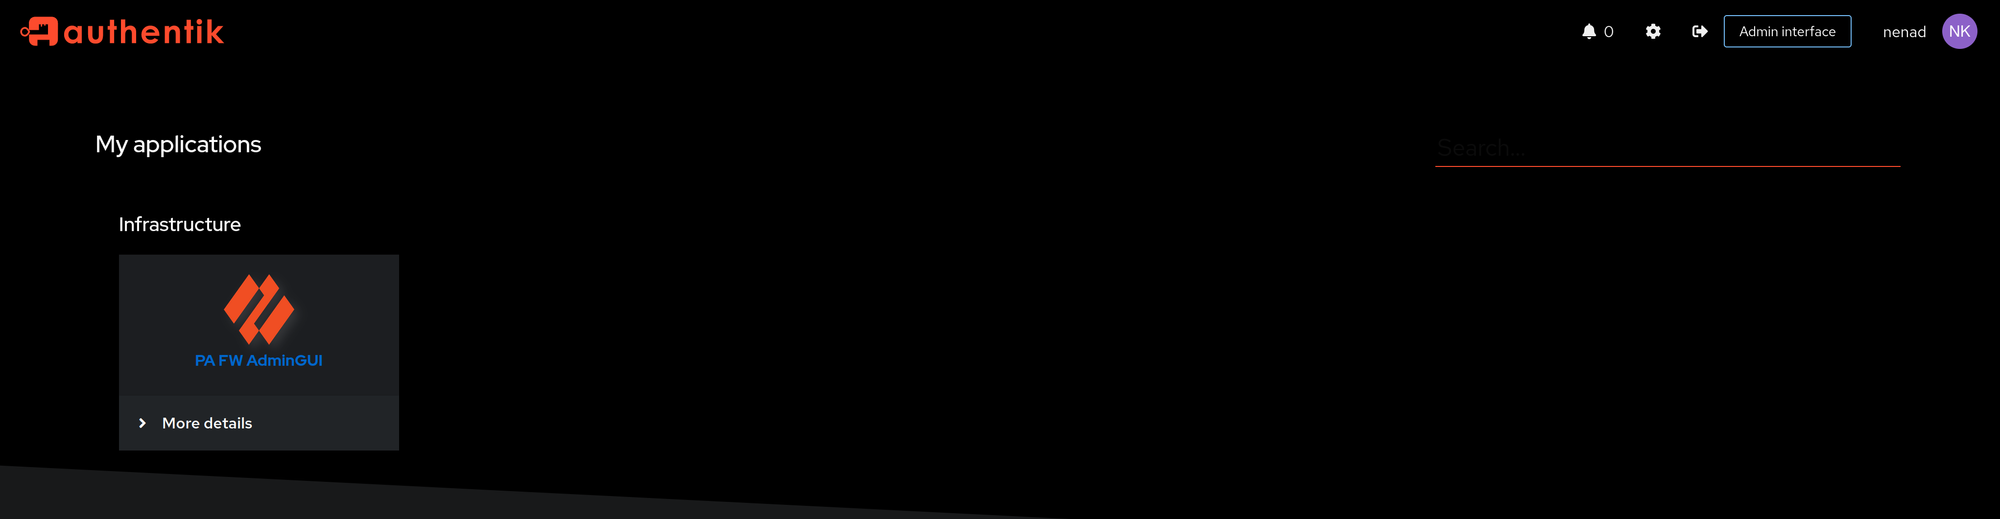
Even better, users that don't belong to the devadmin group won't even see this application under User interface:

devadmin groupAs you can see, this looks different from the view of a user that is associated with devadmin group:
devadmin groupNow, with this setup working, it's easy to follow other tutorials on how to implement MFA on your authentik accounts and make this even more secure! In the following posts we will use authentik to grant access to Palo Alto GlobalProtect Remote Access VPN.
Member discussion