Cloning VMs in ESXi - without a vCenter server
Intro
One of the issues you may encounter with ESXi is the fact that it doesn't offer an option to natively clone VMs. Of course, you can just copy necessary files and then just register the VM in ESXi, but that will still use file names that are in the original VM. I don't like this, so I am going to show you all the steps in 'cloning' the VM (basically just copying the necessary files from one location to another) and then making changes to the .vmx and .vmdk files to reflect new naming convention.
This whole process is extremely useful when you make a golden template of a VM that you want to use in the future. This way you can avoid installing the VMs whenever you need a new instance up and running. Make sure that you set everything up in your VM and once done, follow this process.
ESXi VM cloning
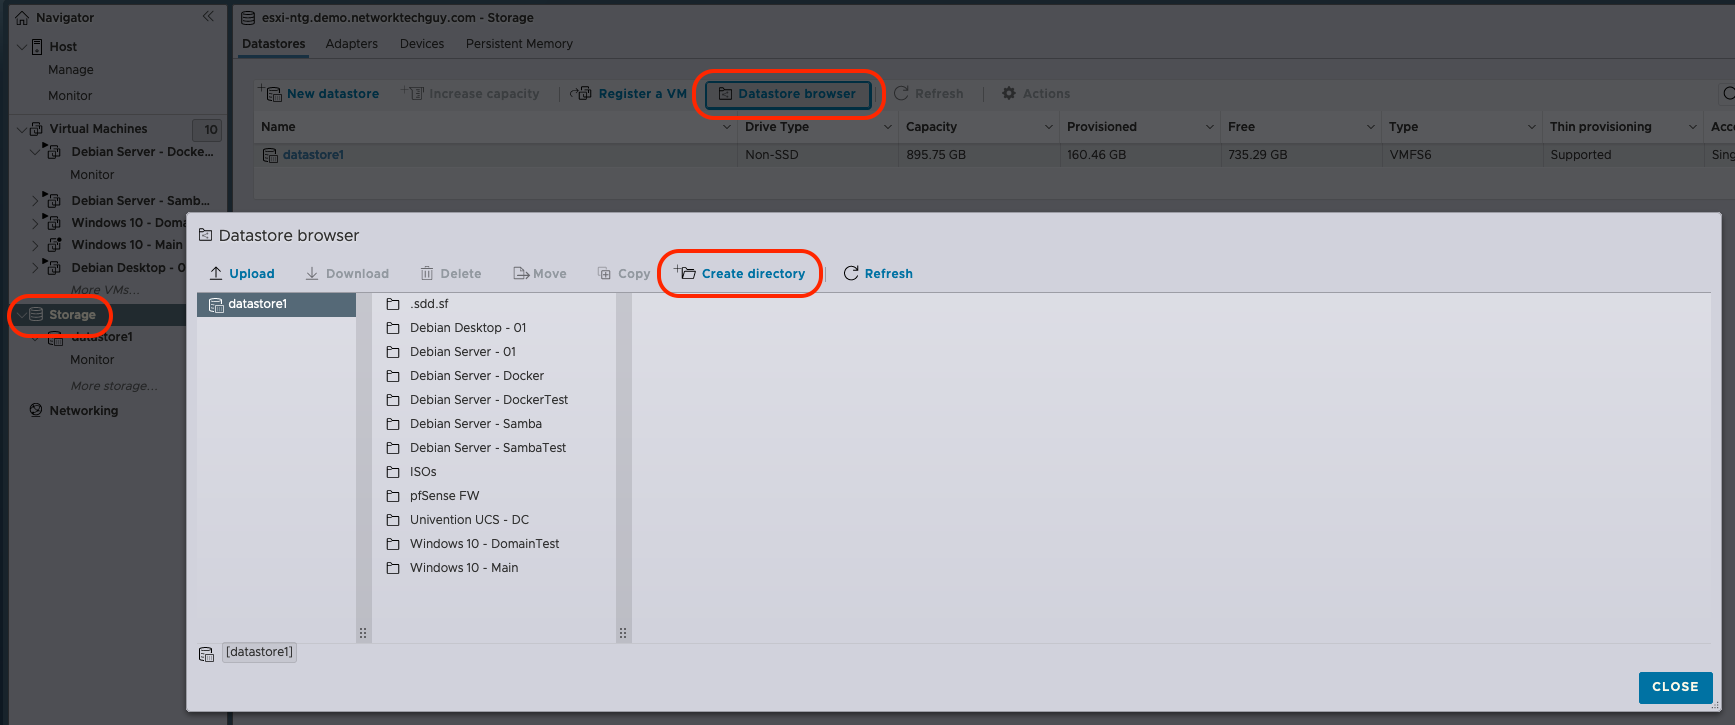
Let's start by selecting Storage on the left side of the screen, and then selecting Datastore browser. That will open another window where we will click on Create directory:
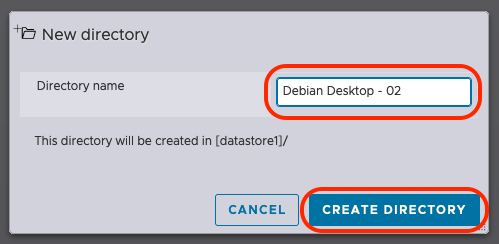
Enter the name of the new directory and press CREATE DIRECTORY:
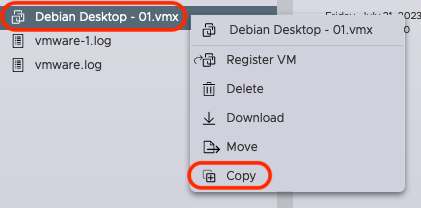
Once the directory is created, position yourself in the directory that holds your existing VM that you want to use a source. Select the .vmx file first, right click and click on Copy:
This will open another window where you need to select a destination folder for this file:
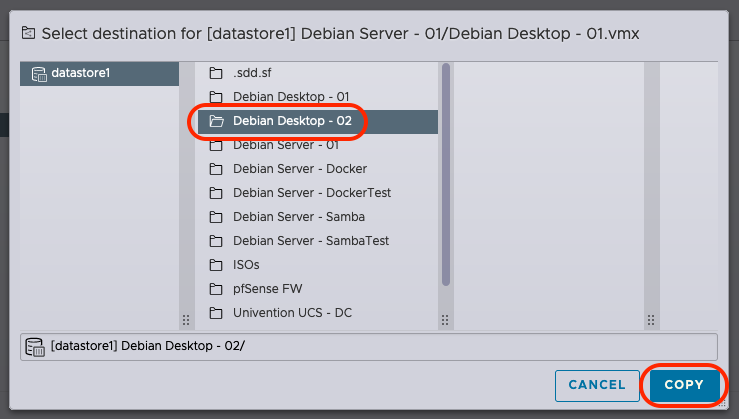
We will select previously created folder and then click on COPY. Copying .vmx file is very quick and you may not even notice status bar at the bottom of the screen changing.
Next, we will copy .vmdk file. This is basically your whole hard disk. This process may take some time, depending on your infrastructure (whether you're using SSDs or NVMe drives or regular HDDs).
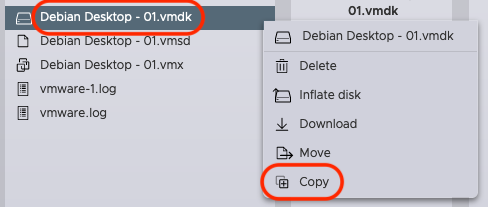
Same as before, select your source .vmdk file, right click and select COPY:
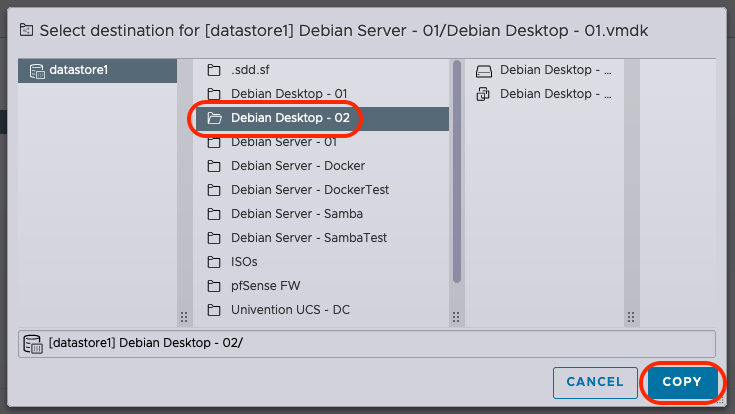
Next, select the directory where you want to copy the file to:
As I mentioned, this may take some time, so watch your status bar for progress:

If you don't want to deal with changing the name of the files and references in the files you copied, you can jump to the end of this post where I explain on how to register the newly copied VM. If you want to make sure that everything is named exactly as you want it, continue reading.
Changes in the CLI
Before you continue, make sure that SSH server is running on your ESXi instance:
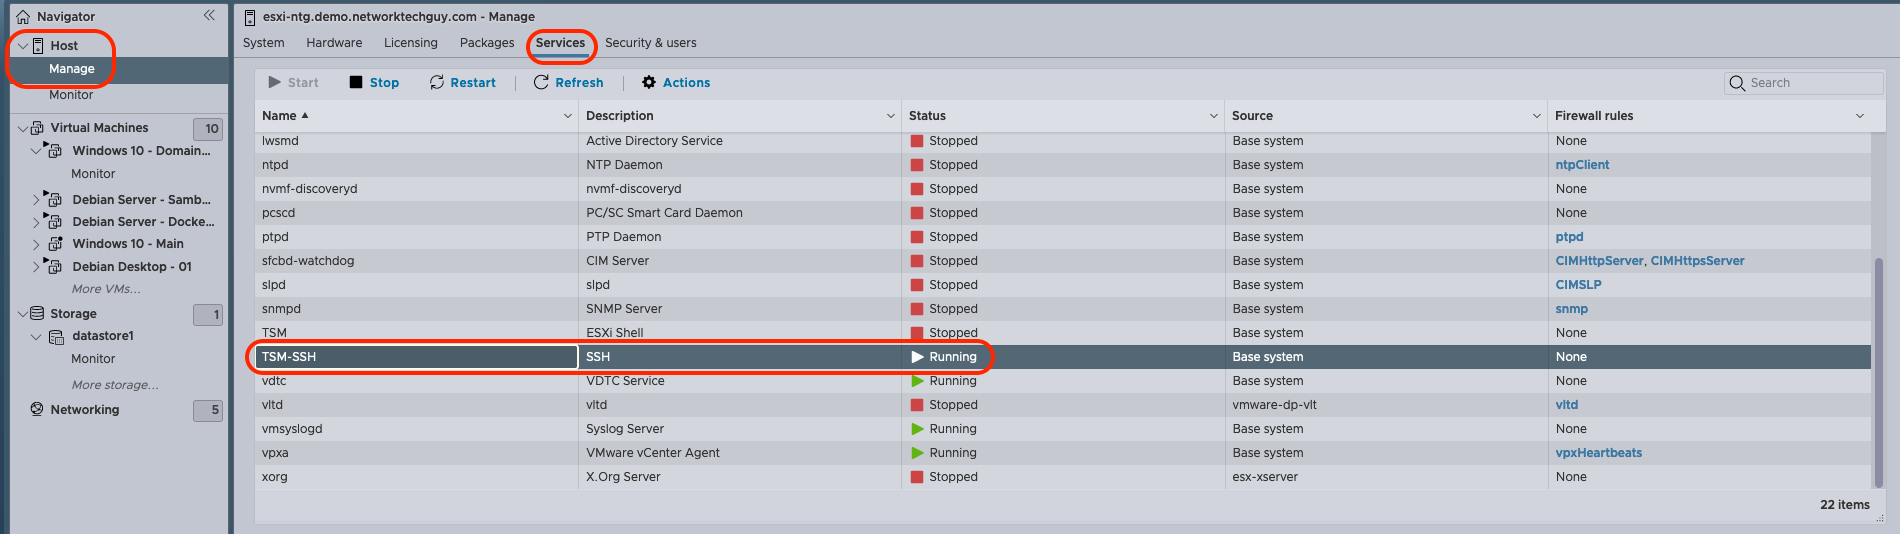
If it's not, just click on Host -> Manage -> Services and select TSM-SSH service and click on Start.
SSH service will now be enabled, until the restart of the ESXi server. It will complain about SSH running next time you log into the system, but you can ignore that message. VMWare insists that running SSH on a server is not a great idea, so I will leave it up to you if you want to leave it running or disabling it after you're done with the changes we are about to make.
So, with this all out of the way, let's connect to our ESXi via SSH. Use root credentials to log in and you will be greeted with prompt like this:
╰─>$ ssh [email protected]
([email protected]) Password:
The time and date of this login have been sent to the system logs.

WARNING:
   All commands run on the ESXi shell are logged and may be included in
   support bundles. Do not provide passwords directly on the command line.
   Most tools can prompt for secrets or accept them from standard input.

VMware offers powerful and supported automation tools. Please
see https://developer.vmware.com for details.

The ESXi Shell can be disabled by an administrative user. See the
vSphere Security documentation for more information.
[root@esxi-ntg:~]
Position yourself in the directory you previously created in GUI:
[root@esxi-ntg:~] cd /vmfs/volumes/datastore1/Debian\ Desktop\ -\ 02/
[root@esxi-ntg:/vmfs/volumes/64b6cb2a-91d9a1d5-800b-005056902e9a/Debian Desktop - 02]
Datastores are available under /vmfs/volumes, followed by the datastore name - in my case that is datastore1, which is the default name given by ESXi when you install the system. If you changed the name of the datastore, this will be different for you. After that, comes the name of the directory you created.
Let's list all the files in that directory:
[root@esxi-ntg:/vmfs/volumes/64b6cb2a-91d9a1d5-800b-005056902e9a/Debian Desktop - 02] ls -alh
total 9016448
drwxr-xr-x    1 root     root       72.0K Jul 23 20:12 .
drwxr-xr-t    1 root     root       76.0K Jul 23 19:59 ..
-rw-------    1 root     root      100.0G Jul 23 20:01 Debian Desktop - 01-flat.vmdk
-rw-------    1 root     root         564 Jul 23 20:12 Debian Desktop - 01.vmdk
-rw-------    1 root     root        3.4K Jul 23 20:00 Debian Desktop - 01.vmx
You will notice that there are actually 3 files there, not only 2 that we used to copy everything - a .vmx file, a .vmdk file and a new one called -flat.vmdk. Notice that the size of the -flat.vmdk file is actually the size of the HDD you assigned to your VM when you created it.
Let's customize this a little bit. Instead of having names of the previous VM, we will rename them so that it reflects the names of the new VM. I'm going to make this simple, so I will just choose Debian Desktop - 02, but you can choose whatever name you want.
We will simply rename files:
[root@esxi-ntg:/vmfs/volumes/64b6cb2a-91d9a1d5-800b-005056902e9a/Debian Desktop - 02] mv 'Debian Desktop - 01-flat.vmdk' 'Debian Desktop - 02-flat
.vmdk'
[root@esxi-ntg:/vmfs/volumes/64b6cb2a-91d9a1d5-800b-005056902e9a/Debian Desktop - 02] mv 'Debian Desktop - 01.vmdk' 'Debian Desktop - 02.vmdk'
[root@esxi-ntg:/vmfs/volumes/64b6cb2a-91d9a1d5-800b-005056902e9a/Debian Desktop - 02] mv 'Debian Desktop - 01.vmx' 'Debian Desktop - 02.vmx'
Note that I'm using single quotes ' between names, as there are spaces in the names of the files so this way I'm sure that right files are being renamed. Make sure that you use the quote before and after the name of the file!
Finally, we have our new file names:
[root@esxi-ntg:/vmfs/volumes/64b6cb2a-91d9a1d5-800b-005056902e9a/Debian Desktop - 02] ls -alh
total 9016448
drwxr-xr-x    1 root     root       72.0K Jul 23 20:41 .
drwxr-xr-t    1 root     root       76.0K Jul 23 19:59 ..
-rw-------    1 root     root      100.0G Jul 23 20:01 Debian Desktop - 02-flat.vmdk
-rw-------    1 root     root         564 Jul 23 20:12 Debian Desktop - 02.vmdk
-rw-------    1 root     root        3.4K Jul 23 20:00 Debian Desktop - 02.vmx
Now, with this out of the way, the easy part is done. We still need to change name references in .vmdk and .vmx files. DO NOT try to open -flat.vmdk file in your editor!
Unfortunately, ESXi only comes with vi editor - if you're not familiar with it, you can always go back to GUI and download these two files from ESXi server to your local computer and edit them in Notepad or whatever you're using on your local computer and edit it there. Since this is not a vi tutorial, we will do exactly that, but if you're comfortable in using it, you can just make changes there directly and save them. I believe that most homelabers are not, so I will show you how to download the files, make changes and the upload it back to the server.
So, open your datastore browser and download both .vmdk and .vmx files. Once again, make sure that you're not selecting the -flat.vmdk file while doing this!
Open the .vmdk file and there is only one reference to the name of the -flat.vmdk inside of double quotes ". Make your change there and save the file:
Now, open the second file (.vmx) and look for any references of the old name. Depending on your VM, it will have a few variables that need to be changed. In my case, these were the variables that needed to be changed to reflect the new names:
scsi0:0.fileName="Debian Desktop - 02.vmdk"displayName="Debian Server - 02"vmxstats.filename="Debian Desktop - 02.scoreboard"sched.swap.derivedName="/vmfs/volumes/64b6cb2a-91d9a1d5-800b-005056902e9a/Debian Desktop - 02/Debian Desktop - 02-b2f95b67.vswp"migrate.hostLog="./Debian Desktop - 02-e139194a.hlog"
Save the file and upload both files back to your ESXi server. After the upload, let's check if everything is as it should be:
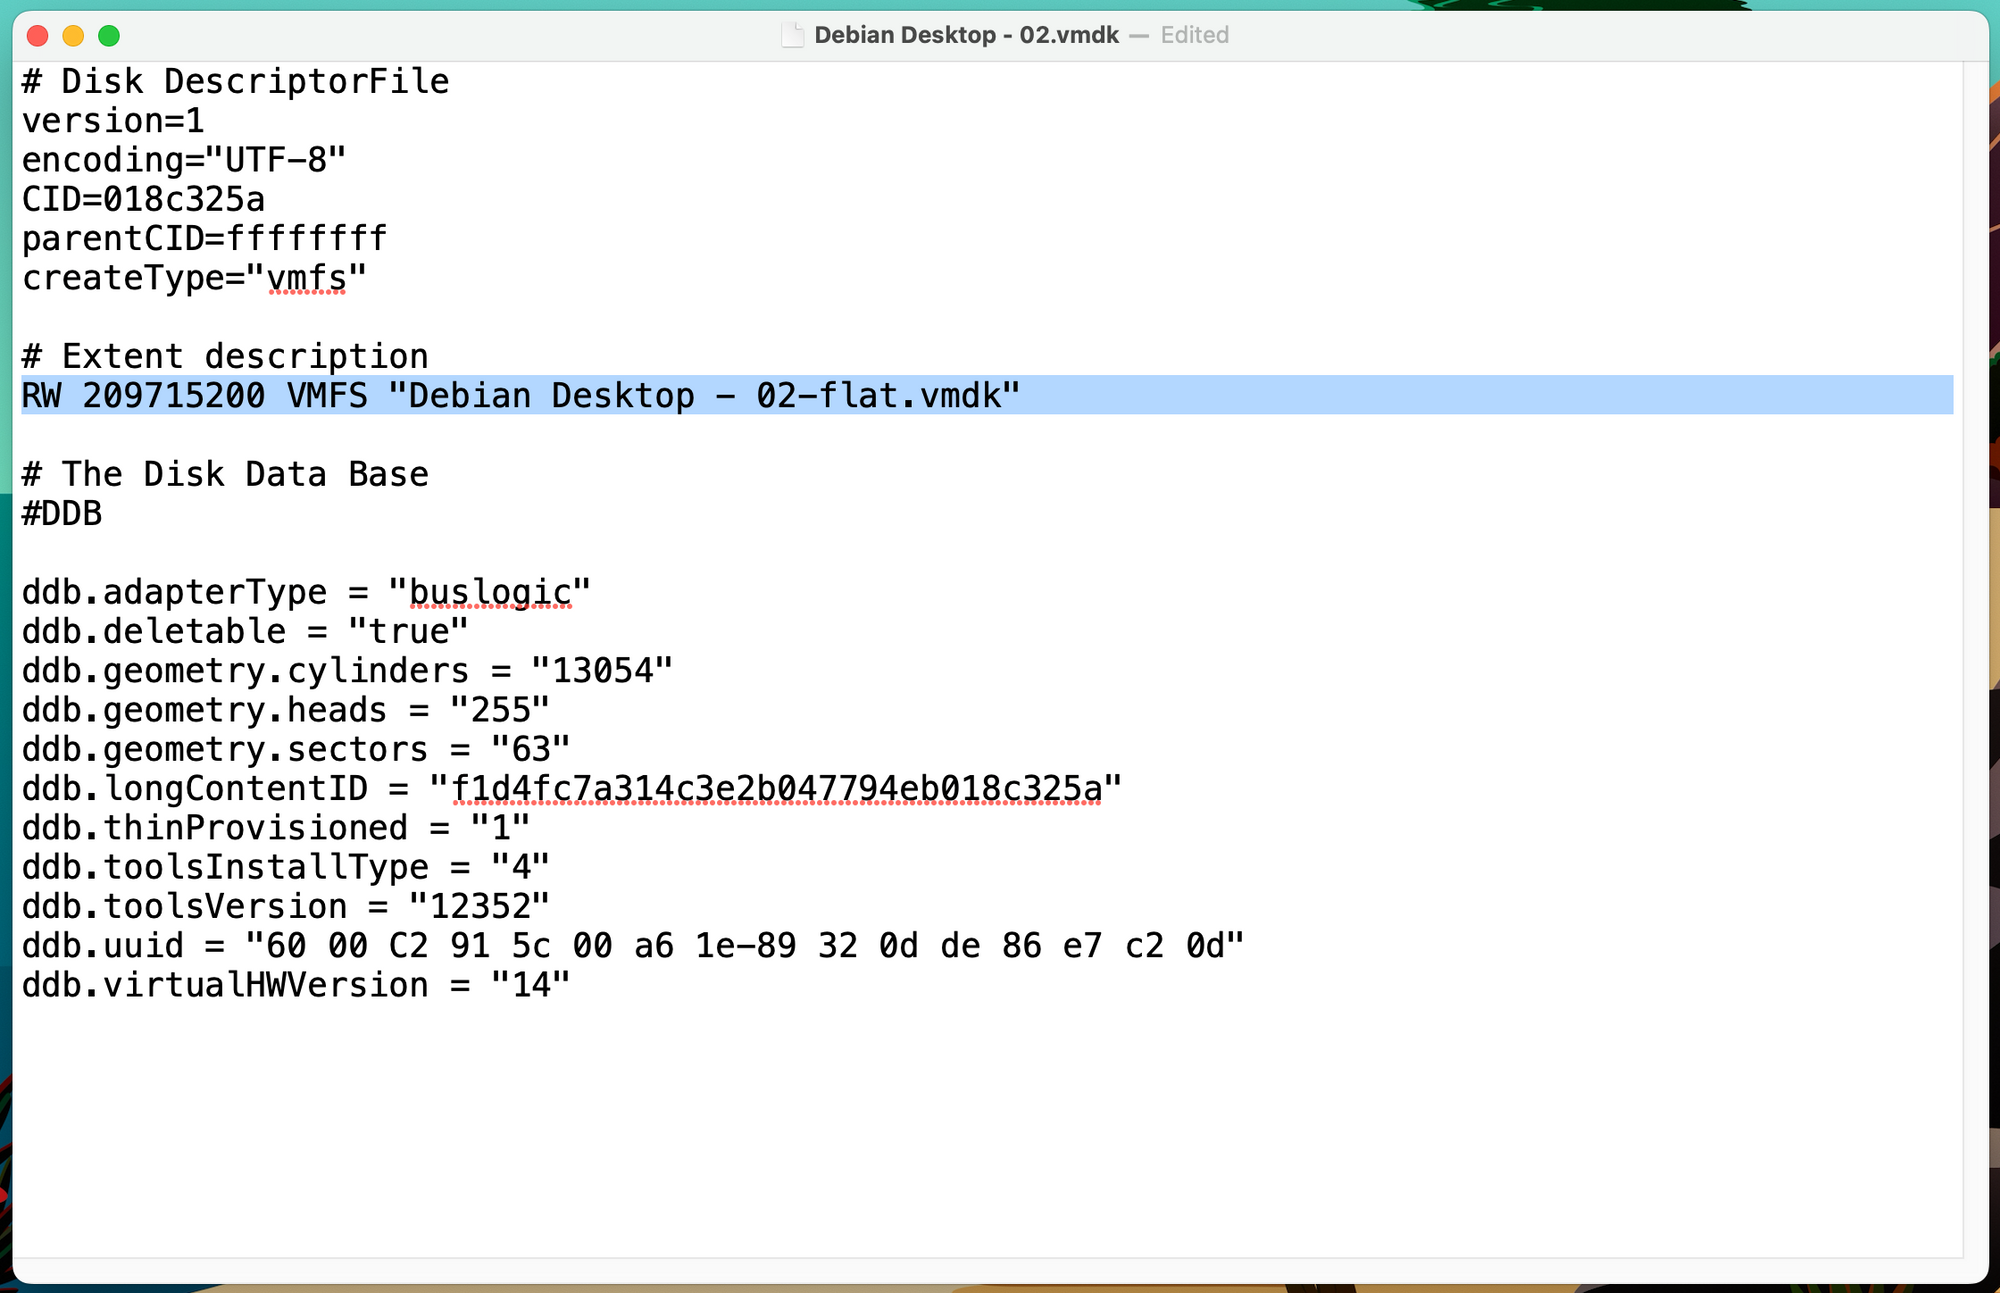
[root@esxi-ntg:/vmfs/volumes/64b6cb2a-91d9a1d5-800b-005056902e9a/Debian Desktop - 02] cat 'Debian Desktop - 02.vmdk'
# Disk DescriptorFile
version=1
encoding="UTF-8"
CID=018c325a
parentCID=ffffffff
createType="vmfs"

# Extent description
RW 209715200 VMFS "Debian Desktop - 02-flat.vmdk"

# The Disk Data Base
#DDB

ddb.adapterType = "buslogic"
ddb.deletable = "true"
ddb.geometry.cylinders = "13054"
ddb.geometry.heads = "255"
ddb.geometry.sectors = "63"
ddb.longContentID = "f1d4fc7a314c3e2b047794eb018c325a"
ddb.thinProvisioned = "1"
ddb.toolsInstallType = "4"
ddb.toolsVersion = "12352"
ddb.uuid = "60 00 C2 91 5c 00 a6 1e-89 32 0d de 86 e7 c2 0d"
ddb.virtualHWVersion = "14"
Notice that it shows the new name of the file, so this file was successfully uploaded. Let's check the .vmx file:
[root@esxi-ntg:/vmfs/volumes/64b6cb2a-91d9a1d5-800b-005056902e9a/Debian Desktop - 02] cat 'Debian Desktop - 02.vmx'
.encoding = "UTF-8"
config.version = "8"
virtualHW.version = "20"
vmci0.present = "TRUE"
floppy0.present = "FALSE"
svga.vramSize = "268435456"
numvcpus = "4"
memSize = "4096"
bios.bootRetry.delay = "10"
powerType.suspend = "soft"
tools.upgrade.policy = "manual"
sched.cpu.units = "mhz"
sched.cpu.affinity = "all"
vm.createDate = "1689709598501053"
scsi0.virtualDev = "pvscsi"
scsi0.present = "TRUE"
sata0.present = "TRUE"
usb.present = "TRUE"
ehci.present = "TRUE"
scsi0:0.deviceType = "scsi-hardDisk"
scsi0:0.fileName = "Debian Desktop - 02.vmdk"
sched.scsi0:0.shares = "normal"
sched.scsi0:0.throughputCap = "off"
scsi0:0.present = "TRUE"
ethernet0.virtualDev = "vmxnet3"
ethernet0.networkName = "VLAN200-Business"
ethernet0.addressType = "generated"
ethernet0.wakeOnPcktRcv = "FALSE"
ethernet0.uptCompatibility = "TRUE"
ethernet0.present = "TRUE"
displayName = "Debian Server - 02"
guestOS = "debian12-64"
toolScripts.afterPowerOn = "TRUE"
toolScripts.afterResume = "TRUE"
toolScripts.beforeSuspend = "TRUE"
toolScripts.beforePowerOff = "TRUE"
tools.syncTime = "FALSE"
uuid.bios = "56 4d d6 f4 b8 53 be 03-ec 2c 98 cb ae 7a b6 03"
uuid.location = "56 4d d6 f4 b8 53 be 03-ec 2c 98 cb ae 7a b6 03"
vc.uuid = "52 0b 71 c4 41 49 dd 21-af ac e6 8d 81 52 62 87"
sched.cpu.min = "0"
sched.cpu.shares = "normal"
sched.mem.min = "0"
sched.mem.minSize = "0"
sched.mem.shares = "normal"
ethernet0.generatedAddress = "00:0c:29:7a:b6:03"
vmci0.id = "-657187315"
cleanShutdown = "TRUE"
cpuid.coresPerSocket = "1"
tools.guest.desktop.autolock = "TRUE"
nvram = "Debian Desktop - 02.nvram"
svga.present = "TRUE"
pciBridge0.present = "TRUE"
pciBridge4.present = "TRUE"
pciBridge4.virtualDev = "pcieRootPort"
pciBridge4.functions = "8"
pciBridge5.present = "TRUE"
pciBridge5.virtualDev = "pcieRootPort"
pciBridge5.functions = "8"
pciBridge6.present = "TRUE"
pciBridge6.virtualDev = "pcieRootPort"
pciBridge6.functions = "8"
pciBridge7.present = "TRUE"
pciBridge7.virtualDev = "pcieRootPort"
pciBridge7.functions = "8"
hpet0.present = "TRUE"
RemoteDisplay.maxConnections = "-1"
sched.cpu.latencySensitivity = "normal"
vmxstats.filename = "Debian Desktop - 02.scoreboard"
numa.autosize.cookie = "40012"
numa.autosize.vcpu.maxPerVirtualNode = "4"
sched.swap.derivedName = "/vmfs/volumes/64b6cb2a-91d9a1d5-800b-005056902e9a/Debian Desktop - 02/Debian Desktop - 02-b2f95b67.vswp"
pciBridge0.pciSlotNumber = "17"
pciBridge4.pciSlotNumber = "21"
pciBridge5.pciSlotNumber = "22"
pciBridge6.pciSlotNumber = "23"
pciBridge7.pciSlotNumber = "24"
scsi0.pciSlotNumber = "160"
usb.pciSlotNumber = "32"
ethernet0.pciSlotNumber = "192"
ehci.pciSlotNumber = "33"
sata0.pciSlotNumber = "34"
scsi0.sasWWID = "50 05 05 64 b8 53 be 00"
vmotion.checkpointFBSize = "4194304"
vmotion.checkpointSVGAPrimarySize = "268435456"
vmotion.svga.mobMaxSize = "268435456"
vmotion.svga.graphicsMemoryKB = "262144"
ethernet0.generatedAddressOffset = "0"
monitor.phys_bits_used = "45"
softPowerOff = "TRUE"
usb:1.speed = "2"
usb:1.present = "TRUE"
usb:1.deviceType = "hub"
usb:1.port = "1"
usb:1.parent = "-1"
svga.guestBackedPrimaryAware = "TRUE"
guestInfo.detailed.data = "architecture='X86' bitness='64' distroAddlVersion='12 (bookworm)' distroName='Debian GNU/Linux' distroVersion='12' familyName='Linux' kernelVersion='6.1.0-10-amd64' prettyName='Debian GNU/Linux 12 (bookworm)'"
tools.remindInstall = "FALSE"
migrate.hostLog = "./Debian Desktop - 02-e139194a.hlog"
scsi0:0.redo = ""
usb:0.present = "TRUE"
usb:0.deviceType = "hid"
usb:0.port = "0"
usb:0.parent = "-1"
It seems that this file is also OK now, so let's go and import our new/old VM into ESXi.
Importing the cloned VM to ESXi
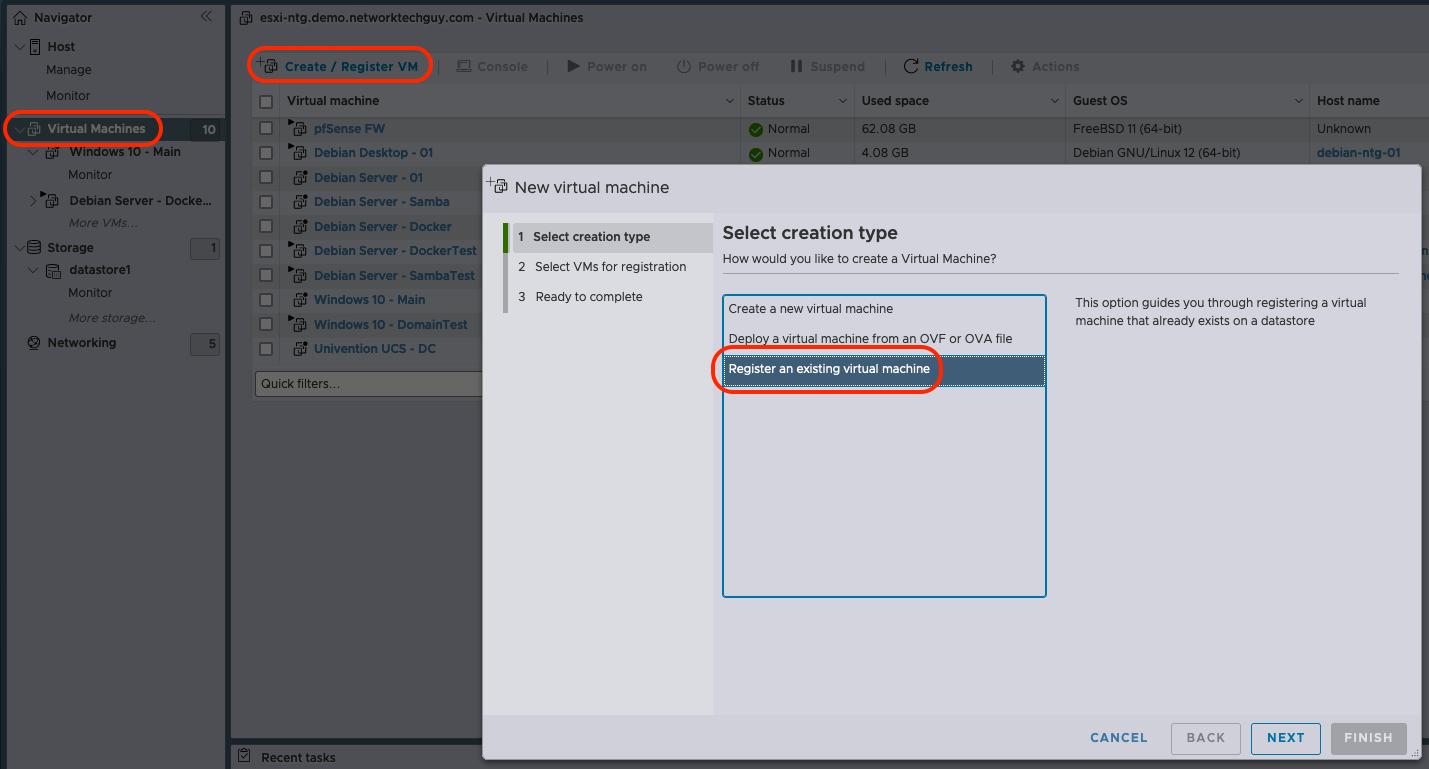
Click on Virtual Machines in the menu on the left side of the screen, then click on Create / Register VM and select Register an existing virtual machine:
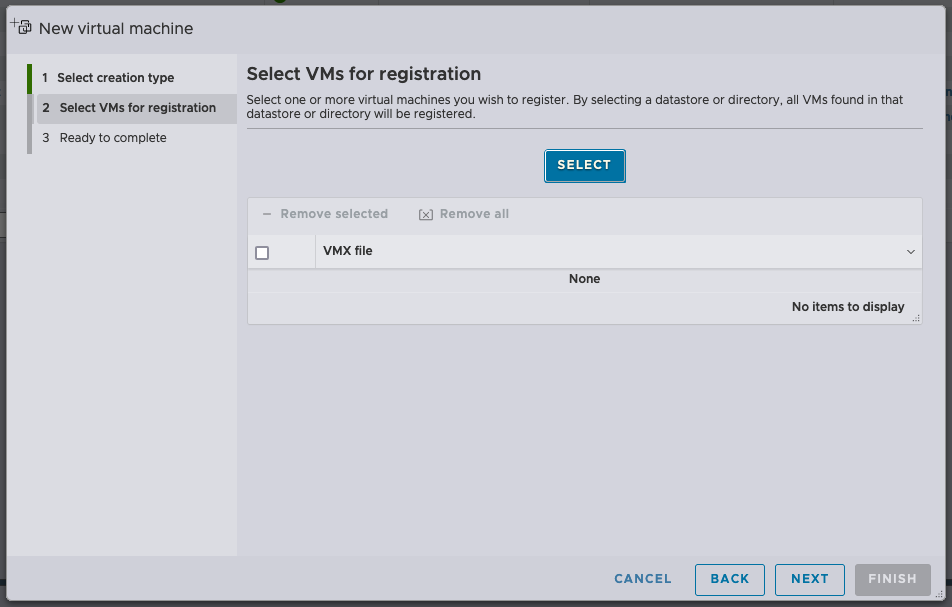
Click NEXT and in the next window click on SELECT:
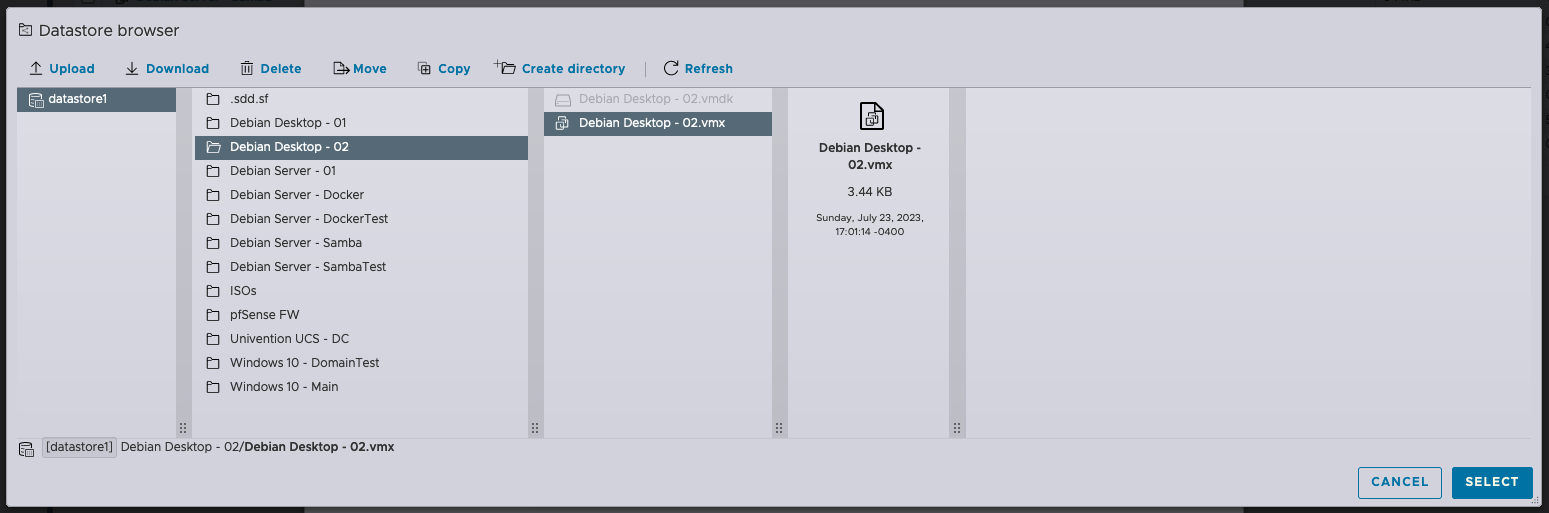
Datastore browser window will open, so position yourself in the directory of your new VM and select the .vmx file and click on SELECT after that:
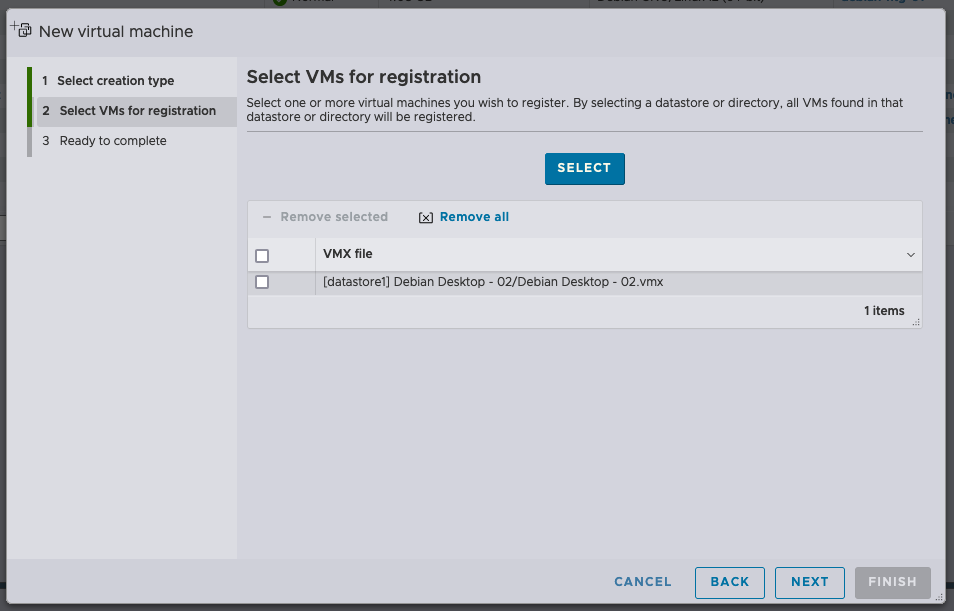
This will take you back to the previous window, with the newly selected VM in the list. Click on NEXT:
Finally, your new VM is ready to be imported:
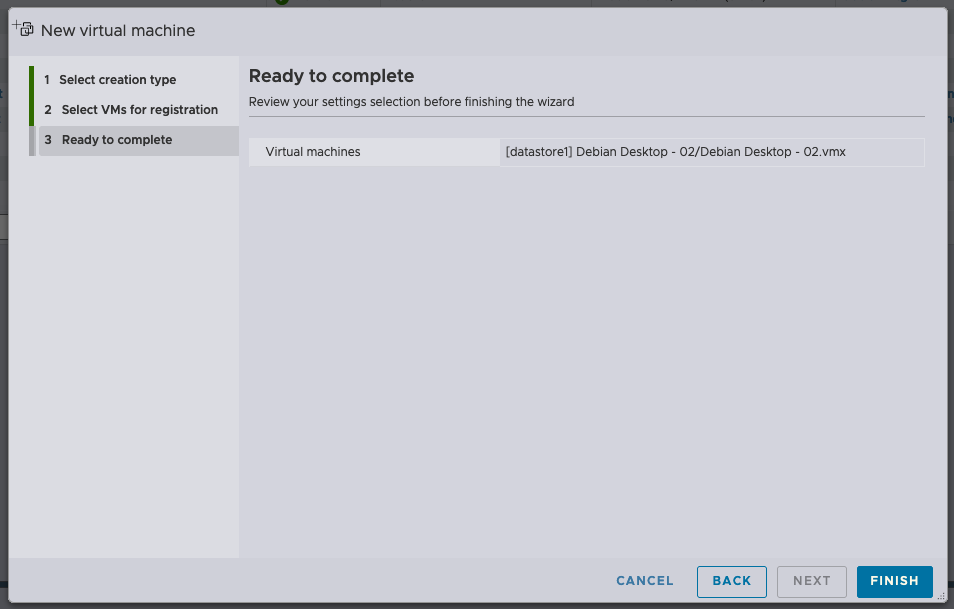
Click on FINISH to finalise the process.
Your new VM should show up on the list of VMs and you should be able to start it by clicking on the Power on button at the top.
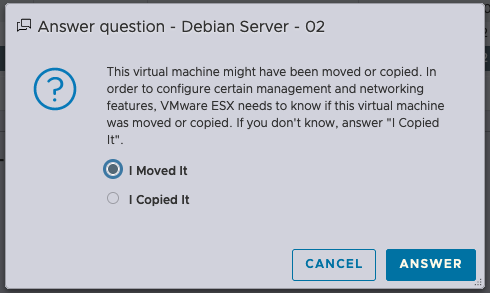
A message will appear immediately after you press on Power on button:
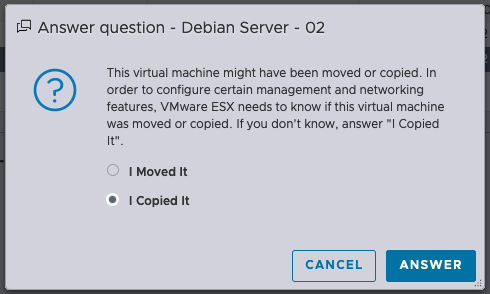
As you can see, it asks you what you actually did with the VM, and by default I Copied It is selected. Since we made changes in all the necessary files, we can actually select I Moved It, as there are no changes necessary to be made:
If you didn't follow this whole procedure and jumped to the bottom of this post immediately after copying the .vmx and .vmdk files at the beginning, make sure to choose I Copied It option, as this will allow ESXi to make necessary changes to the .vmx and .vmdk files - although, if you go back to CLI, you will notice that the naming convention is still using old names from the source VM, just the references in the files have changed.
One last thing - when your new VM has started, make sure to change the IP address (if assigned statically) and the name of the VM.
And this is the end of this article. Hopefully you find it useful, and if you have any questions or comments, leave them in the comments section.
Member discussion