Install and configure Nextcloud in an LXC - Part 1
In this article we will explain how to install Nextcloud in an LXC (Linux Containers).
Instead of deploying new VMs for every project, we can easily launch an LXC and gain almost all benefits of running a project in an isolated environment. Main reason why we decided not to run Nextcloud in Docker was the fact that some of the configuration steps would require significant changes to the deployment (docker-compose) to make Nextcloud run as smoothly as possible. Previous attempts of running NC in Docker almost always proved to be lacking in some way - most often frontend speed was a major issue. With what we know now, we could probably deploy Nextcloud in Docker environment with all the changes applied in docker-compose file, but that will be another project.
In this example we will follow this diagram:
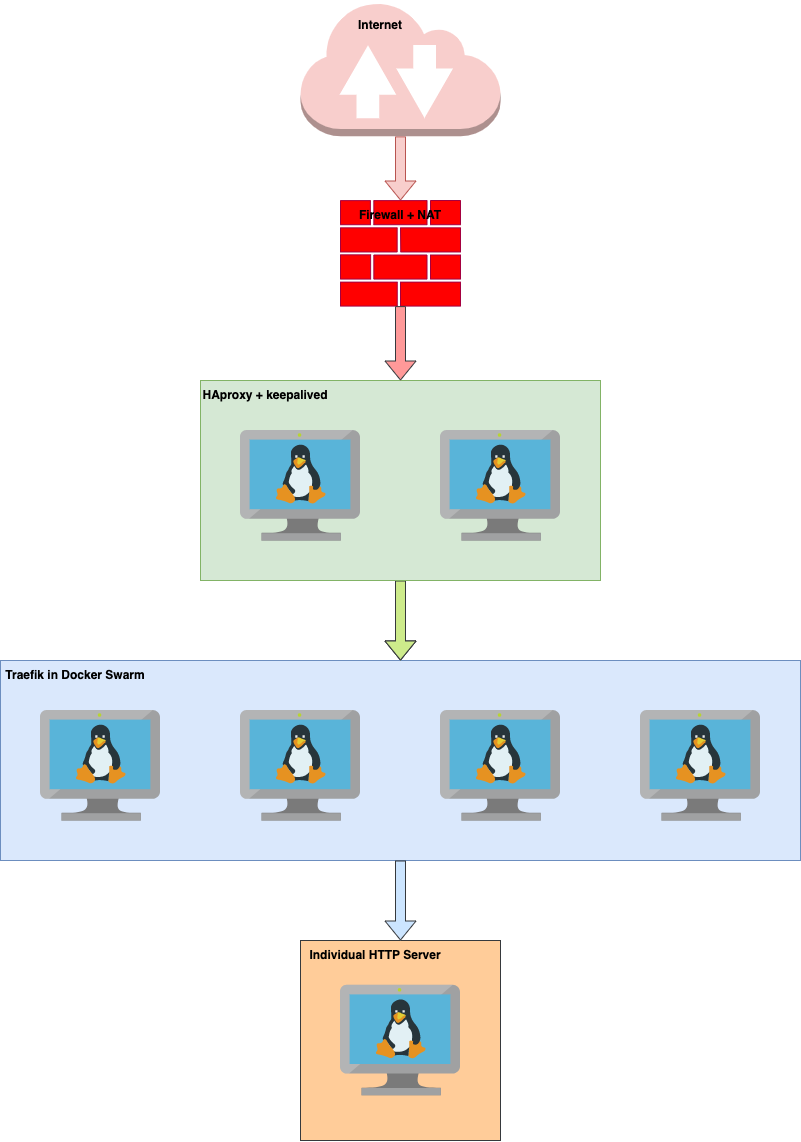
This may be a little bit of an overkill, but this is a production environment where we already have a number of services running in docker swarm. All containers in swarm are already using Traefik for reverse proxy, so the easiest way to implement this solution was to, logically, place Nextcloud 'behind' Traefik.
Flow for traffic coming from the Internet goes something like this:
- HTTP(s) packet is forwarded by DNS to WAN IP of the firewall
- NAT rule on the firewall forwards HTTP/S traffic to the VIP address of HAproxy that is served by
keepalived - HAproxy on the unit that is designated as Master in
keepalivedthen forwards to either of 4 servers that operate indocker swarm - since in docker swarm each container is simultaneously available on any of the members of docker swarm, Traefik on any server will take over the HTTP/S packet and forward it to the appropriate container, or in our case, an external host
This is a fully scalable solution because Traefik can easily handle traffic to external hosts, as long as they are reachable.
One other reason why we prefer to use Traefik is because it is very well integrated into container-sphere and once properly set-up, it becomes very easy to add new services - whether those directly in docker swarm, or external such as this installation of Nextcloud.
Pre-requisites for this project are simple - a working LXC host that will serve our LXC container. LXC host should have at least 8GB RAM (NC can be quite power hungry), if not more, but all that depends on the number of users you will have in your NC. As you can see below, all commands are run with a user that has privileges in the lxd group.
System prep
Let's start with launching our LXC container:
lxc launch images:debian/bullseye nc-01We opted to run our NC in Debian, but this can easily be replaced with a Ubuntu instance:
lxc launch ubuntu:20.04 nc-01In our environment we have multiple bridge interfaces available to LXC containers, so we will apply the proper one to the container:
lxc profile assign nc-01 default,br-500We will also make this container privileged as we will be mounting a network share to it so that it can be passed to NC:
lxc config set nc-01 security.privileged true
lxc config set nc-01 security.nesting true
As seen above, we also need to set parameter security.nesting to true, as it is also required so that we can mount an SMB share to the LXC container.
Finally, we can enter the container:
lxc shell nc-01First things first though. Let's update our system first and then install a couple of packages we will need in this project:
apt update && apt -y upgrade && apt -y install sudo netplan.io curl wget unzip rsyslog nano openssh-serverDepending on the Debian version you launched, it may or may not come with some of this packages. sudo, curl, wget, unzip and rsyslog are pretty much self-explanatory while netplan.io is installed so that we can easily set IP addressing for our container in a smooth YAML format.
Once everything is installed, let's set the IP addressing by editing /etc/netplan/50-cloud-init.yaml. Our configuration looks something like this:
network:
  version: 2
  ethernets:
    eth0:
      addresses:
      - 10.5.0.151/24
      gateway4: 10.5.0.1
#      routes:
#        - to: default
#          via: 10.5.0.1
      nameservers:
        addresses:
        - 10.4.0.5
        - 10.4.0.105
        search:
        - domain1.com
        - domain2.com
Depending on the version of netplan.io you run, you may have to use routes statement instead of gateway4 as it is shown in this example. routes statements are commented out here.
When you are done with the editing the configuration file, apply the configuration with:
netplan applyLet's also create a user for this system so that we can SSH into it when we want to make changes - mind you, this is completely optional, as we can always SSH into our LXC host and enter the shell from there:
adduser nex
usermod -aG sudo nex
With all this taken care of, we can continue with the next step.
Install Nextcloud pre-requisite packages
We will be installing NC with the following setup:
nginxas our web server*PostgreSQLdatabasePHP 8.1**
nginx: In our case scenario we already have a working Traefik reverse proxy on another host, so we will only use nginx as a web server and manage everything else in Traefikbullseye) installs PHP 7.4 by default, which is not supported by Nextcloud, while Debian 12 (bookworm) installs PHP 8.2 by default, which is also not supported by NextcoudSo let's install nginx and PostgreSQL first:
apt install nginx postgresql postgresql-contribCheck the version of installed PostgreSQL:
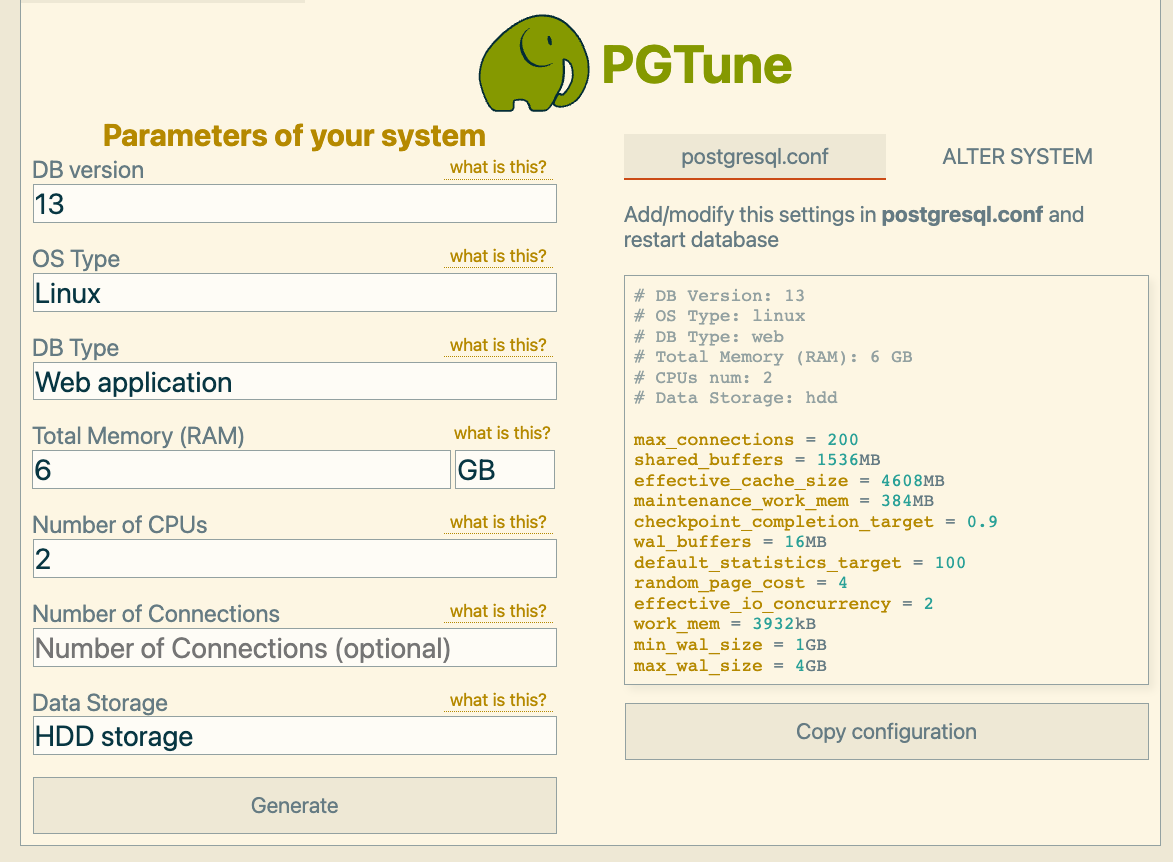
psql --versionUse PGTune and enter your LXC host info or whatever you want to as long as values are not above your LXC host values. PGTune will provide you with a code snippet once you click Generate that you can then either insert or make changes in /etc/postgresql/13/main/postgresql.conf file. Remember, if you're running other LXC containers on your host, you don't want the NC container to eat up all the available resources, or better yet, for PostgreSQL to eat up all available resources.
Restart the server with the following command:
systemctl restart postgresqlFinally, we will install PHP 8.1 in our LXC container. To do so, we have to add new source to our apt sources.list file:
apt install apt-transport-https lsb-release ca-certificates
curl -sSLo /usr/share/keyrings/deb.sury.org-php.gpg https://packages.sury.org/php/apt.gpg
sh -c 'echo "deb [signed-by=/usr/share/keyrings/deb.sury.org-php.gpg] https://packages.sury.org/php/ $(lsb_release -sc) main" > /etc/apt/sources.list.d/php.list'
apt update
Finally, install PHP 8.1 (and some other necessary packages required by NC):
apt install php8.1 php8.1-common php8.1-fpm php8.1-pgsql php8.1-curl php8.1-dom php8.1-gd php8.1-mbstring php8.1-simplexml php8.1-xmlreader php8.1-xmlwriter php8.1-zip php8.1-bz2 php8.1-intl php8.1-ldap php8.1-smbclient php8.1-imap php8.1-bcmath php8.1-gmp php8.1-imagickPHP requires some fine-tuning, so before we continue, let's review what needs to be done:
- edit
/etc/php/8.1/fpm/php.ini - edit
/etc/php/8.1/fpm/pool.d/www.conf
In /etc/php/8.1/fpm/php.ini we want to set upload_max_filesize to desired value and same with post_max_size (usually post_max_size is a little bit bigger than upload_max_filesize, as you could think of the latter as a subset of the former, but if you set this value to a high enough number, you should be OK; alternatively, you could set post_max_size to 0 to basically set it to unlimited, but this is not something you would want to do in production environments). Another setting that you may want to set is opcache.mmap_base. We're not 100% certain about that, but it seems that it requires value to be entered in hexadecimal system, so in our case the appropriate value for 512 MB was 0x20000000.
If you don't want to check in your hypervisor settings, you can check how many CPU cores are available to your LXC container with:
echo Cores = $(( $(lscpu | awk '/^Socket/{ print $2 }') * $(lscpu | awk '/^Core/{ print $4 }') ))To see how much memory PHP process is consuming, enter:
ps --no-headers -o "rss,cmd" -C php-fpm8.1 | awk '{ sum+=$1 } END { printf ("%d%s\n", sum/NR/1024,"M") }'Don't forget that, even though your LXC host may have 16 GB RAM, if you're running other LXC containers, they will all independently consume that memory. On top of that, in NC container, you also have other processes that will eat up memory: nginx, PostgreSQL, redis, etc; make sure that you don't dedicate too much RAM to PHP processes, especially if you will have many users in NC, as it may degrade performance of all other services.
Depending on the "hardware" specs of your LXC host (quoted because we are running our LXC host on a VM), you will want to set following values in /etc/php/8.1/fpm/pool.d/www.conf:
pm.max_children
available_RAM (in megabytes) divided by memory consumption of each PHP process; in case you want to dedicate 4 GB RAM to your PHP processes and each process is eating up around 100 megabytes, a rounded up number would equal to value of 40pm.start_servers
pm.min_spare_servers
pm.max_spare_servers
pm.start_servers)These changes will make a significant impact on how your NC instance performs and will make a huge difference in user satisfaction.
Additionally, uncomment following lines at the end of the file:
env[PATH] = /usr/local/bin:/usr/bin:/bin
env[TMP] = /tmp
Don't forget to restart the php8.1-fpm service:
systemctl restart php8.1-fpmIn our case, without fine-tuning these parameters, we ended up with a system that was operational, yet frontend was extremely slow when opening new pages and everything was very laggy. Once fine-tuned, the system is extremely snappy, considering that it's running in an LXC container.
If everything went well, check that all the pre-requisite services are running as expected:
systemctl status nginx
systemctl status postgresql
systemctl status php8.1-fpm
All of them should return something like this:
systemctl status nginx
● nginx.service - A high performance web server and a reverse proxy server
     Loaded: loaded (/lib/systemd/system/nginx.service; enabled; vendor preset: enabled)
     Active: active (running) since Thu 2023-02-23 19:41:01 EST; 23h ago
Note the last line which says Active: active.
To the next step.
Install Nextcloud
Let's change the working directory to /tmp and get the last stable version of the NC package:
cd /tmp/
wget https://download.nextcloud.com/server/releases/nextcloud-25.0.4.zip
Current stable version of NC is 25.0.4 at the time of writing this article.
Unzip the file in a new folder:
unzip nextcloud-25.0.4.zip -d /var/www
chown www-data:www-data /var/www/nextcloud -R
PostgreSQL configuration
Let's create the database for NC:
sudo -i -u postgres psqlOnce inside, create the necessary user, database, assign the database to the user and grant them all privileges on the database:
CREATE USER ncuser WITH PASSWORD 'password';
CREATE DATABASE ncdb TEMPLATE template0 ENCODING 'UNICODE';
ALTER DATABASE ncdb OWNER TO ncuser;
GRANT ALL PRIVILEGES ON DATABASE ncdb TO ncuser;
Note that PostgreSQL doesn't like dashes in user and database names, so 'ncuser' is acceptable to it, while 'nc-user' is not. Write this information down as it will be needed later on.
Exit PostgreSQL with
\qnginx configuration
Let's create a new server configuration block:
nano /etc/nginx/sites-available/nextcloudMost of the configuration below is from Nextcloud directly, the only change we are making here is the fact that we will serve all content via HTTP in nginx, not HTTPS, as we will use external Traefik reverse proxy to serve HTTPS.
Configuration should look similar to this:
upstream php-handler {
#    server 127.0.0.1:9000;
     server unix:/var/run/php/php8.1-fpm.sock;
}

# Set the `immutable` cache control options only for assets with a cache busting `v` argument
map $arg_v $asset_immutable {
    "" "";
    default "immutable";
}

server {
    listen 80;
    listen [::]:80;
    server_name nc-int.domain.com; #internal name of the host
    server_name nc.domain.com; #reverse proxy name of the host
    # Path to the root of your installation
    root /var/www/nextcloud;

    # Prevent nginx HTTP Server Detection
    server_tokens off;

    # Enforce HTTPS # this option is disabled
    # return 301 https://$server_name$request_uri;

    # set max upload size and increase upload timeout:
    client_max_body_size 512M;
    client_body_timeout 300s;
    fastcgi_buffers 64 4K;

    # Enable gzip but do not remove ETag headers
    gzip on;
    gzip_vary on;
    gzip_comp_level 4;
    gzip_min_length 256;
    gzip_proxied expired no-cache no-store private no_last_modified no_etag auth;
    gzip_types application/atom+xml application/javascript application/json application/ld+json application/manifest+json application/rss+xml application/vnd.geo+json application/vnd.ms-fontobject application/wasm application/x-font-ttf application/x-web-app-manifest+json application/xhtml+xml application/xml font/opentype image/bmp image/svg+xml image/x-icon text/cache-manifest text/css text/plain text/vcard text/vnd.rim.location.xloc text/vtt text/x-component text/x-cross-domain-policy;

    # Pagespeed is not supported by Nextcloud, so if your server is built
    # with the `ngx_pagespeed` module, uncomment this line to disable it.
    #pagespeed off;

    # The settings allows you to optimize the HTTP2 bandwitdth.
    # See https://blog.cloudflare.com/delivering-http-2-upload-speed-improvements/
    # for tunning hints
    client_body_buffer_size 512k;

    # HTTP response headers borrowed from Nextcloud `.htaccess`
    add_header Referrer-Policy                   "no-referrer"       always;
    add_header X-Content-Type-Options            "nosniff"           always;
    add_header X-Download-Options                "noopen"            always;
    add_header X-Frame-Options                   "SAMEORIGIN"        always;
    add_header X-Permitted-Cross-Domain-Policies "none"              always;
    add_header X-Robots-Tag                      "noindex, nofollow" always;
    add_header X-XSS-Protection                  "1; mode=block"     always;

    # Remove X-Powered-By, which is an information leak
    fastcgi_hide_header X-Powered-By;
    # Specify how to handle directories -- specifying `/index.php$request_uri`
    # here as the fallback means that Nginx always exhibits the desired behaviour
    # when a client requests a path that corresponds to a directory that exists
    # on the server. In particular, if that directory contains an index.php file,
    # that file is correctly served; if it doesn't, then the request is passed to
    # the front-end controller. This consistent behaviour means that we don't need
    # to specify custom rules for certain paths (e.g. images and other assets,
    # `/updater`, `/ocm-provider`, `/ocs-provider`), and thus
    # `try_files $uri $uri/ /index.php$request_uri`
    # always provides the desired behaviour.
    index index.php index.html /index.php$request_uri;

    # Rule borrowed from `.htaccess` to handle Microsoft DAV clients
    location = / {
        if ( $http_user_agent ~ ^DavClnt ) {
            return 302 /remote.php/webdav/$is_args$args;
        }
    }

    location = /robots.txt {
        allow all;
        log_not_found off;
        access_log off;
    }

    # Make a regex exception for `/.well-known` so that clients can still
    # access it despite the existence of the regex rule
    # `location ~ /(\.|autotest|...)` which would otherwise handle requests
    # for `/.well-known`.
    location ^~ /.well-known {
        # The rules in this block are an adaptation of the rules
        # in `.htaccess` that concern `/.well-known`.

        location = /.well-known/carddav { return 301 /remote.php/dav/; }
        location = /.well-known/caldav  { return 301 /remote.php/dav/; }

        location /.well-known/acme-challenge    { try_files $uri $uri/ =404; }
        location /.well-known/pki-validation    { try_files $uri $uri/ =404; }

        # Let Nextcloud's API for `/.well-known` URIs handle all other
        # requests by passing them to the front-end controller.
        return 301 /index.php$request_uri;
    }

    # Rules borrowed from `.htaccess` to hide certain paths from clients
    location ~ ^/(?:build|tests|config|lib|3rdparty|templates|data)(?:$|/)  { return 404; }
    location ~ ^/(?:\.|autotest|occ|issue|indie|db_|console)                { return 404; }

    # Ensure this block, which passes PHP files to the PHP process, is above the blocks
    # which handle static assets (as seen below). If this block is not declared first,
    # then Nginx will encounter an infinite rewriting loop when it prepends `/index.php`
    # to the URI, resulting in a HTTP 500 error response.
    location ~ \.php(?:$|/) {
        # Required for legacy support
        rewrite ^/(?!index|remote|public|cron|core\/ajax\/update|status|ocs\/v[12]|updater\/.+|oc[ms]-provider\/.+|.+\/richdocumentscode\/proxy) /index.php$request_uri;

        fastcgi_split_path_info ^(.+?\.php)(/.*)$;
        set $path_info $fastcgi_path_info;

        try_files $fastcgi_script_name =404;

        include fastcgi_params;
        fastcgi_param SCRIPT_FILENAME $document_root$fastcgi_script_name;
        fastcgi_param PATH_INFO $path_info;
        # fastcgi_param HTTPS on; # disabled because Traefik takes care of HTTPS

        fastcgi_param modHeadersAvailable true;         # Avoid sending the security headers twice
        fastcgi_param front_controller_active true;     # Enable pretty urls
        fastcgi_pass php-handler;

        fastcgi_intercept_errors on;
        fastcgi_request_buffering off;

        fastcgi_max_temp_file_size 0;
    }

    location ~ \.(?:css|js|svg|gif|png|jpg|ico|wasm|tflite|map)$ {
        try_files $uri /index.php$request_uri;
        add_header Cache-Control "public, max-age=15778463, $asset_immutable";
        access_log off;     # Optional: Don't log access to assets

        location ~ \.wasm$ {
            default_type application/wasm;
        }
    }

    location ~ \.woff2?$ {
        try_files $uri /index.php$request_uri;
        expires 7d;         # Cache-Control policy borrowed from `.htaccess`
        access_log off;     # Optional: Don't log access to assets
    }

    # Rule borrowed from `.htaccess`
    location /remote {
        return 301 /remote.php$request_uri;
    }

    location / {
        try_files $uri $uri/ /index.php$request_uri;
    }
}
Finally, create a symbolic link from this file to sites-enabled:
ln -s /etc/nginx/sites-available/nextcloud /etc/nginx/sites-enabled/Test nginx configuration and if everything is OK, reload it:
nginx -t
systemctl reload nginx
If everything went well, you should now be able to access a non-secure version of your new NC instance at http://nc-int.domain.com.
Open address of your NC instance in a browser, choose your admin username and password, enter information about your database and start the installation. After installation is complete - congratulations, you have a working NC instance!
In the next article we will do some Nextcloud post-install fine tuning.
Member discussion